First teased in Computex 2019 as an early prototype, Noctua finally began shipping of their much anticipated NH-P1 fully-passive, fanless CPU cooler after almost 2 years. We are excited to test the cooler to see if it matches Noctua’s track record of excellent cooling performance.
Unboxing
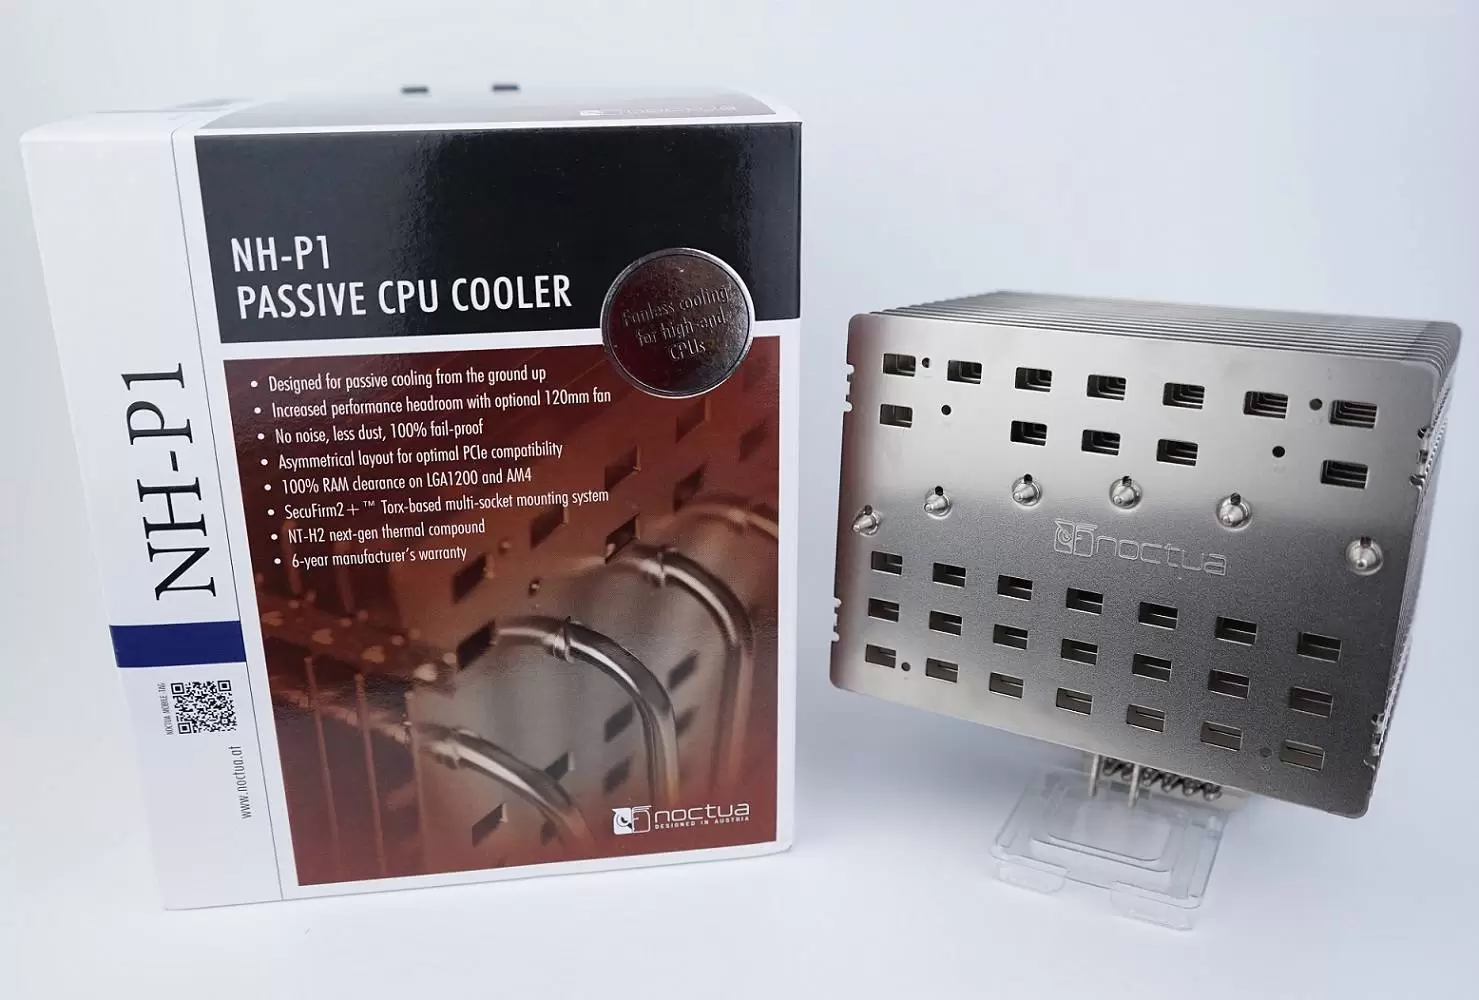
The NH-P1 is shipped in a familiar white and brown cardboard box. A series of features are highlighted on the back, like 100% RAM clearance and PCIe slot compatibility.
Apart from the short descriptions translated into 9 languages, there are a few lists on the side of the box about the specifications and package content.
The CPU cooler and accessories are packaged in separate cardboard boxes.
Different from most Noctua coolers, the NH-P1 includes a pack of NA-CW1 cleaning wipe, a tube of NT-H2 thermal compound (instead of NT-H1), an upgraded SecuFirm2+ mounting system and a high-quality long Torx screwdriver (NM-SD1). You will also get the usual installation manuals, a set of fan clips and a metal case badge.
The new SecuFirm2+ system supports modern CPU sockets, such as Intel LGA1200, LGA115x, LGA20xx and AMD AM4. We have no idea about why Noctua decided to slightly modified the design of the mounting hardware and switch from standard Phillips screw head to Torx. It may be related to the additional weight from the NH-P1’s larger heatsink. The model names and revision numbers of the baseplate (NM-IBP2 Rev. 2) and brackets (NM-IMB2) are identical to those found on the NH-D15.
Noctua NH-P1 Passive CPU Cooler
Being a completely-fanless cooler, the NH-P1’s heatsink serves as the only component to dissipate the heat from the processor through the convection of air around it (hot air rises). This also means the design of the heatsink is drastically different and has to be purposely-built.
The heatsink on the NH-P1 has about 74% less number of fins (13 vs 50) than a normal single-tower Noctua NH-U12A or NH-U12S. The aluminium fins are also bigger and thicker at around 1.5 mm to compensate the loss of heat capacity from the lower fin count. They are rotated 90 degrees and aligned to be paralleled with the natural convention airflow. The fins are spaced out much wider to let the hot air to travel through the fin stack with less resistance, while there are holes on the fins to allow trapped air to escape.
The whole cooler weighs in at about 1.18 kg. It has a height of 158 mm, a width of 154 mm and a depth of 152 mm. Compatibility with RAM and PCIe slots should still be good, because of the asymmetric heatsink design.
Some of the heatsink fins extend further towards the CPU contact base for additional surface area. The six 6 mm nickel-plated copper heatpipes are connected to the base (38 mm x 40 mm), which are responsible for carrying the heat away from the processor.
Noctua NF-A12x25 LS-PWM Fan
Although the NH-P1 is a 100% passive CPU cooler, you have the option to install a 120 mm fan on the top of the heatsink, if you need some extra cooling performance. Noctua suggests to have the special low-speed version of the NF-A12x25 fan to keep the noise in an acceptable level.
The NF-A12x25 LS-PWM spins from 450 RPM to 1200 RPM, controlled via the 4-pin PWM connector. It is capable of generating about 32.78 CFM of airflow. It has a rated MTBF of over 150,000 hours and a 6-year warranty.
The fan can be mounted on the heatsink’s top and sides, depending on the orientations of your motherboard and PC case, using the included fan clips.
Review
We have updated our CPU cooler tests to more reflect real-world cooling performance of coolers.
Testing Methodology
To find out how the cooler performs, a total of three benchmarks are included. AIDA64 is used to run a CPU stress test. CPU, FPU and system cache are all stressed to create as much heat output as possible. Also, Cinebench R15 and Cinebench R20 are used to simulate real-world CPU load (like video-editing or rendering). It will be run continuously for three times. Ambient temperature is around 21°C.
Results will be taken at a 50% and 100% fan speed, controlled via the motherboard CPU PWM header. Stress test will run for at least 15 minutes. Once the CPU has reached the equilibrium temperature, we will record both the average and highest temperatures of the CPU package/hottest core with HWiNFO in the next 5 minutes.
The NH-P1 was tested with its default no-fan configuration, as well as adding a NF-A12x25 LS-PWM fan. We swapped the included NT-H2 thermal compound with the NT-H1 for benchmark consistency. The CPU idled at around 32°C to 35°C.
In AIDA64, the cooler was not able to handle the excess heat from our overclocked Intel Core i7-9700K processor (~150-watt of TDP). Temperatures of the CPU package and cores reached 99°C and the CPU started thermal throttling, after the stress test was running for about 7 minutes. To clarify, this result is expected, since the NH-P1 is not rated for the continuous load from high-end CPUs, especially overclocked ones. You can check Noctua’s website for CPU compatibility. The NH-P1 would also return to its idle temperature slower than conventional air coolers after load, as there is no fan to quickly cool down the heatsink.
Putting a fan on top to assist the airflow helped keep the temperatures under control, at 96°C, which further dropped to 86°C and 87°C, when the fan was spinning at 100% speed (~1200 RPM).
Being a shorter benchmark, the NH-P1 was able to hold the temperatures at 86°C passively in Cinebench R15. The additional fan reduced the CPU to 81°C and 82°C.
Results in Cinebench R20 were very similar to those in AIDA64, possibly because of the longer run time. Although the CPU temperatures raised to 99°C and 96°C in the fanless configuration, no thermal throttling was recorded in the process. With the cooling fan at half PWM speed (~650 RPM), the temperatures decreased by 8°C and 7°C respectively. Another 7°C and 4°C improvements can be seen by ramping up to fan to the max.
Comparison
[visualizer id=”8645″ lazy=”no” class=””]
In this chart, we only include the default configuration of all coolers. Due to the fanless design, the NH-P1 has roughly the same cooling performance as a compact/low-profile air coolers, like the NH-L9x65. It is trading higher CPU temperature for completely silent operation.
Conclusion
The Noctua NH-P1 is a capable cooler, designed for those who are willing to sacrifice a bit of CPU performance to remove the loudest component of a computer. According to our benchmark results, it could handle short and bursty loads from the CPU pretty well. However, the CPU had to thermal throttle to keep the temperature down, if the test ran for more than 5 to 10 minutes. The cooling performance of the NH-P1 will greatly depend on your PC case’s ventilation, because the heat is carried away from the heatsink only by the natural convection of air. Users can opt to purchase the NF-A12x25 LS-PWM fan to increase cooling headroom, by setting a PWM fan curve that ramps up the fan, once the CPU reaches a certain temperature threshold.
Without an included cooling fan, the NH-P1 does not have any moving part and will not actively suck air from the outside. This makes it perfectly suitable in dusty environments, such as a workshop, which can reduce the need for regular maintenance.
The NH-P1 is priced at $109.90 USD (MSRP) with a 6-year warranty. This is a undoubtedly an expensive CPU cooler, considering the NH-D15 and NH-U12A are now on sale for approximately the same prices. More niche products with smaller target audience tend to cost more, because of increased manufacturing costs. The NH-P1 is in a unique position in the market, where it is one of the few passive coolers that is possible to use on a relatively demanding CPU. It is easy to install and does not require a specialized PC case, like those offered by Streacom.
You can purchase the cooler from your local/online retailers or the links below from Amazon and Newegg.
Thanks Noctua for providing the cooler for review. (Review Sample)
Feel free to leave comments below. Share the article if you enjoy reading it. Follow us on Twitter, Facebook, Instagram and Pinterest.
Support this website simply by shopping on Amazon and Newegg. We will receive small kickbacks, if the above affiliate links are used to make any purchases. Or you can directly donate to us via our Buy Me a Coffee page.
Announced in late 2020, the Reverb G2 is the 2nd generation VR/WMR headset from HP. It is upgraded with new optics, controllers and more tracking cameras. It took us a few months to wait for the headset to be backed in stock, due to the global supply shortage and high demand. The HP Reverb G2 is priced at $599 USD (MSRP), sitting right between the Oculus Quest 2 at $299 USD and Valve Index at $999 USD.
Unboxing
The Reverb G2 VR headset is packed inside two layers of cardboard boxes for shipping. The outer box has a plain black background with a couple stickers containing the delivery information, device’s model name and serial number. The inner box gets an embossed photo of the VR headset on the top, while having the HP logo on the sides.
Both the VR headset and the two controllers are wrapped by soft felt fabric bags to prevent scratches during delivery. Alongside the controllers is the box for all the cables and accessories.
In the box, you will get a bunch of cables and adapters to connect the VR headset to the computer. There is a small power brick and its extension cable for power. Another 6-meter long data cable, terminated in USB Type-C and full-sized DisplayPort connectors, is also available. If your computer does not have compatible ports for the cables, the DisplayPort to mini-DisplayPort adapter and USB Type-C to Type-A adapter will be very useful. Four non-rechargeable AA batteries are provided to use with the two motion controllers.
HP Reverb G2 VR Headset
We will go through some basic technical specifications of the HP Reverb G2 VR headset, but we will elaborate further in a future review article. One of the biggest selling point of the Reverb G2 is its two 2.89-inch high-resolution IPS LCD displays, which are 4320 x 2160 combined or 2160 x 2160 per panel/eye (most in the world of VR headsets). They are running at a frame rate of 90 Hz.
Branded as a Windows Mixed Reality (WMR) headset, the Reverb G2 uses Microsoft’s inside-out tracking technology. A total of four cameras are located on the headset, accompanied by the internal gyroscope, accelerometer and magnetometer, are responsible to track the movement accurately.
There is no internal storage on the Reverb G2, which you must connect the headset to a computer to perform any functions, unlike the Oculus Quest 2.
Each motion controller has six buttons and one joystick onboard. It uses Bluetooth to connect to the VR headset. The upper tracking ring will light up when powered.
A 45-watt power adapter is required for the Reverb G2, connected via a barrel-style plug.
The 6-meter headset cable transfers both data and power from the computer to the Reverb G2. The breakout box splits the signal to a DisplayPort connector and USB Type-C connector.
Impressions
Based on my first few hours of experiencing the HP Reverb G2, the displays are a lot sharper than the HTC Vive, as expected. Headset tracking is fine with the four integrated cameras, but the tracking angles for the motion controllers are rather limited (especially when moving below the headset), despite HP claiming that it is improved to cover 30% more vertical area than the 1st generation Reverb.
Feel free to leave comments below. Share the article if you enjoy reading it. Follow us on Twitter, Facebook, Instagram and Pinterest.
Support this website simply by shopping on Amazon and Newegg. We will receive small kickbacks, if the above affiliate links are used to make any purchases. Or you can directly donate to us via our Buy Me a Coffee page.
Proxmox Virtual Environment (VE) is an open source, special server virtualization platform, which is a Linux distro based on Debian. It is mainly used to create or manage virtual machines and computer clusters, which can be easily done though the system’s web GUI. In this article, we will show how to set up a VM inside Proxmox.
Basic Requirement
To get started, you will have to first get the Proxmox VE OS installed properly on the desired computer/server. You should be able to connect and access the web GUI via the provided IP address (e.g. https://X.X.X.X:8006) in another computer’s browser.
On the other hand, you will need to download the ISO images of the operating system for the virtual machine’s installation. You can choose practically anything OS, depending on your use cases and hardware. For example, TrueNAS CORE, Ubuntu Desktop or Microsoft Windows 10.
Installation Procedures
Once you have logged into the web GUI of the Proxmox server, you should navigate to its local storage from the left side menu (Server View), named “local (pve)”.
Click the “ISO Images” section to upload the ISO file for the VM’s operating system.
You can directly upload the files to the server from your personal computer, if you have already downloaded them beforehand.
Or you can let the server fetch/download the files itself, by choosing the “Download from URL” option.
Wait up to 15 minutes for the upload to complete.
Next, you can click the blue “Create VM” button on the top right corner to start the set up wizard.
In the General tab, you need to assign a name and a unique VM ID to this particular virtual machine (e.g. VM ID: 103 and Name: Test-VM). Expanding the advanced options allows you to make the VM start at boot, with specific order or delay.
Tick the “Use CD/DVD disc image file (iso)” options in the OS tab.
Select the correct uploaded ISO image for the VM.
Change the Guest OS type to match the chosen ISO image. For example, switch it to Linux if you are trying to install Ubuntu.
You should leave the settings in the System tab by default, as Proxmox should have modified them based on your Guest OS type.
In the Disks tabs, you can alter the size of the virtual hard disk, as well as its storage location. You can also add more virtual disks to the VM by clicking the “Add” button. For the Bus/Device, SCSI should work fine for most Linux distros, but may need extra drivers for Windows. Therefore, changing it to IDE for Windows is recommended.
As the name implies, the CPU and RAM tabs are used to adjust the amount of CPU cores and RAM that will be allocated to the VM. The “Ballooning Device” option will allow the Proxmox server and Guest OS to dynamically manage the memory size, decided by the current usage of the VM.
You do not have to change anything in the Network tab, unless you want to assign a different network interface or bridge from the Proxmox server.
Finally, a summary list will appear for you to double-check all the settings for the virtual machine.
Click “Finish” to confirm the creation of the VM.
If successful, the virtual machine will appear on the Server View menu.
Select the newly-created VM to see more information about it.
Click the “Start” button on the top right corner.
Press the “Console” button on the side menu or double-clicking the VM’s name on the Server View menu to open up the graphical output of the virtual machine.
Follow the on-screen instructions for the OS installation like normal.
Feel free to leave comments below. Share the article if you enjoy reading it. Follow us on Twitter, Facebook, Instagram and Pinterest.
Support this website simply by shopping on Amazon and Newegg. We will receive small kickbacks, if the above affiliate links are used to make any purchases.


 Explained")


")