DNS (Domain Name System) plays a vital part in the network infrastructure, that is responsible for translating domain names (e.g. UnbxTech.com) into IP addresses. Devices will then use the information to route the data to the correct web servers. Some ISP-provided DNS servers are known to collect users’ browsing history and sell them to other companies/advertisers, not to mention the concern over Internet Censorship. It is common to see people switching to reputable public DNS servers.
What is Private DNS?
Private DNS mode is a feature rolled out since Android 9.0 Pie in 2018, that allows the operating system to send all DNS queries to a custom DNS server, while encrypting the queries over TLS (DNS over TLS/DoT) to prevent hijacking, snooping or phishing attacks.
In previous Android versions, you can only control which DNS server the devices use in Wi-Fi networks, but not in cellular networks. You will have to manually override the DNS settings in every individual Wi-Fi networks, or directly changes the settings in your router.
Procedures
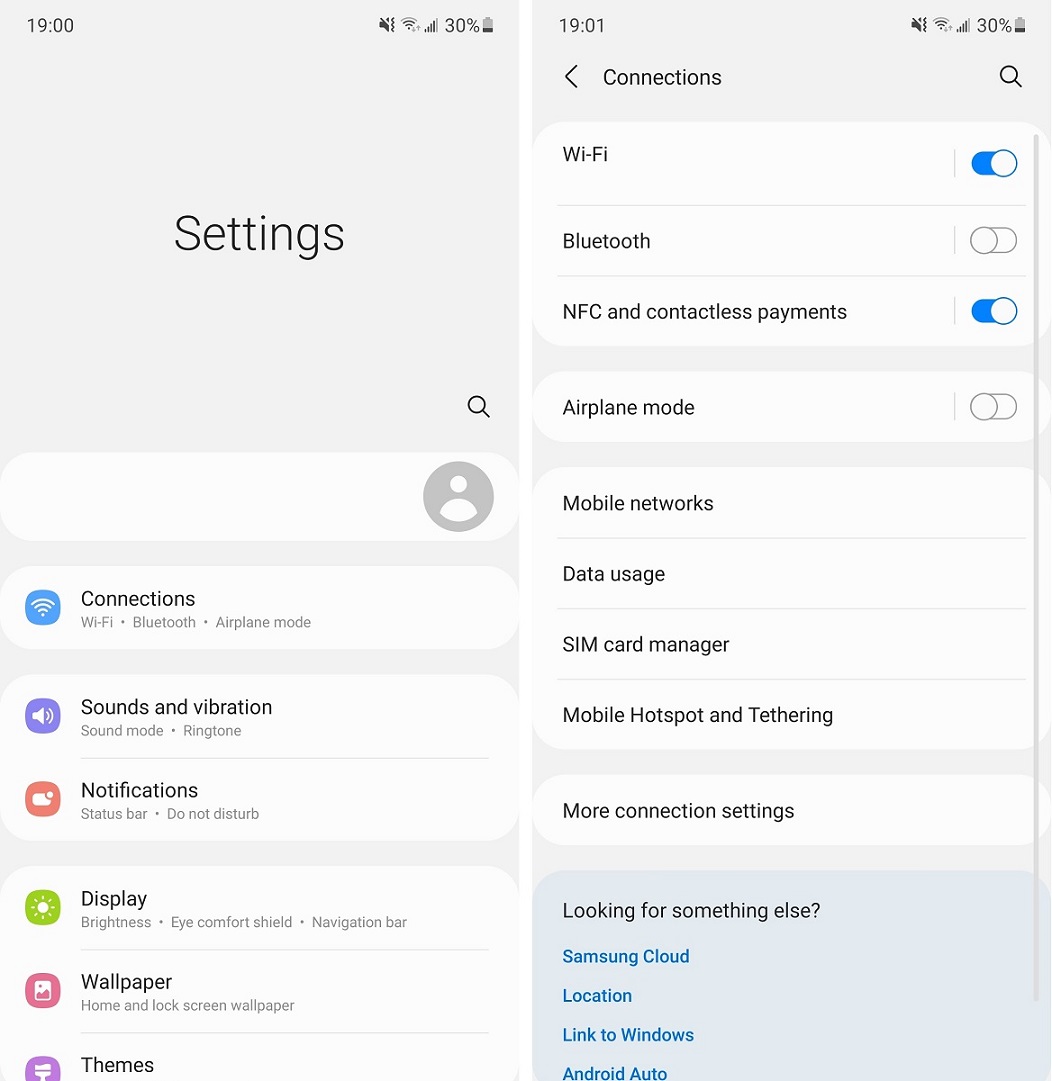
To enable the Private DNS mode, you will need a device running on Android 9.0 Pie or newer. In this example, we are using a Samsung Galaxy Note 10+ on Android 11 and One UI 3.1. The user interface may be slightly different for your smartphone, but the process is largely the same.
- First, go to Settings.
- Look for the sections named “Connections” or “Network & internet”.
- Click “More connection settings” or “Advanced” to expand more options.
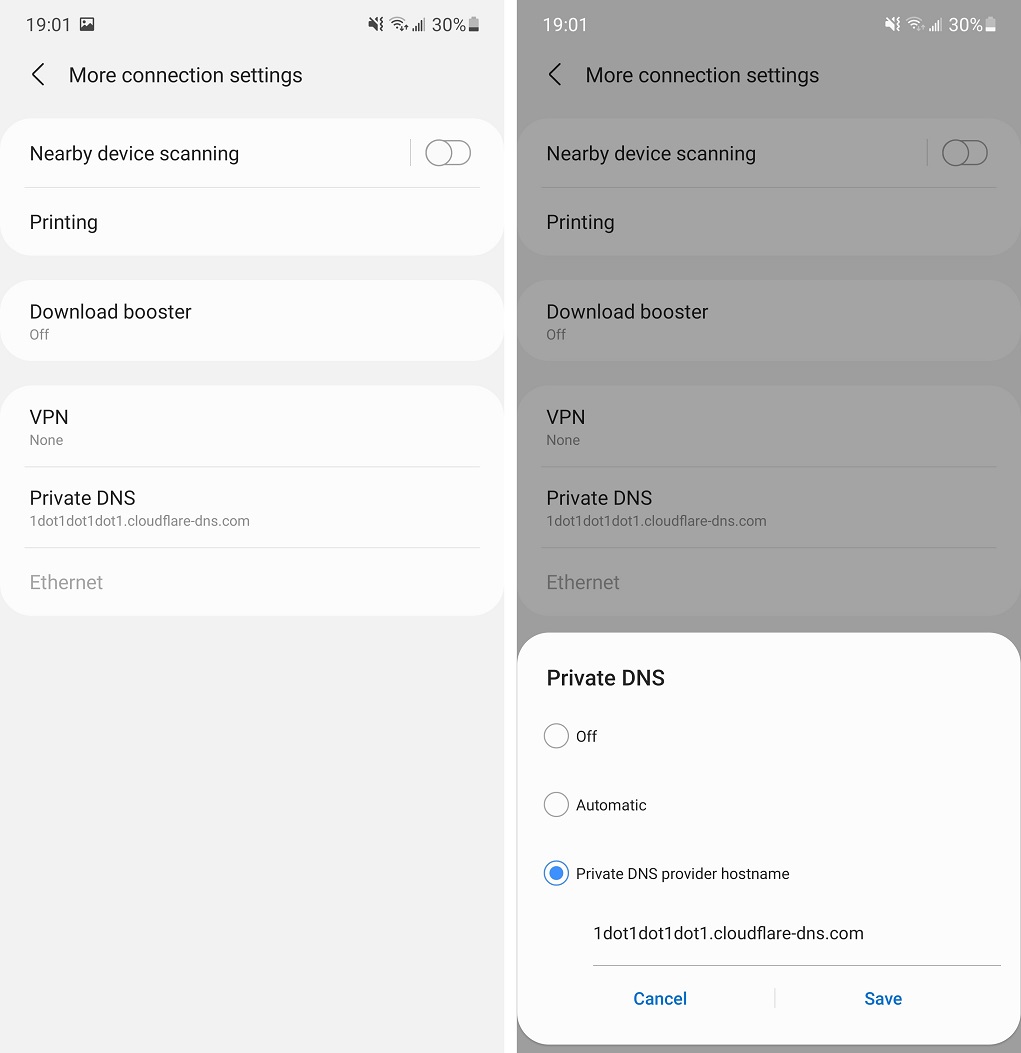
- Select “Private DNS”.
- Click “Private DNS provider hostname” and Enter your desired custom Public DNS server.
- We use Cloudflare DNS (1.1.1.1) as an example. Enter “1dot1dot1dot1.cloudflare-dns.com” and hit “Save”.
- You can visit 1.1.1.1/help, welcome.opendns.com or other online tools to verify if the device has successfully switch to using the new assigned DNS servers.
Remember to type in the hostname of the DNS server, not the IP address, such as 1.1.1.1 or 8.8.8.8. You should make sure the DNS server supports DNS over HTTPS (DoH) and DNS over TLS (DoT) for better security. It is recommended to also use a creditable Virtual Private Network (VPN) service to protect your other network data.
Below is the list of popular public DNS servers’ hostnames.
- Cloudflare DNS: 1dot1dot1dot1.cloudflare-dns.com
- Google Public DNS: dns.google
- OpenDNS (Cisco)*: dns.opendns.com
- Quad9 DNS (IBM): dns.quad9.net
*OpenDNS currently only supports DNS over HTTPS (DoH) and DNSCrypt but not DNS over TLS (DoT).
Feel free to leave comments below. Share the article if you enjoy reading it. Follow us on Twitter, Facebook, Instagram and Pinterest.
Support this website simply by shopping on Amazon and Newegg. We will receive small kickbacks, if the above affiliate links are used to make any purchases.





The server hostname for OpenDNS (Cisco) should be dns.opendns.com for DoT connections, not doh.opendns.com.
Thanks for the correction. Android’s Private DNS cannot use DoH connections (doh.opendns.com). After doing some extra research, OpenDNS only supports DoH and DNSCrypt. Therefore, “dns.opendns.com” will work, but without DoT encryption. Article is now updated with the new information.
Terima kasih, akhirnya openDNS bisa digunakan 🙏
Is there a DNSCrypt OpenDNS for the family shield that anyone knows of?
Hi Buddies, can this DNS server hostname; 1dot1dot1dot1.cloudflare-dns.com will work for my cellular data in my Infinix note 11. kindly guide me guys my internet is too slow for some apps.
I like how well-written and informative your content is. You have actually given us, your readers, brilliant information and not just filled up your blog with flowery texts like many blogs today do. If you visit my website ZQ3 about Thai-Massage, I’m sure you can also find something for yourself.