


 Explained")


")


Cloudflare recently (April 2017) launched its new free public DNS service (1.1.1.1). They claimed to be the fastest DNS directory in the Internet, with strict privacy policy to protect users. However, what steps need to be taken to change your DNS, if you want to try Cloudflare or other public DNS services for quicker Internet speed and better privacy?
What is a DNS?
A DNS (Domain Name System) is an essential system that converts a human-understandable domain name, such as UnbxTech.com or Google.com, into a machine-understandable IP address. The browsers, routers and switches will utilize that resolved IP address to connect to the required web servers in the Internet.
Normally, you will be using your Internet Service Provider’s (ISP) default DNS servers, but there are some disadvantages, like concerns about privacy and Internet Censorship. Fortunately, alternative public DNS options are available.
Reputable and Popular public DNS servers
- Google Public DNS: 8.8.8.8 or 8.8.4.4 (Secondary)
- Cloudflare: 1.1.1.1 or 1.0.0.1 (Secondary)
- OpenDNS: 208.67.222.222 or 208.67.220.220 (Secondary)
All above IP address are in IPv4.
How to change devices’ settings to use the new DNS servers?
The easiest way to let all the connected devices in your private/home network to use the new DNS servers will be directly modifying your router’s settings (recommended). Alternatively, you can change the DNS on individual devices (smartphones, tablets, computers).
Router
First, you will have to connect a computer to its network through Wi-Fi or Ethernet cable. To access the settings panel of the router, type in the gateway IP address in any browsers. The default should be 192.168.1.1, but yours may vary from different router models. You may be asked to enter username and password.
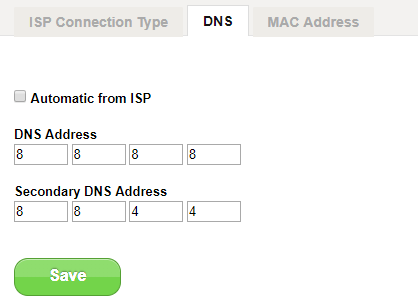
Once in the settings, find the DNS server settings. If there are already a set of IP addresses, you can write them down for future reference. Then, replace the two IP address, both the primary and secondary, of the free public DNS service (Google, Cloudflare, etc) you desired to the settings.
For Example, using Google Public DNS:
- DNS 1: 8.8.8.8
- DNS 2: 8.8.8.4
Finally, save the settings and restart the routers to apply the changes.
Windows 10
First, right-click at the start menu and select “Network Connection”. Then, click “Change adapter options” and choose the network you are currently using. Right-click it and select “Properties”.
A prompt will appear, and locate the “Internet Protocol Version 4 (TCP/IPv4)” and double-click it. Click “Use The Following DNS Server Addresses” and enter the two IP address, both the primary and secondary, of the free public DNS service you desired below.
Finally, click “OK”, then “Close”, then “Close” to save and apply the changes.
macOS
First, go to “System Preference” and search for “DNS Server” on the top right. It will directly take you to the specific settings page. Or you can click “Network”, then “Advanced” and “DNS”.
After that, press the little “+” icon in the bottom left. Add the two IP address, both the primary and secondary, of the free public DNS service you desired.
Finally, click “Ok”, then “Apply” to save the settings.
iOS
Go to settings and select “Wi-Fi”. Press the blue “i” icon of the network you want to modify. Select “Configure DNS” and set it to manual. Remove any existing DNS entires by tapping the “-” icon. Then, tap the “+” button to add the two IP address, both the primary and secondary, of the free public DNS service you desired.
Finally, please remember to click the “Save” button on the top right to apply the changes.
Android
To use custom DNS servers, Android will need to have a static IP address, which will have to modify in your router’s settings. Therefore, configuring the DNS settings in the router instead is recommended.
Go to settings and click “Wi-Fi”. Long press the specified Wi-Fi network, and choose “Modify network”. Add the two IP address, both the primary and secondary, of the free public DNS service you desired at the “DNS 1” and “DNS 2” fields. You may need to find these settings in the advanced section, which will vary depends on the versions of the Android operating system.
Finally, click “Save” to apply the settings.
Feel free to leave comments below, if you have any opinion about this website. Share the website around if you enjoy reading it. Subscribe to our Newsletter or follow our Google+, Facebook and Twitter.
Support this website simply by shopping in Amazon. It will give us small kickbacks, if you use the above affiliate links to make any purchases, which will help us grow.
Dns.ad guard. Com