Home Blog Page 114

How to Reset Your Router or Access Point

Reset Router or Access Point

Sometimes it may be necessary to reset your home router/access point, when you misconfigure the settings, forget the administrator password, or want to re-purpose old routers.


The exact procedures of the methods may varies slightly depends on the models or manufacturers of the routers, but the overall experience should be very similar.

Software Reset

If you can still access the administrator/configuration panel of the router successfully, a software reset can quickly restore the device to its default settings.

Reset Router or Access Point
This is from a Belkin router

Soft reset can be easily found in the settings of the router. For most cases, the button should be labelled as “Restore Factory Defaults”, and located in the system menu.

Once you press the button, a prompt will usually appear to warn you. The router will wipe away all existing configuration, and return back to the state when it first shipped from the manufacturers. No customization, including saved static IP addresses, port forwarding and passwords, will be kept.

Hardware Reset

For the worst case scenarios, if you have no way of entering the configuration panel, a hard reset will be your only option. Just like a soft reset, all settings will be deleted.

Reset Router or Access Point

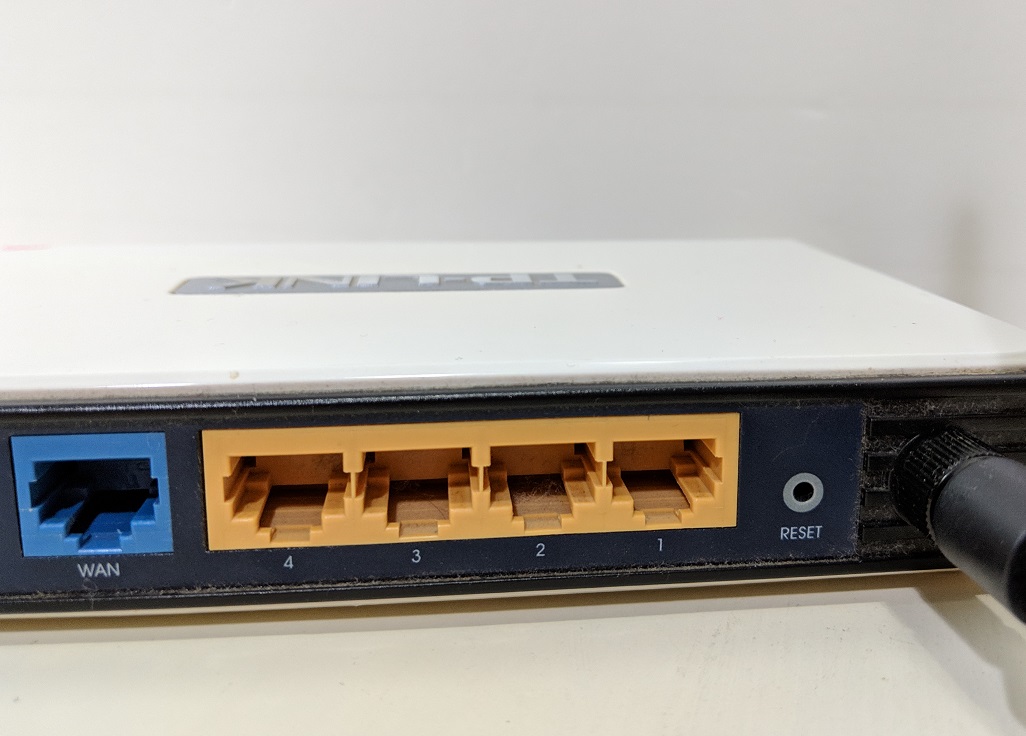
There is always a tiny pinhole button at the side, back or bottom of the router. To prevent accidental presses, the reset button is usually hard to reach, unless using something pointy like a paper clip or a SIM ejector tool. Hold down the button for at least 15 seconds, and keep the router powered on at the same time. The indication lights may flash a few times in the process.

You need to wait for another 15 seconds to 1 minute for the router to fully reset to the default settings. If the above method does not work, you should consider checking your router’s user manual.

After either Software or Hardware Resets, you should be able to access the configuration panel by entering the router’s IP address, usually 192.168.x.x or 10.1.x.x. Also, learn how to change your DNS settings to speed up your home network.

Feel free to leave comments below, if you have any opinion about this website. Share the website around if you enjoy reading it. Subscribe to our Newsletter or follow our Google+, Facebook and Twitter.

Support this website simply by shopping in Amazon. It will give us small kickbacks, if you use the above affiliate links to make any purchases, which will help us grow.

How to Use Remote Desktop on Windows 10

Windows 10 Remote Desktop

Since the launch of Windows XP, Microsoft has included a feature to remotely control another Windows PC in the network, called Remote Desktop. It is very helpful, if the other computer does not have a display output at the time, or you want to quickly access certain files on the other machine. Here is how to set up and use Remote Desktop on Windows 10.


Preparation

The Remote Desktop feature is disabled by default. You must first enable it on the host PC, which is the computer you are going to remotely control.

Windows 10 Remote Desktop

The process of activating Remote Desktop has made simpler in Windows 10. You have to open the Settings app and click on the System sub-menu. On the sidebar, you should be able to see the Remote Desktop section. Switch “Enable Remote Desktop” to On.

Depending on what your set up is, you can tick the “Keep my PC awake for connections”. Please keep in mind Remote Desktop requires the host PC to remain powered on to established connections.

Windows 10 Remote Desktop

Click “Advanced settings” to enable Network Level Authentication for better security.

Remote Desktop App

Windows 10 Remote Desktop

Apart from the built-in basic Remote Desktop Connection app, Microsoft has also released a more user-friendly multi-platform application, which is free and available in both Windows, macOS, Android and iOS.

Start a Remote Desktop Connection

Windows 10 Remote Desktop

Once all settings are configured properly, you can open the Remote Desktop app. Depending on the platform you are on, the application’s user interface may be slightly different.

First, press the Add (+) button on the top right corner and select to add a Desktop. You will be asked to enter the IP address or name of the computer that you want to connect. You should enter the local IP address, if you are inside the same local/private network. The IP address will be something like 192.168.x.x/10.1.x.x. You can type “ipconfig” in the Command Prompt and look for IPv4 address. Otherwise, you need to enter a public IP address.

Windows 10 Remote Desktop

You can choose to enter the sign-in information now by adding an account or re-enter every time. If the host PC is using a Microsoft account for login, type in the same account credentials. If it only has a local account, you can use the same local username and password.

When you are trying to connect the remote PC, a certificate warning may be promoted. Don’t worry. You can just click “Connect” to proceed. If everything is set up correctly, the desktop of the machine will appear and can be controlled remotely.

Feel free to leave comments below, if you have any opinion about this website. Share the website around if you enjoy reading it. Subscribe to our Newsletter or follow our Google+, Facebook and Twitter.

Support this website simply by shopping in Amazon. It will give us small kickbacks, if you use the above affiliate links to make any purchases, which will help us grow.

How to Set Up Windows Hello on Windows 10

Microsoft Windows Hello

Windows Hello is the included biometrics security feature introduced alongside Windows 10 in 2015. It allows users to use facial or fingerprint recognition to login to Windows. You can unlock your computer almost instantly without the need of a password.


Basic Requirement

To enable Windows Hello, you are required to have either a compatible camera (capable of 3D sensing) or a fingerprint sensor. If you are using a laptop or All-in-One computer, it may have those camera and sensor built-in. If you are purchasing an external camera/sensor, make sure it supports Windows Hello. For example, Mouse Computer Facial Recognition Camera (CM01).

Procedures

First, open your Settings app and click on Accounts. Select Sign-in options on the sidebar.

Microsoft Windows Hello

If your camera/sensor is compatible or configured properly, the Windows Hello section should appear automatically. Depending on what hardware you have, it will prompt you to set up either facial or fingerprint recognition.

Microsoft Windows Hello

Before you are allowed to use Windows Hello, a PIN code is required. It will use to unlock the computer, if Windows Hello is unavailable temporarily.

Microsoft Windows Hello

After that, follow the on-screen instructions, you will be asked to scan your face or finger. For facial recognition, you should look at your screen and ensure your face is in the center of the frame. If you wear glasses, you should scan first with them off and scan again by clicking the “Improve Recognition” option with them on.

That’s it. You should be able to use Windows Hello to unlock within a split second.

Feel free to leave comments below, if you have any opinion about this website. Share the website around if you enjoy reading it. Subscribe to our Newsletter or follow our Google+, Facebook and Twitter.

Support this website simply by shopping in Amazon. It will give us small kickbacks, if you use the above affiliate links to make any purchases, which will help us grow.

Unboxing and Review of Mouse Computer Facial Recognition Camera (CM01)

Mouse Computer Facial Recognition Camera (CM01)

Biometrics authentication has become a norm for us to unlock our devices, like smartphones, tablets and laptops. With the release of Windows 10 in 2015, Microsoft introduced the built-in biometrics-based security feature, called Windows Hello. The prices for compatible facial recognition cameras stay at a relatively high cost, but the CM01 camera from Mouse Computer may be able to change that.


Unboxing

Mouse Computer Facial Recognition Camera (CM01)

The package is compact and mostly colored in bright yellow. At the front, you get to see a picture showcasing the CM01 facial recognition camera in operation. A few key features like support for Windows 10 and high accuracy, are printed at the back. (My packaging is in Japanese because I bought it from Amazon.jp.)

A photo of the front of the camera can be found on the side of the box.

Mouse Computer Facial Recognition Camera (CM01)

There is not much accessories inside. Only a quick start guide is included, with the camera surrounded by soft foam. The operating system will install its driver automatically, once you have plugged in the camera. You can learn how to set up Windows Hello in one of our article.

Mouse Computer Facial Recognition Camera (CM01)

Mouse Computer Facial Recognition Camera (CM01)

On the outside, the CM01 Facial Recognition Camera is almost identical to any traditional webcam, except it has one additional camera and two Infra-red light emitters. It can take video at resolution up to 720p at 30 fps. It is perfectly fine for occasional video calls, like Skype, but video quality is not the CM01’s main selling feature. Also, there is no built-in microphone.

In order to support Windows Hello, the CM01 uses the dual-camera array to create an advanced three-dimensional map of the user’s face. Because it can capture image in 3D, a photo will not be able to trick it. The dual IR lights also allow the camera to function properly in dark or almost no-light conditions.

Mouse Computer Facial Recognition Camera (CM01)

The USB Type-A cable is non-removable, which has a length of 1.5 meters. It should be enough to reach the top of the monitor from the computer. You can choose to install the CM01 camera on top of the display, or place it on the desk.

Conclusion

Unboxing Treatment Recommendation

The CM01 Facial Recognition Camera is a great bargain for anyone, who wants to unlock its computer in a split second. You do not have to remember or type in any long, complicated password. For streamers, the video quality of the CM01 is not great, which there are other options in the market to consider, such as the Logitech BRIO.

The CM01 performed outstandingly, which was able to recognize my face in most situations, including dark environments and with or without headset. The computer unlocks and shows the desktop at the moment you sit down and look at the screen. The unlocking process takes approximately 1 second. The experience is fantastic and unbelievable.

The CM01 camera is priced at $69.99 USD (MSRP), but it appears to be out of stock at the time of this review. You should click the link below to check for the current stock. The camera comes with a 1-year warranty.

You can purchase the camera from your local/online resellers or the links below from Amazon US.


Feel free to leave comments below, if you have any opinion about this website. Share the website around if you enjoy reading it. Subscribe to our Newsletter or follow our Google+, Facebook and Twitter.

Support this website simply by shopping in Amazon. It will give us small kickbacks, if you use the above affiliate links to make any purchases, which will help us grow.

Wi-Fi 6 (802.11ax) Explained

Wi-Fi 6 (802.11ax)

802.11ac (Wi-Fi 5) has been the mainstream Wi-Fi standard for quite some time now. Although 802.11ad was introduced with theoretical gigabit-capable throughput, it is limited in transmission range and lacks supported devices. Fortunately, new standard called 802.11ax or Wi-Fi 6 is coming in 2019.

OFDMA

802.11ax has chosen to use OFDMA (Orthogonal Frequency-Division Multiple Access), instead of OFDM (Orthogonal Frequency Division Multiplexing), to better utilize the Wi-Fi signal’s bandwidth.

In 802.11ac, each channel can only accept traffic from a single user at the same time. Other devices will need to queue up and wait, even there is still unused bandwidth. Now, with OFDMA, each channel are separated into multiple pieces, which each piece can transmit data from different users. This method will greatly increase efficiency and reduce latency, especially with lots of Wi-Fi clients.

MU-MIMO

Some of the existing 802.11ac routers/devices already support MU-MIMO (Multi-User, Multiple-Input, Multiple-Output), for up to 4 devices concurrently. 802.11ax upgrades to transmit to 8 devices simultaneously and capable of supporting both Uplink and Downlink MU-MIMO.

Throughput

At launch, 802.11ax will use the original 2.4 GHz and 5 GHz bands, but will eventually expand to cover from 1 GHz to 7 GHz. The channel width will be identical to 802.11ac, including 20 MHz, 40 MHz, 80 MHz, 80+80 MHz and 160 MHz. Theoretically, 802.11 ac will be able to achieve speed up to 433 Mbps at 80 MHz and 1 spatial stream, 6.9 Gbps at 160 MHz and 8 spatial streams. 802.11ax should reach up to 600 Mbps and 9.6 Gbps at the same conditions.

Other Improvements

The inclusion of BSS coloring further increase the efficiency for transmission, by adding a special BSS header to each packet. This can prevent Wireless Access Points to wait for a long period of time, when the channel has other traffic.

802.11ax adds Target Wake Time (TWT), that schedules specific clients when to wake or sleep. Devices do not need to wake up all the time to check if there is a transmission incoming, which should help preserve battery life for mobile devices.

802.11ax compatible routers/Access Points/devices should be available starting from 2019.

Feel free to leave comments below, if you have any opinion about this website. Share the website around if you enjoy reading it. Subscribe to our Newsletter or follow our Google+, Facebook and Twitter.

Support this website simply by shopping in Amazon. It will give us small kickbacks, if you use the above affiliate links to make any purchases, which will help us grow.

High Bandwidth Memory (HBM) Explained

High Bandwidth Memory
Photo from AMD

You may have heard the use of High Bandwidth Memory (HBM) on most of AMD’s new graphics cards. However, what exactly does it do and how it differs from traditional GDDR memory? Let’s find out.


In June 2015, AMD launched the Radeon R9 Fury X, Fury and Nano to the public, which is the first series of graphics cards utilizing HBM in the industry. NVIDIA continued to use GDDR5 and GDDR5X memory on the consumer cards, but released the Tesla P100 workstation card with HBM2 in April 2016.

Working Principle

Physically, standard GDDR memory chips are soldered to the printed circuit board (PCB) around the GPU die. HBM chips, on the other hand, are installed on top of the package substrate right next to the GPU die.

High Bandwidth Memory
Photo from AMD

HBM modules, including the memory controller, can be stacked vertically to further reduce footprint. Memory chips are interconnected by through-silicon via (TSV) and communicate with the GPU through the Interposer layer.

HBM allows a maximum eight DRAM dies per stack, which has a transfer rate of up to 2 GT/s (HBM 2). Each HBM DRAM die has two 128-bit channel, compared to GDDR5’s single 32-bit channel. Therefore, a HBM stack of four dies can have an extremely wide memory bus at 1024-bit and over 100 GB/s of total bandwidth.

Advantage

Due to the HBM modules are soldered so close to the GPU die physically, you get the benefit of shorter paths for data transmission. Combined with the super wide memory bus, the GPU can be fed with information very responsively (lower latency), while consumes considerably less power to achieve similar bandwidth than GDDR5 memory.

The capability of stacking memory chips vertically and on the same substrate as the GPU die allows manufacturers to save precious space on the PCB. Higher-end graphics card can now be made smaller without sacrificing performance.

Disadvantage

Despite the aforementioned pros for switching to HBM, GDDR5 and GDDR6 memory remain to be the industry standard for consumer graphics cards. The complicated manufacturing processes for stacking multiple chips on top of each other drive the production cost and time high.

Normal users can hardly notice the difference with HBM and GDDR5 memory for gaming. And the introduction of GDDR6 memory with higher bandwidth and lower power consumption makes the incentives of switching to HBM smaller.

Feel free to leave comments below, if you have any opinion about this website. Share the website around if you enjoy reading it. Subscribe to our Newsletter or follow our Google+, Facebook and Twitter.

Support this website simply by shopping in Amazon. It will give us small kickbacks, if you use the above affiliate links to make any purchases, which will help us grow.

Western Digital Announces The New WD Black SN750 NVMe SSD

WD Black SN750 NVMe SSD
Photo from Western Digital

Western Digital recently launches an updated version of its WD Black NVMe SSD, with higher capacity and better optimization. WD also partners with EK Water Blocks to offer a variant with heatsink on both top and bottom.


The second-generation SSD is called the WD Black SN750, which has mostly the same hardware combination like the previous one. It is equipped with WD’s own custom memory controller, firmware and 64-layer 3D TLC NAND flash. The SN750 now has four different capacities to choose from, including 250 GB, 500 GB, 1 TB and 2 TB.

WD Black SN750 NVMe SSD
Photo from Western Digital

The new drive utilizes a PCIe 3.0 x4 interface and NVMe protocol to transfer data. It can reach maximum sequential read and write speeds at up to 3470 MB/s and 3000 MB/s respectively. Lower capacity models will have slightly worse write performance at around 1600 MB/s. For endurance, the SSD has rated TBW from 200 TB to 1200 TB.

The WD Black SN750 only comes in M.2 2280 form factor. For standard versions with no heatsink attached, it costs $79.99 USD for 250 GB, $129.99 USD for 500 GB, $249.99 USD for 1 TB and $499.99 USD for 2 TB (MSRP). They should be available for purchase now in various retailers.

Feel free to leave comments below, if you have any opinion about this website. Share the website around if you enjoy reading it. Subscribe to our Newsletter or follow our Google+, Facebook and Twitter.

Support this website simply by shopping in Amazon. It will give us small kickbacks, if you use the above affiliate links to make any purchases, which will help us grow.

Apple Releases New Smart Battery Cases for iPhone XR, XS and XS Max

Apple iPhone Smart Battery Case
Photo from Apple

Apple first launched its smart battery case for the iPhone 6/6s in 2015 and followed up with the iPhone 7 a year later. However, Apple did not release one for the iPhone 8 and iPhone X for some reason. Now, Apple finally announced three new smart battery cases for this year’s iPhones.


The new case comes with either black and white. You will need to get different models of cases for the iPhone XR, iPhone XS and XS Max. The cases are not interchangeable. The design of the smart battery cases are identical to previous one. A relatively large bump at the lower part of the case houses the lithium-ion battery, but it stretches all the way to the bottom this time.

According to Apple, the iPhone XR case will provide an additional 39 hours of talk time, 22 hours of Internet use and 27 hours of video playback. The iPhone XS case adds 33, 21 and 25 hours to each category, while the iPhone XS Max at 37, 20 and 25 hours. The new smart battery cases also support Qi-certified wireless chargers and USB-PD compatible fast chargers, which can charge both the case and the phone simultaneously.

Each smart battery case costs $129 USD (MSRP), and $30 USD increase from prior cases. They are available in Apple’s online store starting from 18 January.

Feel free to leave comments below, if you have any opinion about this website. Share the website around if you enjoy reading it. Subscribe to our Newsletter or follow our Google+, Facebook and Twitter.

Support this website simply by shopping in Amazon. It will give us small kickbacks, if you use the above affiliate links to make any purchases, which will help us grow.

Follow Us on Social Media

583FansLike
635FollowersFollow
494FollowersFollow
1,494FollowersFollow
43SubscribersSubscribe

More Articles