Home Blog Page 137

Apple Silently Introduced New 12-inch MacBook Leather Sleeves for $149 USD

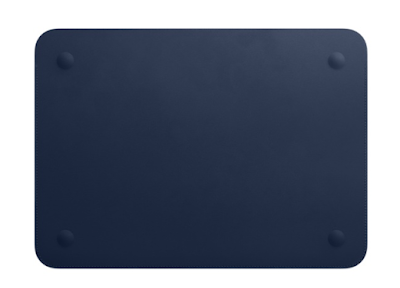
Apple 12-inch MacBook Leather Sleeve


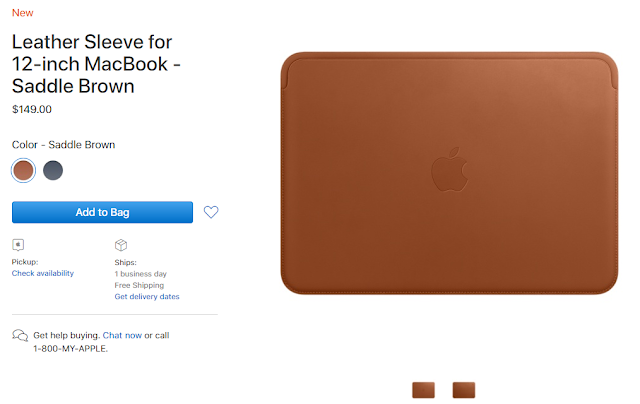
When everyone in the world is focusing on pre-ordering the new iPhone X today (26 October), Apple released a new accessory for its 12-inch MacBook quietly. There is no secret that Apple’s hardware are expensive. The same thing goes to its own accessories, whether they are made for the iPhones, iPads or the MacBooks. The new MacBook Leather Sleeves will cost you $149 USD to own.


.
.
.
Apple:

Made by Apple, this sleeve is crafted from high-quality European leather with a soft microfiber lining. The design of this sleeve allows you to charge your 12-inch MacBook while keeping it protected.


Similar to Apple’s iPad Pro Leather Sleeve, the MacBook Leather Sleeve also has an opening on the side for putting the device into/out the sleeve. But the MacBook sleeve’s cutout is on the longer/horizontal side, while the iPad is on the shorter/vertical side. It should make inserting and taking out the slightly larger 12-inch MacBook much easier.

Apple 12-inch MacBook Leather Sleeve


On the front, the sleeve has the Apple logo embossed, which is the same as every other Apple-made accessories. Four indentations are at the back to accommodate the MacBook’s feet. According to the product page, you can still charge your MacBook while keeping it in the sleeve.

Currently, Apple only offers the Leather Sleeve for the 12-inch MacBook (the one with only a single USB-C port) in two colors, Midnight Blue and Saddle Brown. It is now available for sale at $149 USD, with one business day free shipping. You can expect the sleeve to have perfect fit and finish, like any first-party accessories. If you are interested in buying it, check out Apple’s website to know more. Or you can find other cheaper option (sleeve bag) on Amazon.


Feel free to leave comments below, if you have any opinion about this website. Share the website around if you enjoy reading it. Subscribe to our Newsletter or follow our Google+, Facebook and Twitter.

Support this website simply by shopping in Amazon. It will give us small kickbacks, if you use the above affiliate links to make any purchases, which will help us grow.

Windows 10 Fall Creators Update Adds New Feature to Stop Ransomware

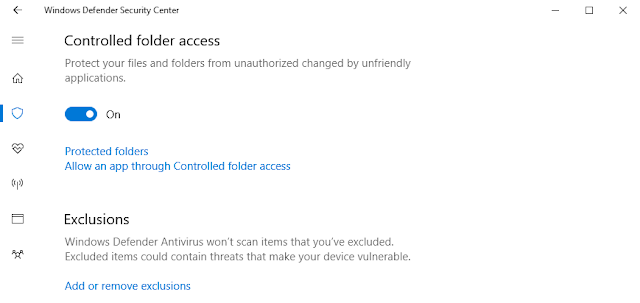
Windows 10 Fall Creators Update - Controlled Folder Access
Photo from Microsoft
 
As we discussed earlier, the Windows 10 Fall Creators Update is now available for download and install. Apart from tiny visual changes and new useful improvements, Microsoft also put on effort on implementing a security feature to stop ransomware, called “Controlled Folder Access”.


.

.
.

What is ransomware?

Back in May 2017, the WannaCry ransomare was one of the largest scale malware attack recently. Over 230,000 computers were infected in more than 150 countries. It raised global concern about defending against similar ransomware attacks.
 
Instead of traditional computer viruses, ransomware work more like computer worms. Due to their ability of  spreading across connected networks, they can infect a lot of computers in a short period of time. Once the ransomware is on your device, it will start encrypting all your files. You cannot access the data, unless you pay the hackers ransom to decrypt. Hence, it is named “ransom-ware”.
 

Windows 10 Fall Creators Update – Controlled Folder Access

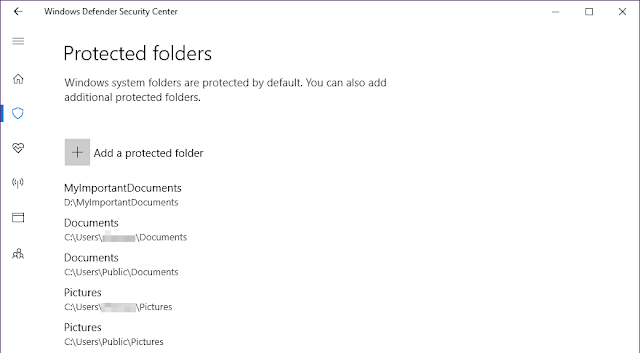
Windows 10 Fall Creators Update - Controlled Folder Access
 
The Controlled Folder Access was first introduced in Windows 10 Insider Preview build 16232 in June 2017 and made publicly available in the latest Fall Creators Update. It is aimed to prevent unauthorized encryption on specific folders performed by ransomware or other malicious software in real time. This is the main method for hackers to demand their ransom payments.
 
The feature can be switched on in Windows Defender Security Center, assuming you have the Fall Creators Update properly installed. It is in the Virus & Threat Protection session of the Security Center (Virus & threat protection settings -> Controlled folder access -> On). After it is turned on, it is already protecting most of the Users files by default, like Documents, Pictures and Videos. You can both add extra folders to protect, and allow trusted applications to access protected folders.
 
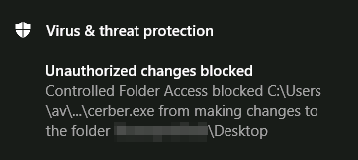
Windows 10 Fall Creators Update - Controlled Folder Access
 
Once you enabled Controlled Folder Access, the system will notify you when unauthorized alterations to the protected folders are detected. It will block the malicious software from making changes in real time.
 
This new security feature will certainly help reduce the effect of ransomware attacks and add an extra layer of security to the computer.
 
Photos and source from Microsoft.


Feel free to leave comments below, if you have any opinion about this website. Share the website around if you enjoy reading it. Subscribe to our Newsletter or follow our Google+, Facebook and Twitter.

Support this website simply by shopping in Amazon. It will give us small kickbacks, if you use the above affiliate links to make any purchases, which will help us grow.

Unboxing and Review of SilverStone Screw and Accessory Kit (CA02)

SilverStone Screw and Accessory Kit (CA02)

If you have every tried assembling a desktop computer, whether for work or for entertainment, you would notice that multiple types of screws and mounting hardware are needed. It can be very confusing for inexperienced DIY PC builders. SilverStone, a reputable PC accessories maker, offers a whole package of screws and accessories with the CA02 kit.


Unboxing

SilverStone Screw and Accessory Kit (CA02)

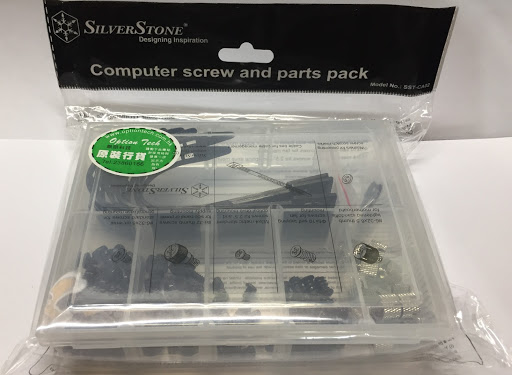
The package of the CA02 kit is extremely simple. The outside is just a plastic bag, with the dimensions and contents printed at the back. You can also find SilverStone‘s website and customer support email on the bag.

SilverStone Screw and Accessory Kit (CA02)

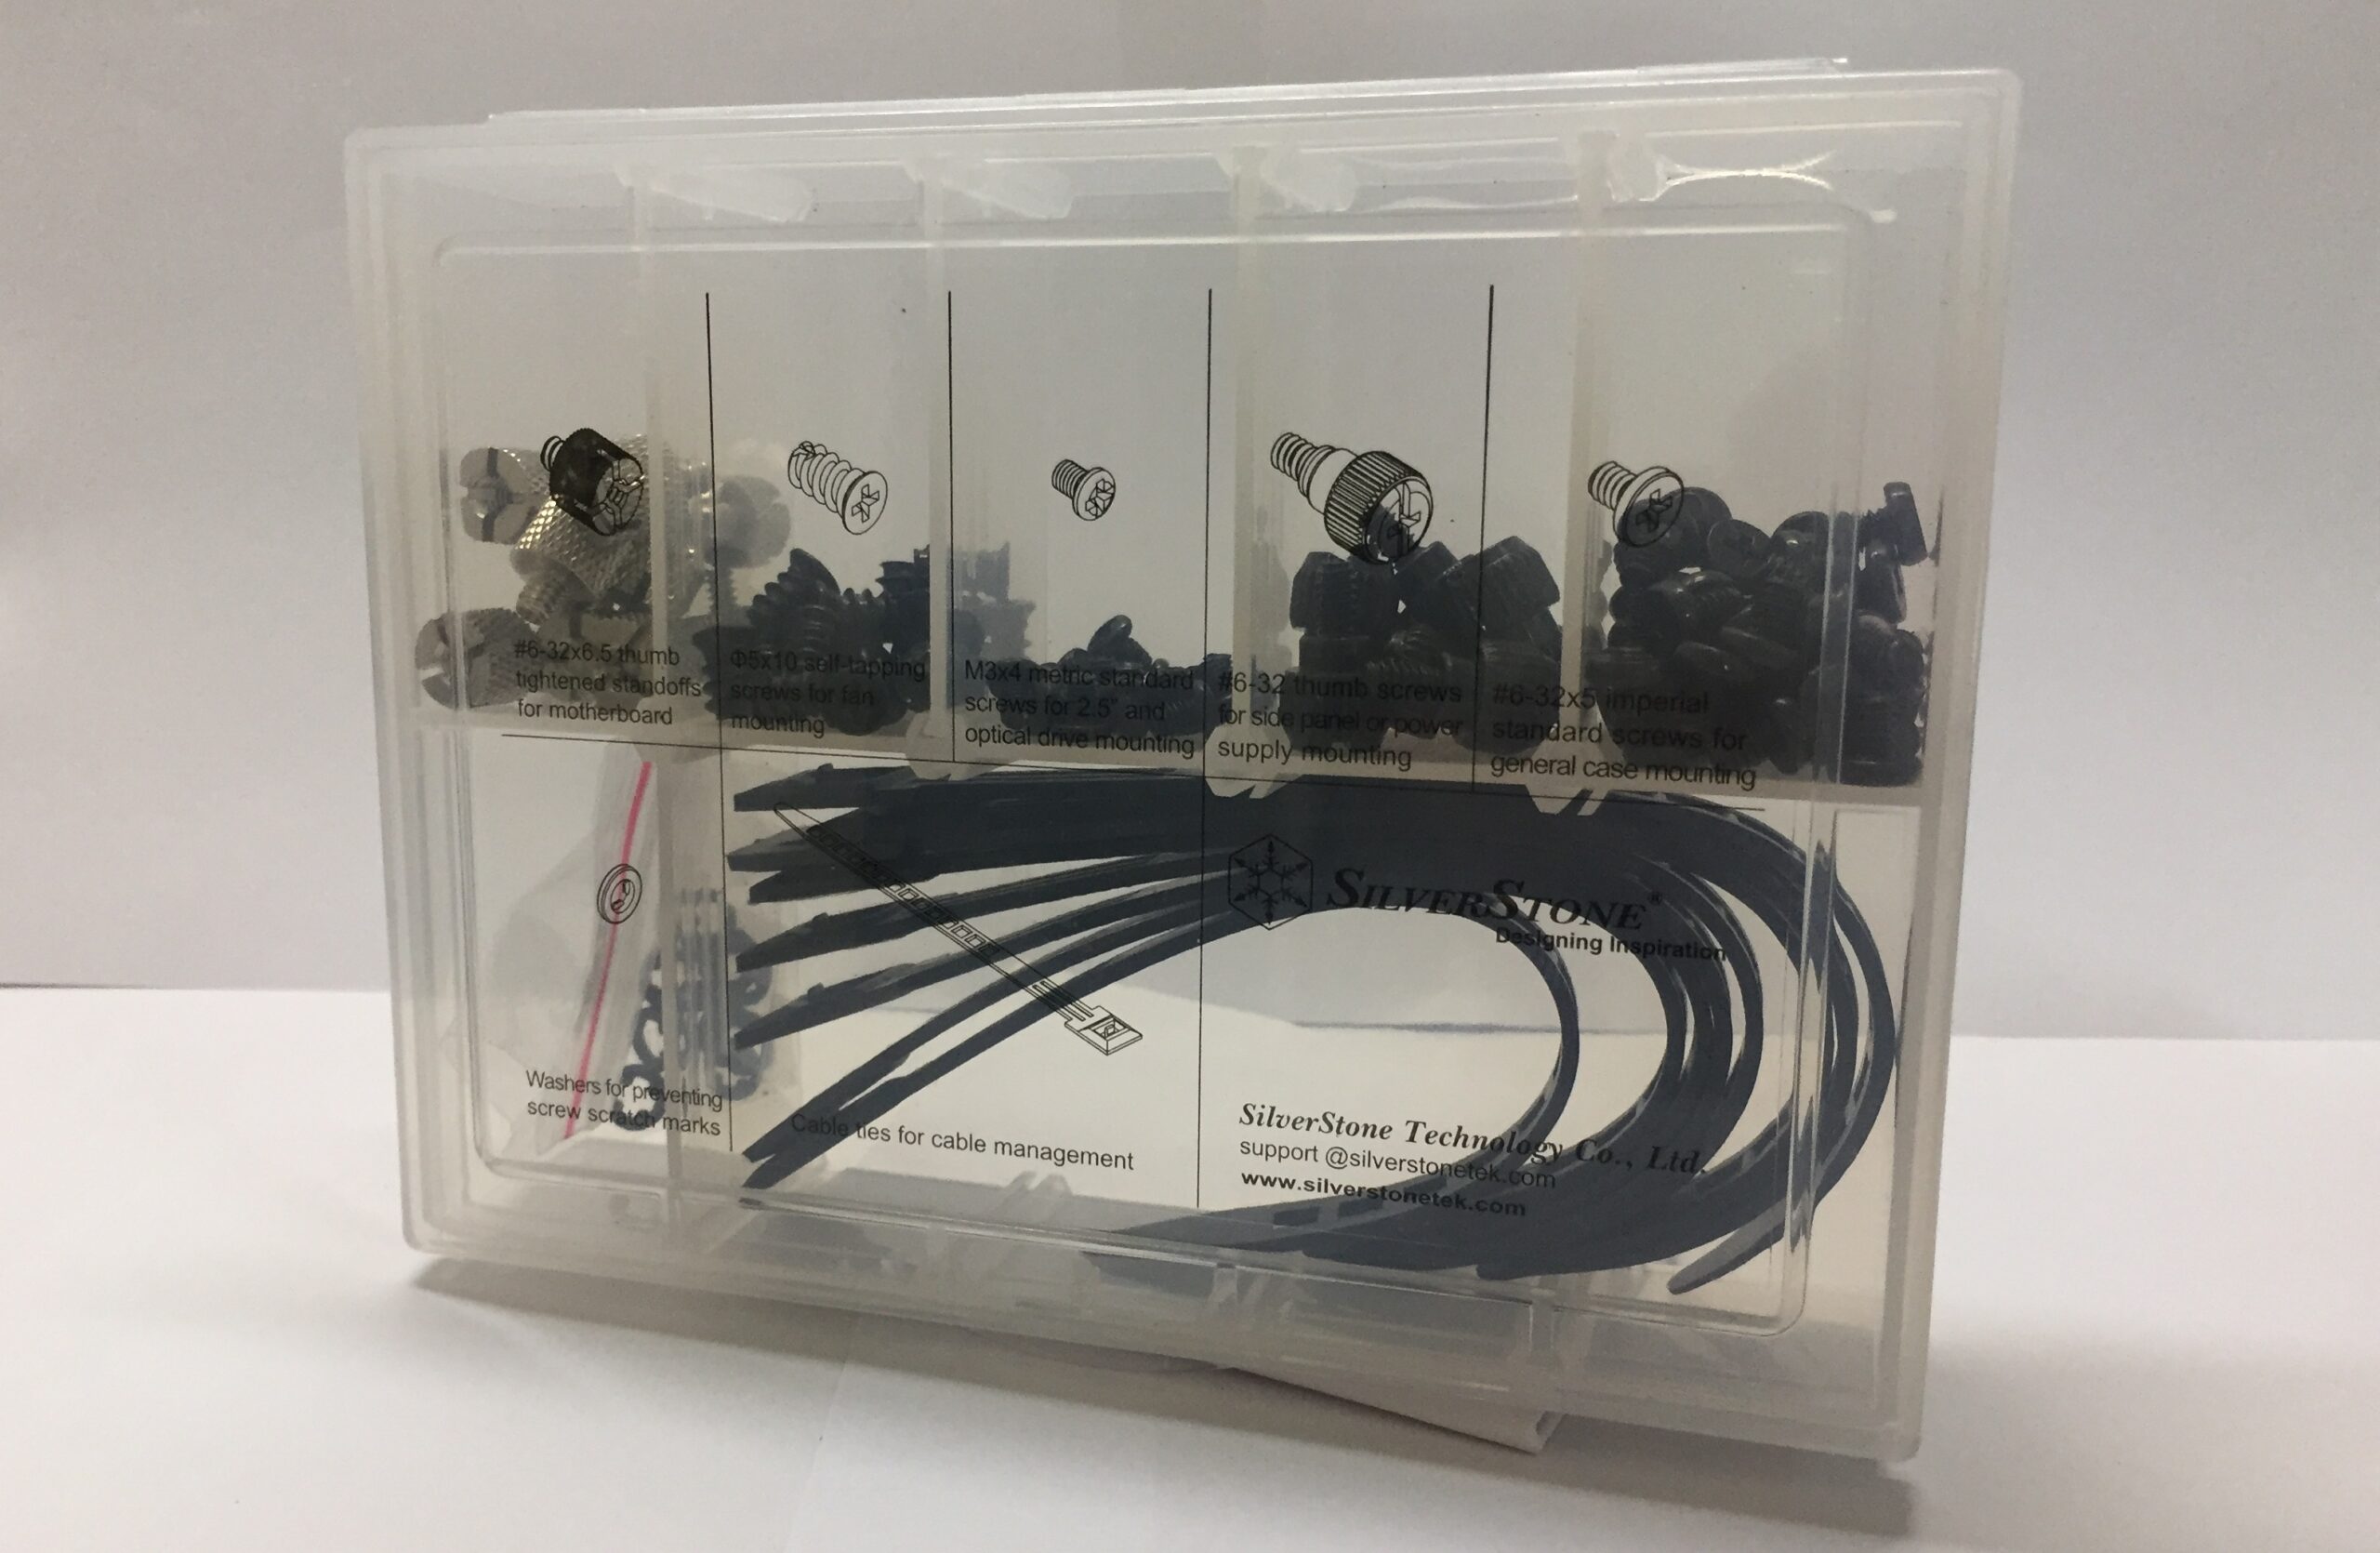
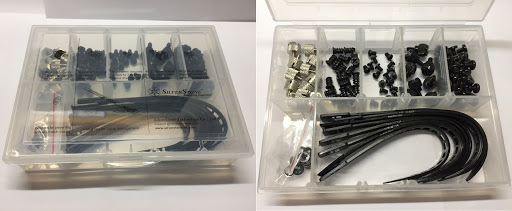
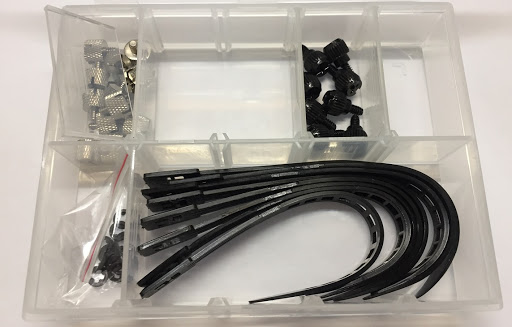
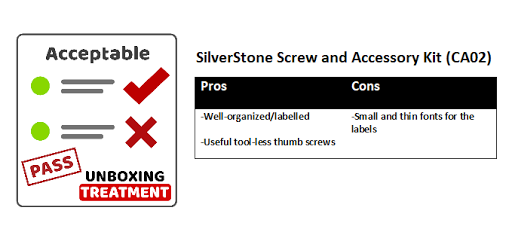
Unwrap the plastic, you will see all screws and accessories are sitting neatly in their separate compartments in a relatively rigid/sturdy plastic box. All names and usages of the screws are clearly printed on the lid of the box, including the exact Unified Thread Standard (like #6-32×6.5 and M3x4).

Review

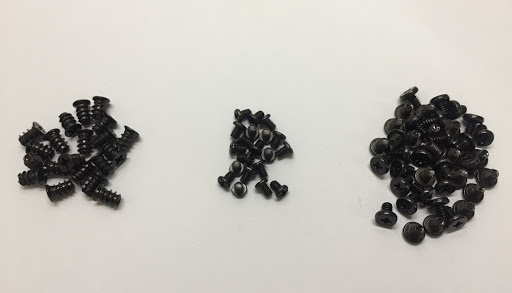
There are total of five different screws, one type of plastic washer and cable tie inside the CA02 kit.

SilverStone Screw and Accessory Kit (CA02)

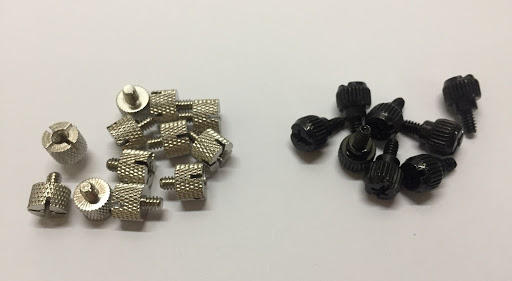
On the left side, they are the #6-32×6.5 thumb-tightened motherboard standoffs. A standoff is used to hold the motherboard above the metal body of the PC case to prevent any short circuit or damage. Traditional standoffs provided by most case manufacturers require a special screwdriver bit to install. With these tool-less motherboard standoffs, you can install them in a faster and easier way with just your thumbs.

Additional #6-32 thumb screws for the case side panels or power supply are included, on the right side.

SilverStone Screw and Accessory Kit (CA02)

There are Φ5×10 fan screws on the left side, M3x4 screws in the middle and #6-32×5 screws on the right.

M3x4 standard screws are used to install optical disc drives and floppy drives, if you still use one. They are also used to mount any 2.5-inch hard drives/solid state drives to your PC case.

#6-32×5 screws are needed for general case mounting, such as 3.5-inch hard drives and power supply.

SilverStone Screw and Accessory Kit (CA02)

A pack of plastic washers are included, if you do not want to scratch the delicate surface of the components or prevent direct contact of metal and the printed circuit board (PCB). There are also reusable cable ties in the CA02 kit for better cable management. Unlike normal one-time use zip ties, these can be reused, which are more convenient when adding or removing cables inside the loop.

SilverStone Screw and Accessory Kit (CA02)

The CA02 box itself can be reconfigured to put any other type of screws and accessories. The separators can be relocated to create new larger compartments.

Conclusion

SilverStone Screw and Accessory Kit (CA02)

The SilverStone Screw and Accessory Kit (CA02) is suitable for both beginners and experienced PC builders. If you lose the pack of screws that come with the PC case, or you build a lot of computers for some reasons, this kit pretty much covers most of your needs in a well-organized box. For its price, you will not be disappointed in both use cases.

Feel free to leave comments below, if you have any opinion about this website. Share the website around if you enjoy reading it. Subscribe to our Newsletter or follow our Twitter, Facebook and Instagram.

Support this website simply by shopping in Amazon and Newegg. It will give us small kickbacks, if you use the above affiliate links to make any purchases, which will help us grow.

How to Manually Install Windows 10 Fall Creators Update

Install Windows 10 Fall Creators Update


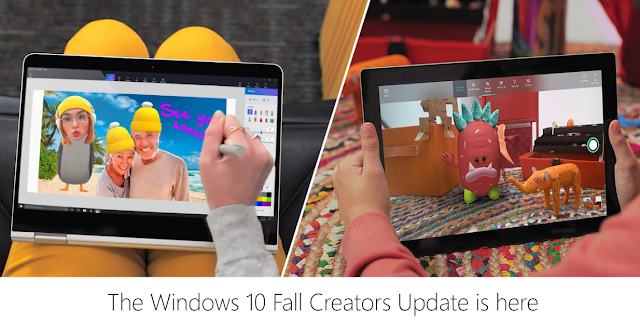
On 17 October, Microsoft finally officially released the Windows 10 Fall Creators Update to the public. It brings quite a lot of new useful features and tweaks to the system. Microsoft is aiming to offer a relatively large update every six months, since the launch of the first version of Windows 10. And the Fall Creators Update is one of them. Microsoft will now start pushing the update to your computers, if they are compatible. If you do not want to wait, here is how to install the update manually.


.
.
.

New Features

Microsoft is implementing a new design language to the Windows 10, which is called Fluent Design. This will be the future universal design system for Windows, after the old Metro design. It focuses on the light, depth and motion, following today’s trend of flat UI (user-interface) designs.

Windows 10 Fall Creators Update


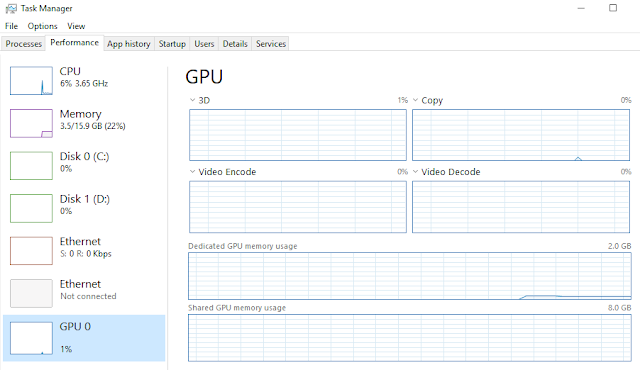
You can now check your GPU utilization right in the system task manager without the need for third-parties applications. GPU and its memory usage can now be found in the “Performance” tab in the task manager. However, there are still no temperature readings and clock speed for the GPU.

The Edge browser also gets some improvements. You can now pin browser tabs/webpages to the task bar. Onedrive files on-demand allows users to access files like normal local folders, while it downloads selective files from the cloud when you need them.

To know more about the Windows 10 Fall Creators Update, visit Microsoft’s website.

Installation

Install Windows 10 Fall Creators Update


It will take some time, probably weeks or even months, before Microsoft completes pushing the Fall Creators Update to all users in the world. Fortunately, there are ways for you to update it manually and immediately.

The simplest way to update your computer is to click “Check for updates” at the settings menu (Settings -> Windows Update -> Update status). If you are one of the users in the the first phase of update roll out, the update will start downloading automatically. A prompt will show to you, once the update is ready to install.

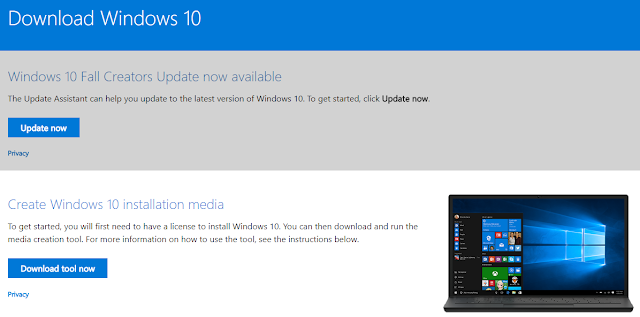
If a message “Your device is up to date.” appears after checking the update, you will need to manually install the update. You have to visit the Microsoft software download website and select “Update now” to download the Update Assistant. A licensed version of Windows 10 is required for this method. Follow the onscreen instructions after installing the assistant software, it will download and update the operating system by itself. Also, you can download the Media Creation Tool to reinstall or do a clean install of Windows 10. Please perform data backup before starting any updates, in case anything abnormal happens.

Your Windows 10 version will be at 1709, and OS build 16299.19 or higher, after the Fall Creators Update.


Feel free to leave comments below, if you have any opinion about this website. Share the website around if you enjoy reading it. Subscribe to our Newsletter or follow our Google+, Facebook and Twitter.

Support this website simply by shopping in Amazon. It will give us small kickbacks, if you use the above affiliate links to make any purchases, which will help us grow.

How to Install Google Pixel 2 Launcher to Your Android Phones

Install Google Pixel 2 Launcher


Not too long ago, Google finally released their next generation Pixel smartphone.Along with the new hardware, the Pixel 2 and Pixel 2 XL both get an redesigned home screen/launcher. In fact, the Pixel 2 Launcher is an exclusive feature for the Google’s new phones officially. However, Android enthusiasts in the community are able to let almost any Android phones (Android 5.0 or higher) to sideload the launcher with ease.


.
.
.
The most noticeable change to the new Pixel 2 Launcher is the position of the Google search bar. Instead of staying at the top of the screen, it moves down to the bottom, above the three navigation buttons. Its main purpose is to allow the Pixel 2 XL users to still use the search bar without reaching the top, even though it has a larger and taller 18:9 display. This arrangement will push up the app row quite a bit, which needs some time to get used to.

Install Google Pixel 2 Launcher


Google also added an “At A Glance” widget. It will show the current date and weather at your location most of the time. If you have upcoming Google Calendar events, the widget will change to show the next event. Like the Pixel 1 Launcher, you swipe up to reveal the app drawer. You will get an frequently used apps suggestion at the top.

Install Google Pixel 2 Launcher


Tap and hold at any empty space on the home screen can let you access the launcher’s settings. You can customize the “At A Glance” widget to display the calendar events and traffic alerts. The app suggestion in the app drawer can also be turned off at here.

Install Google Pixel 2 Launcher


The way that the app drawer reacts when you reach to the bottom of all applications is different too. In the new Pixel 2 Launcher, its whole array of apps will bounce instead of the gray semi-circle. The design is more simple and fluid in my opinion.

Installation

Install Google Pixel 2 Launcher


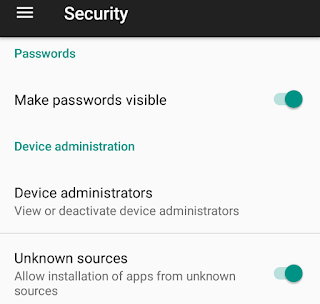
You will need any android phones with at least Android 5.0 Lollipop. You do not have to root your phone to install this launcher. All you need to do is download and install the .apk file at APKMirror.com. Please note that “Unknown sources” will need to switch on, allowing .apk files to be installed outside Google Play Store (Setting -> Security -> Device administration). If you want to use the Google Now panel on the home screen with the launcher, you will have to install it as a system app.

If you would love to experience the new Pixel 2 Launcher on your non-Pixel 2 phones, this is worth trying out. You can easily uninstall the launcher just like other apps in your system, if you do not like it.


Feel free to leave comments below, if you have any opinion about this website. Share the website around if you enjoy reading it. Subscribe to our Newsletter or follow our Google+, Facebook and Twitter.

Support this website simply by shopping in Amazon. It will give us small kickbacks, if you use the above affiliate links to make any purchases, which will help us grow.

How to Hard Reset Apple iPhone 8 And iPhone 8 Plus

How to Hard Reset Apple iPhone 8 And iPhone 8 Plus


Although Apple’s iOS operating system has been praised for its better overall software stability, it is inevitable for users to encounter some situations that hard reset is needed. In recent versions of iOS, relatively more bugs are not fixed before official release, causing the phone to behave abnormally. However, Apple has changed the method to hard reset/force restart for the new iPhone 8, iPhone 8 Plus, and possibly the iPhone X.


.
.
.
Due to the removal of the physical home button, you will need to press and hold both the power/side button and the volume down button at the same time for about 10 seconds, or until the Apple logo shows up on the screen for iPhone 7 and iPhone 7 Plus. The phone will restart after that.

Instead of the volume down button, you will need to press and hold the power/side/top button and the home button for about 10 seconds, until the Apple logo appears for iPhone 6s or earlier devices.

How to Hard Reset Apple iPhone 8 And iPhone 8 Plus


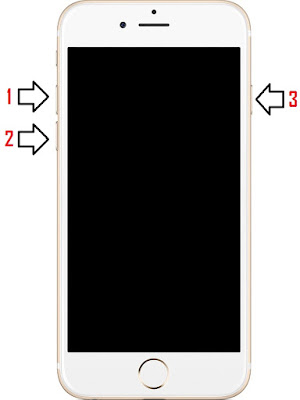
Now, for the iPhone 8 and iPhone 8 Plus, the hard reset process is made a little bit complicated. The original button combination (side button+volume button) is used to activate iOS 11’s Emergency SOS feature on the iPhone. To hard reset the phone, you will have to first press and release the volume up button, then press and release the volume down button, finally press and hold the side/power button until you see the Apple logo.

Hard Reset Procedures (iPhone 8 and iPhone 8 Plus)

1. Press and quickly release the Volume Up button

2. Press and quickly release the Volume Down button

3. Press and hold the Side/Power button until you see the Apple logo


Feel free to leave comments below, if you have any opinion about this website. Share the website around if you enjoy reading it. Subscribe to our Newsletter or follow our Google+, Facebook and Twitter.

Support this website simply by shopping in Amazon. It will give us small kickbacks, if you use the above affiliate links to make any purchases, which will help us grow.

Noctua Released New Chromax Products, Including Fans, Cables and Heatsink Covers

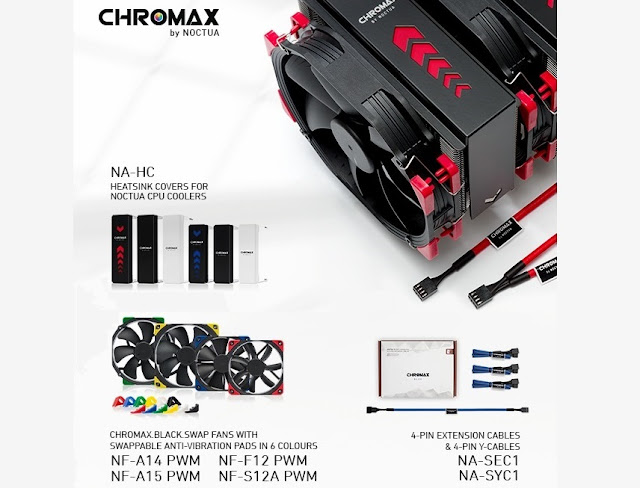
Noctua Released New Chromax Products
Photo from Noctua


On 16 October, Noctua added a bunch of new Chromax products to the existing lineup. Noctua first introduced their Chromax anti-vibration pads and fan mounts (NA-SAVP1 and NA-SAV2) in December 2015, which provide a simple way for users to customize their Noctua fans’ appearances. Now, Chromax fans, cables and heatsink covers are available for better matching the color schemes with other components in the system.


.
.
.
Roland Mossig (Noctua CEO):

With the new chromax line fans, cables and heatsink covers, we now offer a range of products that’s ideal for those who care about looks just as much as about quality and performance.


Instead of buying a fan and Chromax anti-vibration pads separately, you can now purchase a complete set with the chromax.black.swap edition. You can choose between four models of Noctua fans, including NF-A14 PWM, NF-A15 PWM, NF-F12 PWM and NF-S12A PWM. Inside the package, there will be anti-vibration pads in six different colors.

In addition, new Chromax extension cable and Y-cable sets are also available. The cables are sleeved in six colors, just like the other Chromax accessories. The 30 cm extension cable and the Y-cable are compatible with both 3-pin and 4-pin fan connectors, and can be extended further by daisy-chaining.

Lastly, you can add Chromax heatsink covers to your Noctua CPU coolers now. The heatsink covers are made out of powder-coated aluminium and can be used with two series of CPU coolers (NH-U12S and NH-D15(S)). You have three colors options to choose – all black, all white and black with swappable inlays. The inlays are included in the six Chromax color.

All products will be available shortly. You can buy the products on Amazon or other resellers.

Chromax Fans:

  • NF-A14 PWM: $24.90 USD (MSRP)
  • NF-A15 PWM: $26.90 USD (MSRP)
  • NF-F12 PWM: $22.90 USD (MSRP)
  • NF-S12A PWM: $22.90 USD (MSRP)


Chromax Heatsink Covers:

  • NA-HC (for NH-U12S): $19.90 USD (MSRP)
  • NA-HC (for NH-D15(S)): $29.90 USD (MSRP)
 

Chromax Extension Cables:

  • NA-SEC1: $9.90 USD (MSRP)


Chromax Y-cables:

  • NA-SYC1: $9.90 USD (MSRP)
 
For more information, you can visit Noctua’s website.


Feel free to leave comments below, if you have any opinion about this website. Share the website around if you enjoy reading it. Subscribe to our Newsletter or follow our Google+, Facebook and Twitter.

Support this website simply by shopping in Amazon. It will give us small kickbacks, if you use the above affiliate links to make any purchases, which will help us grow.

Get A Free Copy of The DxO OpticsPro 11 for A Limited Time

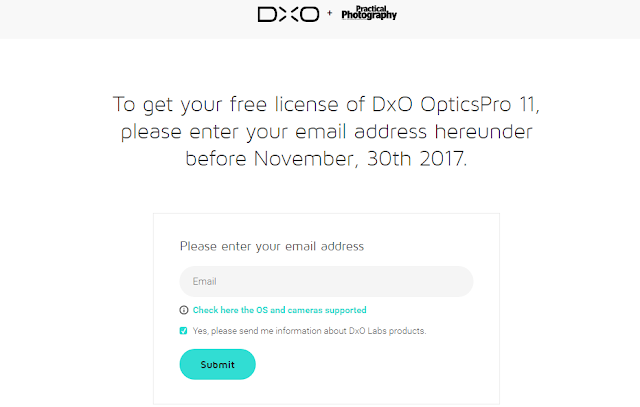
DxO OpticsPro 11 Free License
Screen Capture from DxO

A professional photo editing software is a must for adjusting details of the original photos, if you are using the photos for any important work. Post-production can enhance the photos’ contrasts and reduce their noise for better final products. DxO OpticsPro is one of the image post-processing tool in the market. Now, DxO is partnering with Practical Photography to give everyone a free license of its latest DxO OpticsPro 11 software, until 30 November.


.
.
.
DxO Labs is a well-known software company, based in France. It develops image/video processing software, as well as testing camera gears (DxOMark). According to PCMag, the DxO OpticsPro 11 performs excellently, which is easy-to-use and can greatly improve the photo quality. You can use the OpticsPro 11 for handling and converting RAW image files. Its Smart Lighting feature can help re-adjust the exposure and brightness of the photo to show more details in shadows. More usage of the software can be found on DxO’s website.

To get a free copy of the DxO OpticsPro 11, you will need to enter your email address at DxO’s webpage. An activation code and the software download link will be sent to your email. The code can be used simultaneously on two computers (Mac and Windows PC). In fact, what you receive is the DxO OpticsPro 11 Essential Edition, a slightly slimmed-down version of the Elite Edition. An special discount is also offered to you, if you really want the full OpticsPro 11 Elite Edition (25% off).

DxO OpticsPro 11 Free License

If you are interested in making your photos better in post-production, it is a great time to try out the DxO OpticsPro 11 software for free. The promotion is available for everyone to enter until 30 November 2017. You can visit the DxO’s website to get your free license.


Feel free to leave comments below, if you have any opinion about this website. Share the website around if you enjoy reading it. Subscribe to our Newsletter or follow our Google+, Facebook and Twitter.

Support this website simply by shopping in Amazon. It will give us small kickbacks, if you use the above affiliate links to make any purchases, which will help us grow.

Follow Us on Social Media

583FansLike
635FollowersFollow
494FollowersFollow
1,494FollowersFollow
43SubscribersSubscribe

More Articles