Intel has been unbeatable in the production of semiconductor for quite some time. However, according to the latest earning report from Samsung (Q2 2017), it shows Samsung’s semiconductor related business got $15 billion USD out of the total $54 billion USD in revenue, which is about 27%. At the same time, Intel only earned $14.8 billion USD from making chips. For now, Samsung is the biggest semiconductor manufacturer in the world.
Intel has dominated the market for more than two decades. Intel is mostly producing the semiconductors for themselves, such as CPU for desktops and servers. Intel is struggling in the mobile devices market, which is one of the largest and fastest growing industry. Only recently, Intel is making LTE modem chips for Apple’s iPhone 7.
Unlike Intel, Samsung has invested heavily on manufacturing mobile processors and flash memory, which are all in great demand. Its customers include Apple, Qualcomm and Nvidia, just to name a few. Samsung has expanded its product lines, from DRAM modules, NAND flash to GPU. With the global shortage in DRAM and NAND chips, Samsung may be able to leverage the increased sales prices to compete with Intel.
Despite all that, there is no guarantee that Samsung can stay at the top for a long time. With TSMC and GlobalFoundries raising their scales of production rapidly, they can become one of the contenders in the near future.
Source from Engadget.
Feel free to leave comments below, if you have any opinion about this website. Share the website around if you enjoy reading it. Subscribe to our Newsletter or follow our Google+, Facebook and Twitter.
Support this website simply by shopping in Amazon. It will give us small kickbacks, if you use the above affiliate links to make any purchases, which will help us grow.
Samsung Beats Intel to Be the Largest Semiconductor Manufacturer
Apple Discontinued The iPod Nano and iPod Shuffle after 12 Years
 |
| Photo from Apple |
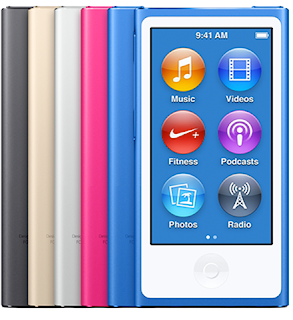
Today, you can no longer find the respective product page for the Apple iPod Nano and iPod Shuffle. Apple terminated the sales of both products, which is the second time in the iPod lineup after the iPod Classic. Currently, there is only the 6th Generation iPod Touch left, with updated storage option and price.
Both the iPod Nano and iPod Shuffle were launched in 2015. They were designed to solely play music in people’s pockets. They once were the icons of MP3 music players in the market, due to their tiny sizes but large storage. However, after the iPhone was launched and more smartphones emerged, iPods’ single-purpose designs make them harder to sell.
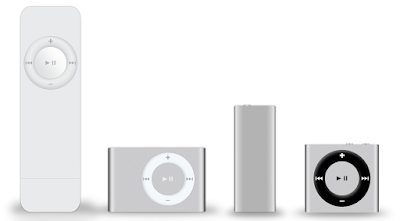
There are total 7 generations for the iPod Nano. They all have a small display on top, up to 2.5 inches. For the 1st to 5th Generation, users navigate through menus by using the Click Wheel. The 6th and 7th Generation Nano get a Multi-Touch display. The iPod Nano can have up to 16GB of storage.
Only 4 generations were announced for the iPod Shuffle. No display is equipped for all generations. Most of them have a control pad for performing basic music playing functions, except for the 3rd Generation. The iPod shuffle can get up to 4GB of storage.
 |
| Photo from Wikipedia |
You will now be redirected to the Apple Music page if you click the two iPods’ product pages. The 6th Generation iPod Touch is limited to two storage options, 32GB and 128GB. They are priced at $199 USD and $299 USD respectively.
You can still purchase the iPods online or other local electronic stores.
Feel free to leave comments below, if you have any opinion about this website. Share the website around if you enjoy reading it. Subscribe to our Newsletter or follow our Google+, Facebook and Twitter.
Support this website simply by shopping in Amazon. It will give us small kickbacks, if you use the above affiliate links to make any purchases, which will help us grow.
How to Create A Virtual Machine Using VirtualBox
What is a virtual machine (VM)? It is an operating system that runs on a specialized software, which emulates physical hardware of a computer. You can use multiple different OS at the same time without rebooting. Running a VM provides people some benefits, such as increase workflow and security. This article will help you set up your first virtual machine using VirtualBox.
VirtualBox is one of the reputable virtualization software in the market. It can be operated on different platforms, from Microsoft Windows to Linux.
Preparing the software and OS
Download the VirtualBox from its website. Remember to also download the VirtualBox Extension Pack in order to get support for USB devices. Moreover, download your desired operating system’s image file (.ISO). I will be using Windows 10 as an example. (You can download Windows 10 disk image from Microsoft. Get the Media Creation Tool and select “Create installation media for another PC”. Choose “ISO file” instead of “USB Flash Drive”.)
Install the VirtualBox software on your computer. Now, you are ready to get started.
Setting up the virtual machine
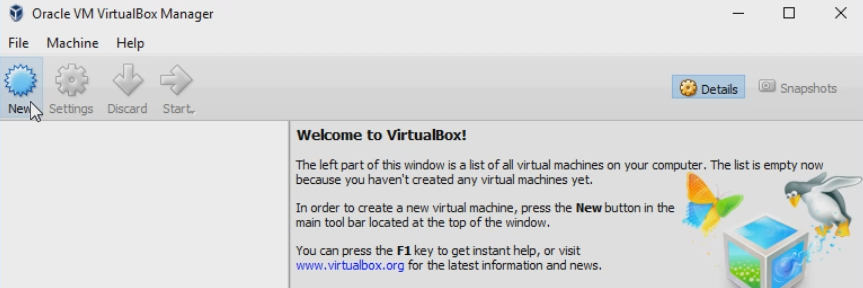 Press “New” to create a new virtual machine.
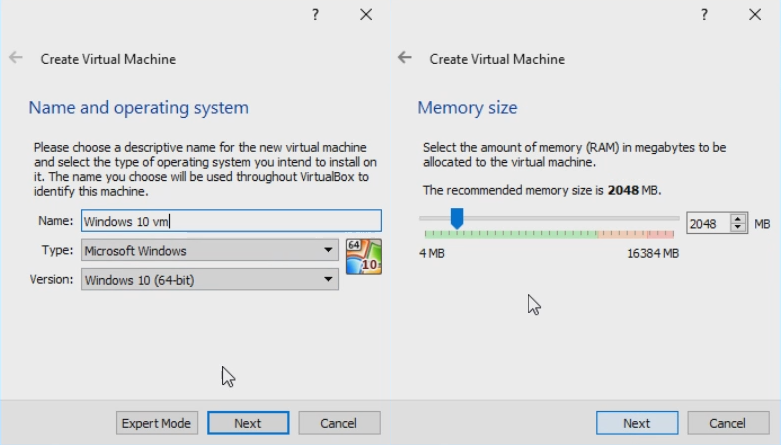
You can type in the name of the VM. The software can select your operating system by guessing from the name. Or you can choose your correct OS. Next, you have to decide how much RAM you want for your VM. The allocated RAM will not be able to used by the host system once the VM is started. Make sure you have enough amount of RAM for both system, if you are going to use both of them simultaneously.
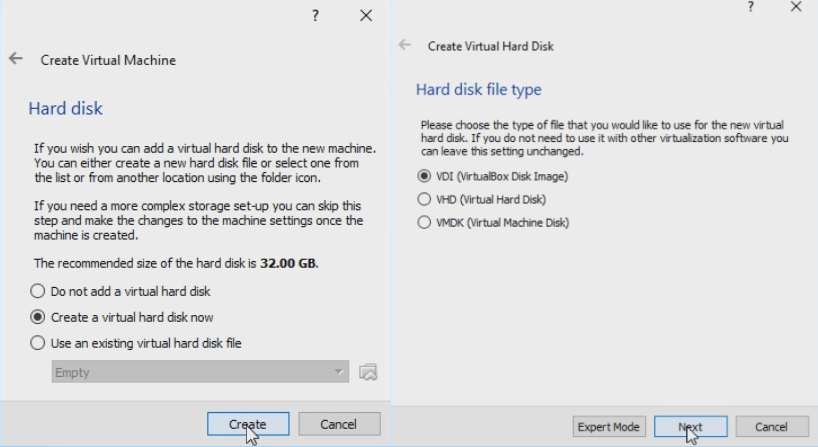
Create a new virtual hard disk that is used to hold all your VM’s files. Leave the hard disk file type as default (VDI).
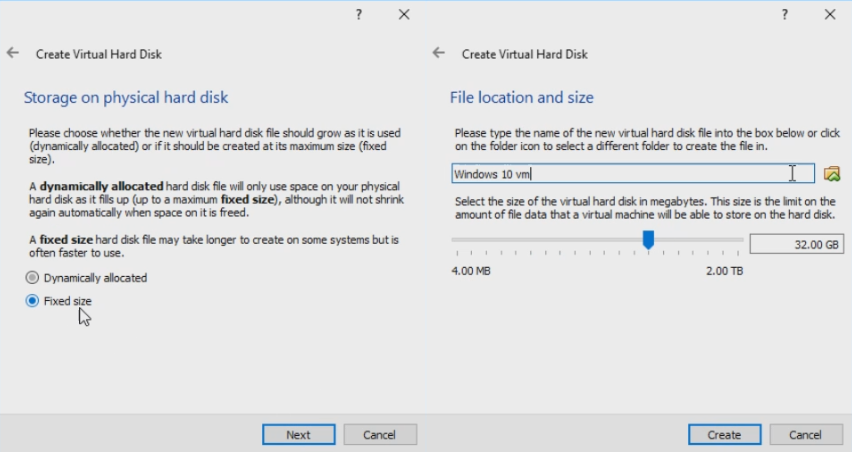
You will need to choose your VM’s hard disk location and size. For the hard disk file, I prefer using a fixed size file instead of a dynamically allocate file because I only use the VM as a secondary system. I do not need a large VM hard disk. This is totally up to your own preference. Just select the options that best meet your needs.
Press “Create” and wait for the virtual hard disk to be initialized. This may take up to 15 minutes or more, depending on your hard disk file’s size.
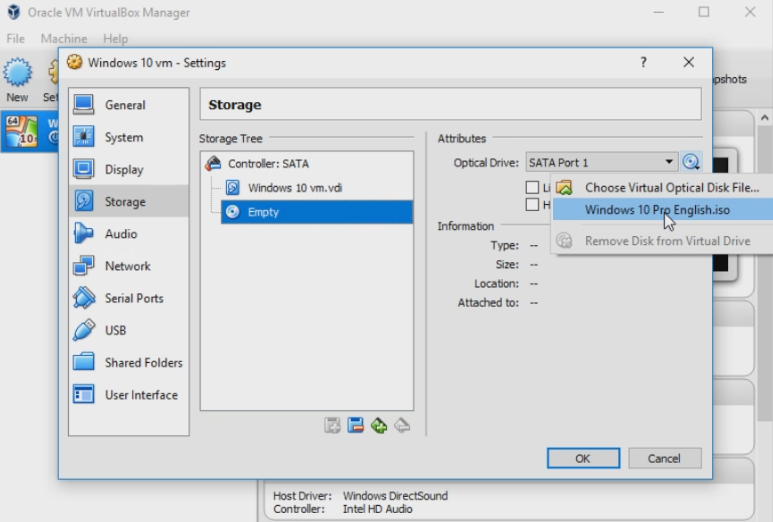
Click the “Setting” button and navigate to the “Storage” tab. You will have to select the optical drive and locate your previously downloaded operating system image file. Then, Press “OK”.
Lastly, start your virtual machine. Your OS’s set up screen should be appeared. From now on, just follow the onscreen instruction and install the OS like normal. Remove the image file after completing the installation.
Hope you enjoy using your first virtual machine in VirtualBox!
Feel free to leave comments below, if you have any opinion about this website. Share the website around if you enjoy reading it. Subscribe to our Newsletter or follow our Twitter, Facebook and Instagram.
Support this website simply by shopping in Amazon and Newegg. It will give us small kickbacks, if you use the above affiliate links to make any purchases, which will help us grow.
Adobe Flash Will Be Discontinued in 2020
 |
| Photo from Adobe |
Adobe Flash was first introduced in 1996. It is designed to create multimedia content, like animations and games. It was common to use Flash to embed content in websites. However, as technology keeps moving forward, Adobe Flash is considered to be too resource-hungry, that hinders web browsers’ performance. Less and less third-party supports are given. Now, Adobe decides to stop updating and distributing the Flash Player at the end of 2020.
In fact, Adobe Flash has been criticized for its proprietary system and mediocre security for quite some time. For example, Apple’s iOS devices do not support Flash at all. In 2010, Apple thought that Flash is not optimized for new modern mobile platforms, is not reliable and secure enough.
Feel free to leave comments below, if you have any opinion about this website. Share the website around if you enjoy reading it. Subscribe to our Newsletter or follow our Google+, Facebook and Twitter.
Support this website simply by shopping in Amazon. It will give us small kickbacks, if you use the above affiliate links to make any purchases, which will help us grow.
How to Install OSMC on Raspberry Pi
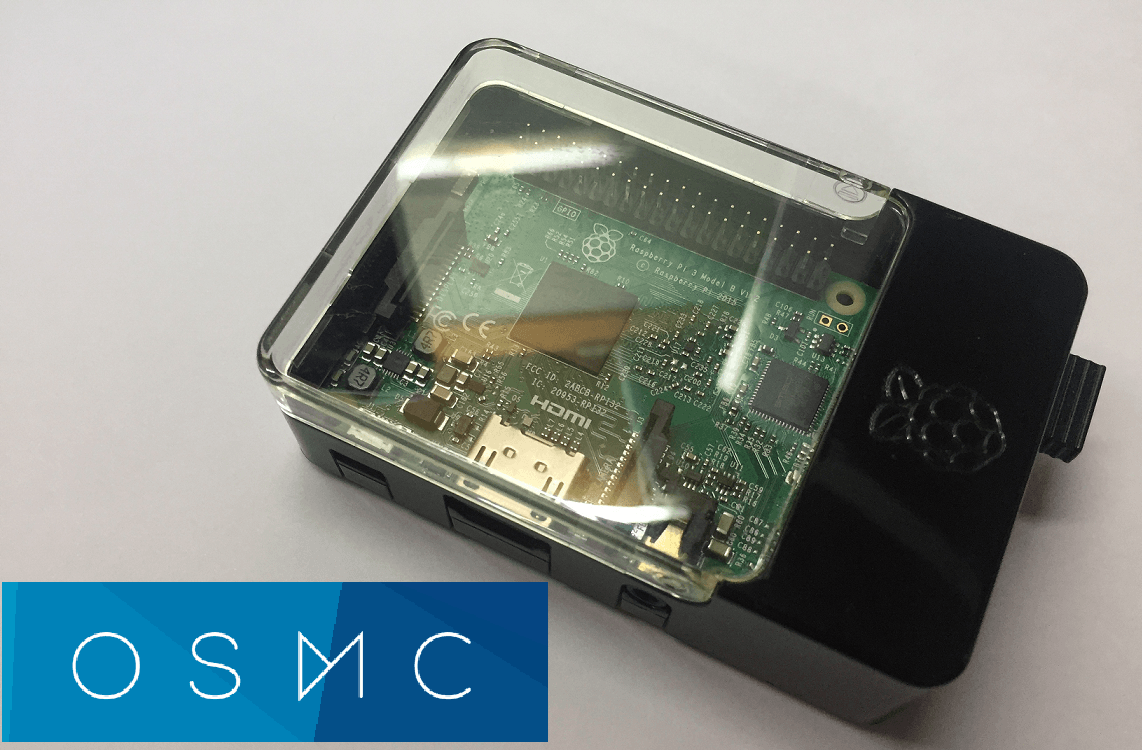
The Raspberry Pi 1 was first launched in 2012. Since then, Raspberry Pi becomes a extremely valuable equipment for every DIY enthusiasts and programmers, due to its affordable price and versatility. One of the most common usage in the community is making the Pi as a home media center/hub. OSMC is a open-source OS for multiple platforms that is suitable for media consumption. This time, we will teach you how to get it installed on your Raspberry Pi.
OSMC is free and open-source, which is based on Debian Linux and Kodi Media Center Software. It can be installed on Raspberry Pi, Vero, and 1st Generation Apple TV. It has a simple user interface and is easy to setup, even for beginners. Without further ado, Let’s get started.<
Hardware you need
- Raspberry Pi
- 5V/2.1A Power Supply with a MicroUSB cable
- MicroSD card with a capacity of 8GB or more
- Micro SD card reader
- An HDMI cable
You can get a Raspberry Pi starter kit, if you do not want to purchase all the parts separately. Generally, there is no difference in the hardware that you use to install other OS, like Raspbian and Ubuntu, except for the OSMC image file.
Preparing the disk image
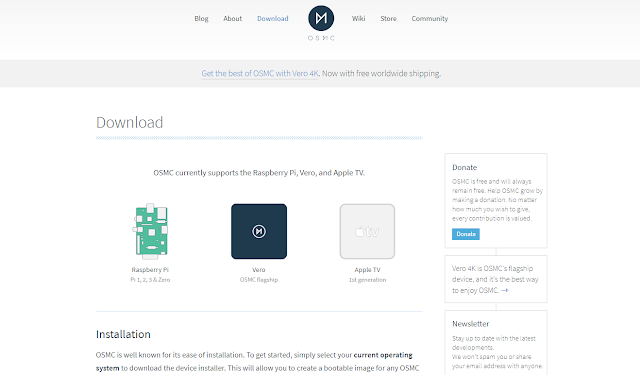
First of all, you will need to download the OSMC disk image from its website. You need to select the image for your respective device. A .gz file named similar to “OSMC_TGT_rbp2_2017XXXX.img” will be downloaded. Then, extract the file.
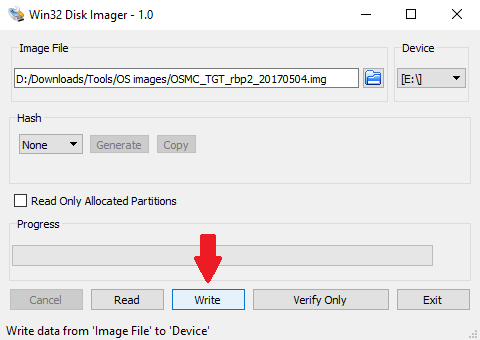
To write the bootable image to the microSD card, Win32 Disk Imager is required. Put your SD card into your card reader and plug into a computer. You have to select the extracted image file as the source and your SD card as the destination. Please make sure you choose the correct SD card, any existing data on it will be wiped. If everything is okay, press the “write” button and wait until it’s finished.
Alternatively, you can use the device installers provided by OSMC. It combines both the downloading and creating bootable image into one single installer. You can use the installer in Windows, macOS, and Linux. It does simplify the installation process, but the “disk imager” method is more versatile and can be used to install other OS.
Once the Win32 Disk Imager or the device installer complete their installation, you can put the microSD card back into the Raspberry Pi and enjoy using your own OSMC media center.
Feel free to leave comments below, if you have any opinion about this website. Share the website around if you enjoy reading it. Subscribe to our Newsletter or follow our Google+, Facebook and Twitter.
Support this website simply by shopping in Amazon. It will give us small kickbacks, if you use the above affiliate links to make any purchases, which will help us grow.
Intel’s 6-Core i7-8700 Specifications Leaked
 |
| Photo from XFastest |
A couple days before, a rumor reported that Intel is working on 6-core versions of the upcoming 8th Generation Coffee Lake processors. There will probably be 6-core i5 and i7 CPUs. While everyone is speculating how well the CPUs will perform, a leak on the specifications showed up.
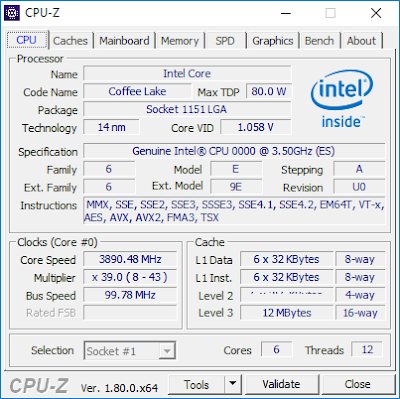
The leak photo is a screen capture of CPU-Z, a software that monitors hardware of your system. The specific CPU model name cannot be identify, probably because of the unreleased hardware. However, based on the Coffee Lake microarchitecture, we know it will be the 8th Generation Core i-series CPU.
According to the previous rumor, only i7 will have 6 cores with Hyper-Threading (12 threads). We can narrow the leaked CPU down to i7. The CPU is reported to have a maximum TDP of just 80W. For reference, a unlocked Core i7-7700K gets a 91W TDP rating. Therefore, the CPU may be a i7-8700, with a locked CPU multiplier.
The i7-8700 will have 6 cores, 12 threads, pairing with 12MB of L3 cache. It will have a base clock of 3.50 GHz, and a Turbo boost clock of about 3.90 GHz. The processor will still be using the existing LGA 1151 socket and be manufactured with a 14nm process.
Source and Photo from XFastest.
Feel free to leave comments below, if you have any opinion about this website. Share the website around if you enjoy reading it. Subscribe to our Newsletter or follow our Google+, Facebook and Twitter.
Support this website simply by shopping in Amazon. It will give us small kickbacks, if you use the above affiliate links to make any purchases, which will help us grow.
Intel Shows its 12-Core i9-7920X’s Base Clock
 |
| Photo from Intel |
Intel officially released the most of its new X-series processors in June 2017. We only have general information, like core count and prices, about the upper tier models above the i9-7900X. At the same time, AMD’s Threadripper CPUs are ready to step into the enthusiast market.
Recently (July 14), Intel reveals the i9-7920X processor’s pricing and base clock speed in its CPU Price List. The CPU will have 12 cores, 24 threads, paired with 16.5 MB of cache. It will be running at 2.90 GHz. No Turbo clock speed is announced.
When comparing with other processors, the i9-7920X seems to have a lower base clock speed. Its 10-core variant, i9-7900X, has a clock speed of 3.30 GHz, about 12.2% higher (+400 MHz). The 12-core Threadripper 1920X is clocked at 3.5 GHz, about 20.7% higher. A lower base clock speed may slightly reduce the i9-7920X’s single-core performance.
There is no exact release date for the i9-7920X processor yet.
Source from Intel.
Feel free to leave comments below, if you have any opinion about this website. Share the website around if you enjoy reading it. Subscribe to our Newsletter or follow our Google+, Facebook and Twitter.
Support this website simply by shopping in Amazon. It will give us small kickbacks, if you use the above affiliate links to make any purchases, which will help us grow.
Apple iOS 10.3.3 Released – What’s New
 |
| Screen Capture from Apple |
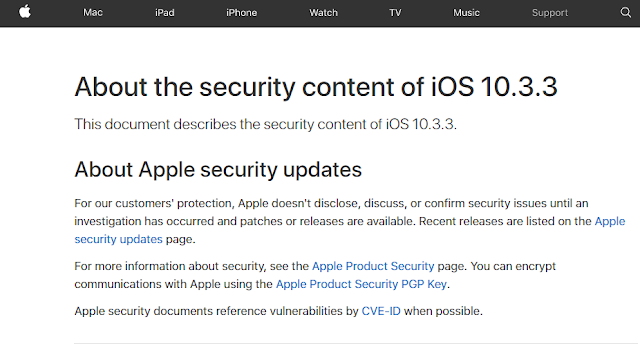
Source from Apple.
Feel free to leave comments below, if you have any opinion about this website. Share the website around if you enjoy reading it. Subscribe to our Newsletter or follow our Google+, Facebook and Twitter.
Support this website simply by shopping in Amazon. It will give us small kickbacks, if you use the above affiliate links to make any purchases, which will help us grow.


