Home Blog Page 146

AMD Leaks the Ryzen 3 Spec while launching the Ryzen Pro Lineup

(Photo from AMD’s official website)


On 29th June, AMD announced their Ryzen PRO lineup for enterprises. These “new” processors have improved security and reliability with extensive AMD’s support. The specifications of the Ryzen PRO are similar to the consumer siblings. We can therefore get a peek of the not-yet-release Ryzen 3 CPUs.


What is Ryzen PRO?


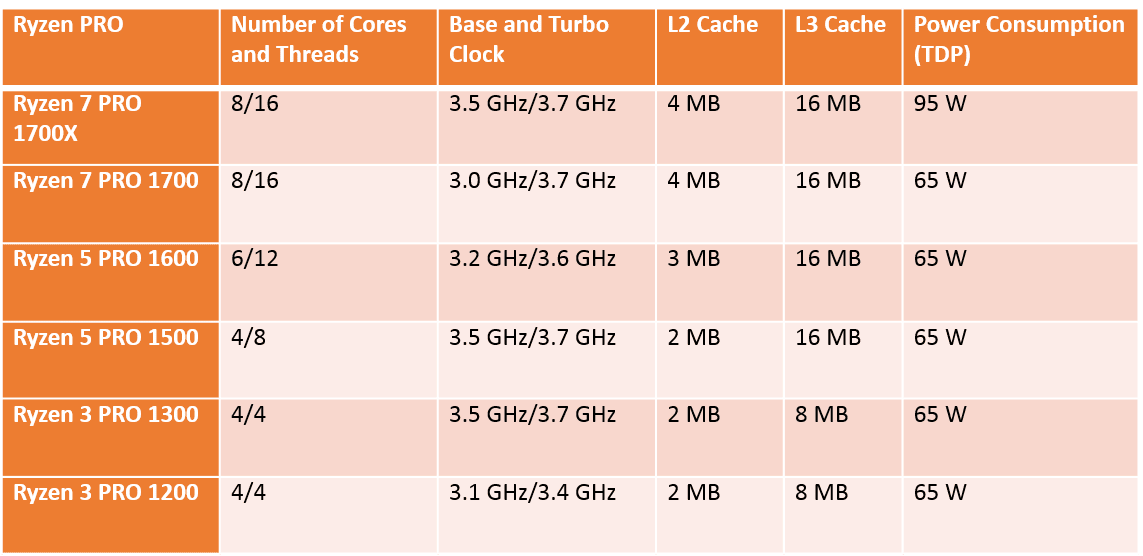
For specifications, the Ryzen PRO and Ryzen do not seem to have a big difference. They both use the latest Zen CPU architecture. They support most of the same technologies, such as Precision Boost, Extended Frequency Range (XFR) and SenseMI.

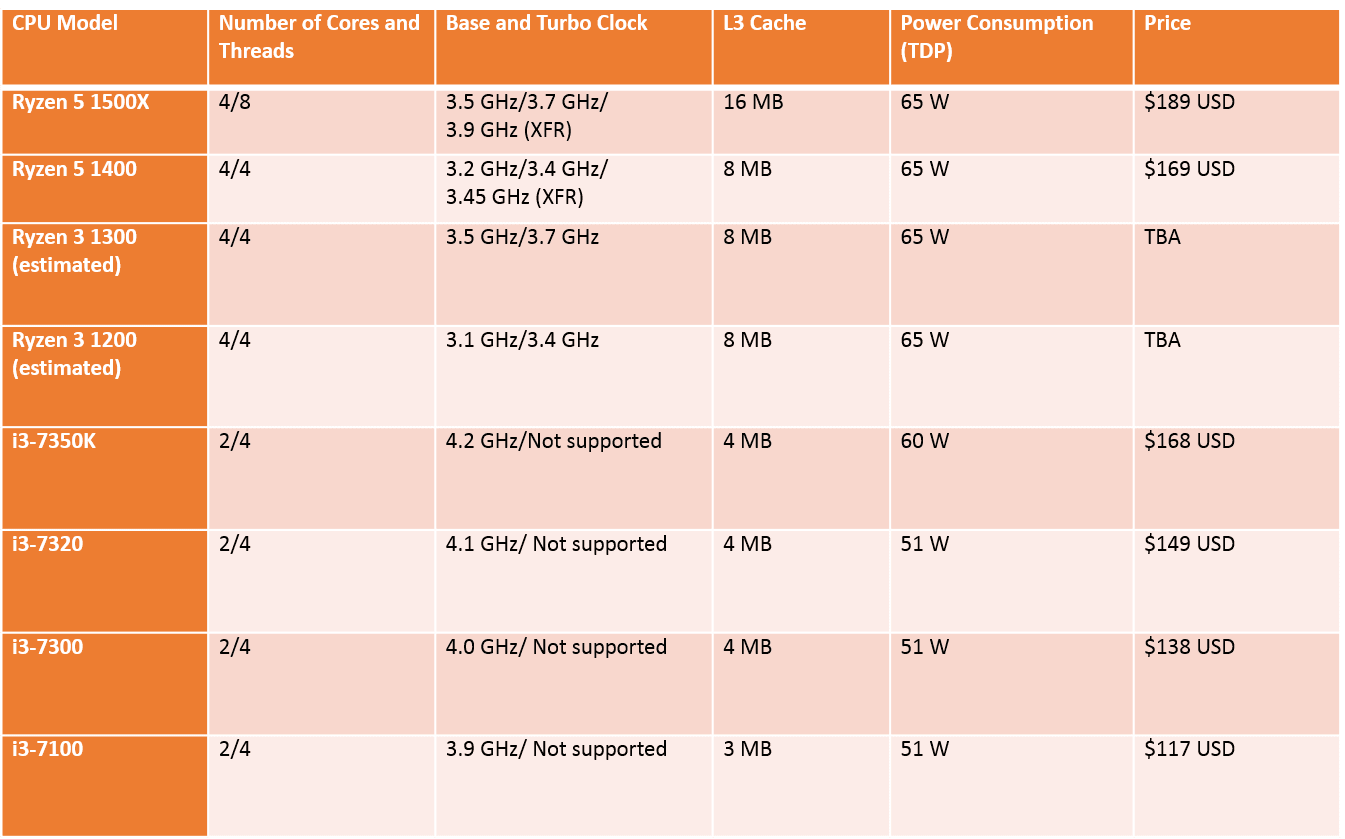
The top-of-the-line Ryzen 7 PRO has 8 cores and 16 threads, with base clock ranging from 3.0 GHz to 3.5 GHz and the same boost clock at 3.7 GHz. The Ryzen 5 PRO gets two models of CPUs, the 1600 and 1500. They have 6 cores and 12 threads, 4 cores and 8 threads respectively. The 4-core variant has a slightly higher base and turbo clock speed.

The most interesting part is the Ryzen 3 PRO. Intel only provides their comercial-grade capabilities, like vPro, to the Core i5 and i7 processors. AMD emphasizes that they offer the enterprise features to all 3 tiers, including the lowest Ryzen 3 PRO. The two models of Ryzen 3 PRO have 4 cores and 4 threads with the same size L2+L3 cache. The 1300 can achieve higher base and turbo clock at 3.5 GHz and 3.7 GHz, while the 1200 at 3.1 GHz to 3.4 GHz.


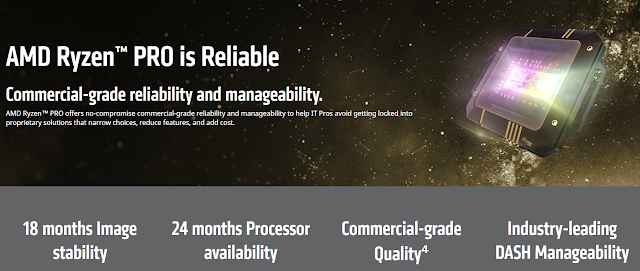
The Ryzen PRO has improved its reliability and technical support for business users. The processor itself is made to meet the long term reliability, with an extended 36-month limited commercial warranty. It ensures both the processors and its AM4 platform will be available for 24 months and 4+ years respectively. This can simplify the hardware renewal plans for companies.


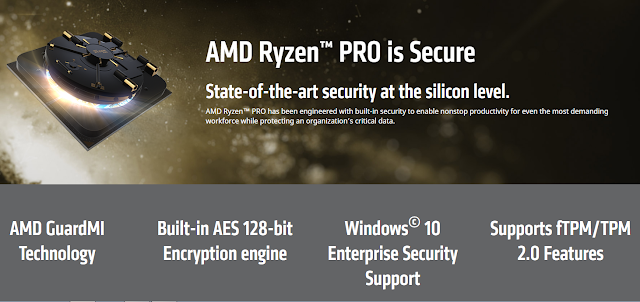
AMD has implemented a number of security technologies inside Ryzen PRO. It supports security standards like secure boot, fTPM/TPM and AES. It offers silicon-level security, starting from the assembly lines.

What can we expect from the Ryzen 3?

Since the Ryzen PRO specifications are identical to the consumer-grade Ryzen, we can estimate what AMD will equip the Ryzen 3 processors.

(Update)
Most of our assumptions and expectations about the Ryzen 3 processors are correct, according to the latest product update from AMD.

Prices shown are the MSRP


The Ryzen 3 is expected to have 4 cores, 4 threads, with SMT disabled. The Ryzen 3 1300 and 1200 will both have the same number of CPU cores and threads, 8MB of L3 cache and 65W TDP. The only difference between the two will be the clock speed. Ryzen 3 1300 will get a 3.5 GHz base clock and a boost clock of 3.7 GHz, while the 1200 at 3.1 GHz to 3.4 GHz.

The Ryzen 3 will be a direct competitor of the Intel’s Core i3 series. All of the Core i3 processors only get 2 cores and 4 threads, with 3MB to 4MB of L3 cache. Each i3 processor get a 100 MHz increase in its base clock speed, from the i3-7100 to the i3-7350K. Also, Core i3 CPUs do not support Turbo Boost.

Ryzen 3 may have a slight advantage over the Core i3 series. It has two more physical CPU cores than the i3 and doubles the size of L3 cache, which can improve multitasking. Although both of them have 4 CPU threads, the Core i3 series has only two physical cores with Hyper-threading, which is not the equal to 4 cores. I have explained that in the PC build under $700 when introducing the Ryzen 5 1500X CPU.


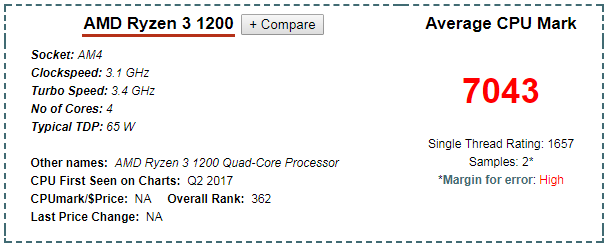
Just after AMD’s announcement of the Ryzen PRO, a PassMark benchmark result of the Ryzen 3 1200 is found. The sample’s specifications match the expected Ryzen 3 1200.


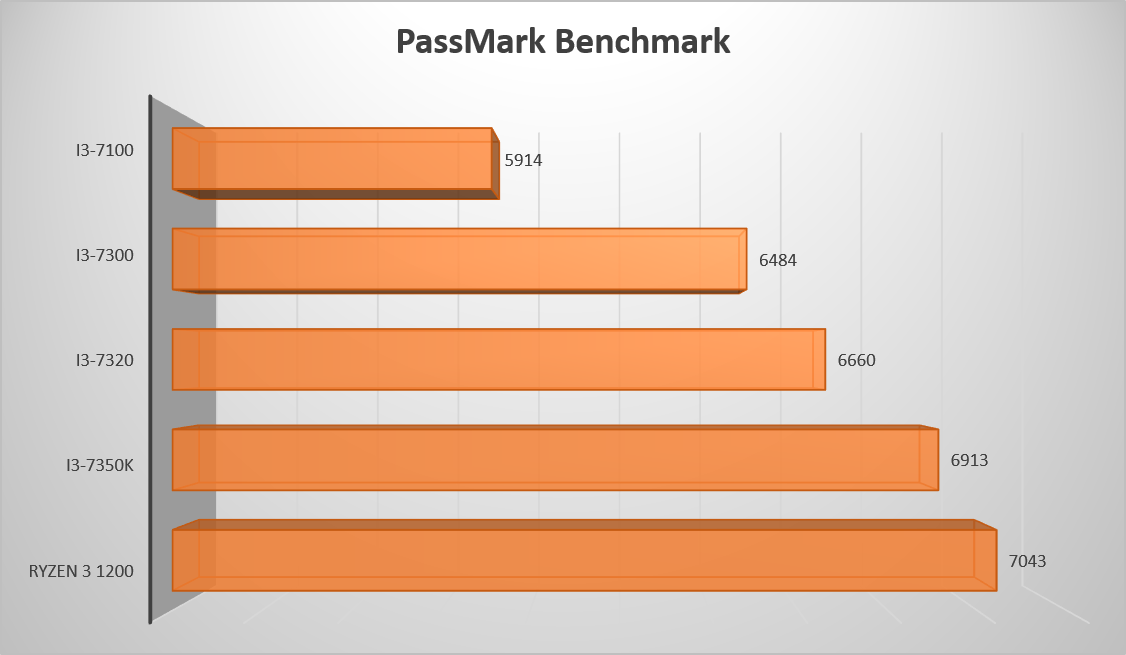
When comparing the Ryzen 3 1200 CPU with Intel’s Core i3 series, the Ryzen 3 scores marginally better. The Ryzen 3 gets a score about 1.8% better than the i3-7350K at base clock, and about 19% higher than the i3-7100. More importantly, this score belongs to the lower clocked Ryzen 3 1200. The Ryzen 3 1300 may score even higher with its 3.5 GHz to 3.7 GHz clock speed.

The Ryzen 3 seems to pack quite a punch in the performance department. With its lower price point than the already great value Ryzen 5, it will be an excellent processor for a home theater PC (HTPC) or even a network-attached storage (NAS) PC.

AMD Ryzen 3
Screen Capture from AMD


(Update)
AMD Ryzen 3 will be releasing on 27 July, 2017. There will be two Ryzen 3 models, the 1200 and  the 1300X.

Sources from wccftech.


Feel free to leave comments below, if you have any opinion about this website. Share the website around if you enjoy reading it. Subscribe to our Newsletter or follow our Google+, Facebook and Twitter.

Support this website simply by shopping in Amazon. It will give us small kickbacks, if you use the above affiliate links to make any purchases, which will help us grow.

Are SSD Manufacturers Lying about Their Drives’ Lifespan?

SSD lifespan

Solid-State-Drive (SSD) is another form of storage using NAND flash instead of magnets like Hard Drive (HDD). It is a much superior storage medium than HDD in terms of transfer speed. SSDs become more popular in the last couple years. However, flash memory inside an SSD will wear down after a certain amount of write cycles. The drive’s storage integrity will start deteriorating after that.

There are rumours about using cheaper Triple-Level-Cell (TLC) memory instead of MLC or SLC memory will increase the chance of drive failure. Do the memory types affect the lifespan of SSDs? Do the manufacturers tell the truth about their drives’ endurance?


Memory Types

SSD NAND Flash

SLC memory is the fastest and most durable one among MLC and TLC, with the benefit of consuming the least amount of power. This is important for extending the battery life of your laptop. But SLC costs the most to manufacture.

MLC memory stays in the middle at all areas, but it takes less physical space in the PCB while being able to hold more data on each flash memory chip. TLC memory are common to see in consumer-grade SSDs, due to its cheaper cost. Yet, its theoretical lower durability causes customers to back off.

Claimed Endrance?

When you are buying a SSD, the manufacturers would have a section called Terabytes Written (TBW) or Drive Writes Per Day (DWPD). What it means is a certain amount of data can be written before the drive will stop working. Most companies will stat the drive to run properly for couple years, normally about 5 years. But do all those claims correct or honest?

A German tech website, Heise, therefore started a test in June 2016 to test how durable SSDs are. They tested 6 different models of SSDs with a 250GB capacity, ranging from budget to high-end drives. Their testing methodology is simple, just keep writing data into the drives until they cannot operate anymore. On 22nd June 2017, the last SSD stopped functioning. Their results are very informative and astonishing.

SSD Lifespan

Lower priced SSDs that use TLC are claimed to have around 60 TBW, while those more expensive MLC SSD are claimed to have up to 150 TBW. In their test, all of the SSD samples reached or exceeded their claimed TBW.

Heise stated that you would be writing about 10 to 35GB to the drives per day in a normal office environment. A SSD with 70 TBW will be able to stand up to 5 years, even if you write 40 GB per day to it.

The Crucial BX200 reached 187 TBW and 280 TBW for the two identical samples, which is at least 2.5 times more than its claimed 72 TBW. The Samsung 750 EVO got up to 1.2 PBW (1200 TBW), about 17 times more. The Samsung 850 Pro has the highest 150 TBW rated endurance, but it achieved up to 9.1 PBW (9100 TBW) finally. It is about 60 times more data written. You can use the 850 Pro for 623 years theoretically.

Conclusion

You no longer need to worry about SSDs’ lifespan when you are purchasing one. Most of the manufacturers are being very conservative about their drives’ endurance. Not only those high-end SSDs have excellent durability, but also those budget ones.

With the added advantage of faster performance, it becomes more like a necessities to have a SSD in your computer, even a small-sized one for the operating system.

SSDs used in Heise’s test:

  • Crucial BX200
  • OCZ TR150
  • SanDisk Extreme PRO
  • SanDisk Ultra II
  • Samsung 750 EVO
  • Samsung 850 Pro

Sources from Heise and The WindowsClub.

Feel free to leave comments below, if you have any opinion about this website. Share the website around if you enjoy reading it. Subscribe to our Newsletter or follow our Google+, Facebook and Twitter.

Support this website simply by shopping in Amazon. It will give us small kickbacks, if you use the above affiliate links to make any purchases, which will help us grow.

Best PC Build Under $700 USD in June 2017

Best PC Build Under $700 USD
(Photo from PCPartPicker.com)

With more and more budget-friendly computer hardware available in the market, you do not need a couple thousand dollars (USD) to build a computer that can run games with impressive graphics. PC hardware are becoming more powerful and cheaper at the same time.


Therefore, with a budget of only $700 USD, you can build a computer that can run AAA games at 1080p in high to maximum graphics settings.


Please be reminded that this article is a recommendation of PC parts that meet the intended budget. You can choose what hardware or where to buy them for your actual build that satisfy your needs. Also, prices and availability of the products will change from time to time.

Processor

AMD Ryzen 5 1500X
(Photo from PCPartPicker.com)


For the heart of the build, I choose the AMD Ryzen 5 1500X. It gets a significant performance boost from its predecessors, the FX-series CPU. The 1500X is directly competing with Intel’s Core i5 series processors in the mainstream gamers’ market.

AMD Ryzen 5 1500X

In terms of specifications, the Ryzen 5 1500X has 4 cores, 8 threads, pairing with 16 MB of L3 cache. Its base clock is 3.5 GHz and can boost up to 3.9 GHz with XFR enabled. From the Core i5-7400 to i5-7600K, all have 4 cores, 4 threads, and are equipped with 6 MB of L3 cache. Their base clock speeds range from 3.0 GHz to 3.8 GHz. The i5-7600K can have turbo boost up to 4.2 GHz. Among these 5 processors, only the Ryzen 5 1500X and the i5-7600K allow users to overclock the CPU.

AMD Ryzen 5 1500X and Intel Core i5-7600K


The above Geekbench 4 scores are the average of 3 benchmark results I find on Geekbench’s website. All results are recorded at each processor’s base clock speed.

Intel Core i5 series processors have a overall better single core performance than the AMD Ryzen 5 1500X. Apart from the lower clocked i5-7400, all the Core i5 CPUs have higher single core scores than the 1500X. With the same 3.5 GHz base clock, the i5-7600 has a 17.1% advantage against the 1500X.

Due to Ryzen 5 1500X‘s higher number of CPU threads*, the 1500X’s multi-core performance ranks second among the five processors. The i5-7600K is about 10.1% faster than the 1500X in multi-core score, still beating the 1500X because of its higher base clock at 3.8 GHz.

*More number of CPU threads does not equal to more number of physical CPU cores. CPU thread is act as a data pipeline that feeds instructions to the CPU. However, the CPU can only process one thread at a time. Multi-thread technologies, like Intel’s Hyper-threading and AMD’s Simultaneous MultiThreading (SMT), let the CPU to utilize resources more effectively.

AMD Ryzen 5 1500X and Intel Core i5-7600K


The Ryzen 5 1500X strikes a great balance between performance and price. Its price-to-performance ratio is at the top in the stack with the best score per $1 USD, 75.2/$1. All the Core i5 series processors get very similar results surprisingly, at about 65/$1. The 1500X is about 17% better in this categories.

Despite the 1500X’s lower price, overclocking is still enabled by default. You can squeeze more power from the CPU. Instead of requiring a high-end motherboard to perform overclocking like Intel (Z270), you can save some money and choose between B350 or X370 motherboards that suit your budget. Also, with more CPU threads, the 1500X can do multi-tasking more efficiently, such as streaming while gaming. If you need heavy multi-tasking, the Ryzen 1600 has 6 cores, 12 threads may be a better choice.

RAM

G.Skill Ripjaws 4 series 8GB (2x4GB)
(Photo from PCPartPicker.com)


With the increased memory compatibility and updated microcode of the Ryzen CPUs, it is easier to choose what RAM to buy. This time, I select the G.Skill Ripjaws 4 series 8 GB DDR4-2400 memory. It is a 2x4GB kit to utilize the dual memory channel of the CPU and motherboard. More importantly, G.Skill is a reputable brand which the RAM has a limited lifetime warranty.

The Ripjaws 4 series is priced reasonably and you can choose higher frequency variants if you want. In certain tests, Ryzen CPUs have shown to perform slightly better with faster RAM.

Motherboard

MSI B350M GAMING PRO mATX AM4 Motherboard
(Photo from PCPartPicker.com)


To pair with the Ryzen 5 1500X processor, you will need an AM4 Motherboard. If you mainly use your computer for gaming, you will not need a lot of expansion cards and workstation features. Therefore, a mircoATX form factor motherboard will be your best choice.

The MSI B350M GAMING PRO is a B350 mATX motherboard. It has two DDR4 RAM slots, supporting dual memory channel. There are one steel-reinforced PCIe x16 slot and two PCIe x1 slots for your graphics card and other expansion cards. It has four USB 3.1 Type A and two USB 2.0 ports at the back. A 1 Gigabit Ethernet port is also included, with MSI GAMING LAN‘s features.

You can have up to four SATA3 storage devices with the addition of one M.2 slot on the motherboard. You can install high speed NVMe M.2 SSD without populating the physical PCIe slots.

The MSI B350M GAMING PRO motherboard combines usability and extra features into a budget-friendly package.

Cooling

Cooler Master Hyper 212 EVO CPU Cooler
(Photo from PCPartPicker.com)

To ensure a stable overclock for the Ryzen 5 1500X CPU, you will need more than the stock Wraith Spire cooler included in the box.

The Cooler Master Hyper 212 EVO is one of the most popular air cooler in the world for gamers. It has four 6 mm direct contact heat pipes with Cooler Master patented CDC technology. This can create up to 6% more contact surface area for better cooling performance. It already has a 120 mm fan installed by default, but it can support an optional 120 mm fan for more cooling.

The Cooler Master Hyper 212 EVO* should be able to keep the 1500X CPU cool with modest overclocking. However, if you want more cooling headroom, a 120 mm all-in-one water cooler, like the Corsair H55 or Cooler Master MasterLiquid Lite 120, is a great upgrade.

*To install on an AM4 motherboard, you will need to have the AM4 upgrade kit.


Graphics Card

Asus GeForce GTX 1050 Ti 4GB Phoenix Graphics Card
(Photo from PCPartPicker.com)


This PC build is aimed to run games mainly at 1080p, which the normal users’ monitors are at this resolution. The Nvidia GeForce GTX 1050Ti is a tremendous option with a suitable price tag.

Nvidia GTX 1050 vs GTX 1050 Ti vs GTX 1060


Without a doubt, the Nvidia GTX 1060 blows away from both the GTX 1050 and the GTX 1050Ti at all areas. It gets the highest base and boost clock speed, up to 1708 MHz. It has the most number of CUDA cores, 66.7% more than the 1050Ti and 100% more than the 1050. It can have up to 6 GB of GDDR5 memory and 192-bit memory bus.

However, the GTX 1060 is a little bit expensive when comparing with the 1050Ti and 1050. It is designed to run games at 1440p which demands more power and is overkill for 1080p gaming.

Nvidia GTX 1050 vs GTX 1050 Ti vs GTX 1060


The above results are from PassMark, which are collected with thousands of samples around the globe. As we can see, all the scores are within expectation. The GTX 1060 scores the most, at 8709. The GTX 1050Ti has 29.1% more marks than the lowest tier GTX 1050.

Nvidia GTX 1050 vs GTX 1050 Ti vs GTX 1060


All cards have a very similar price-to-performance ratio, at around 41/$1 USD. The GTX 1060 score slightly less at 35/$1 USD. The GTX 1050Ti ranks at the top.

I choose the ASUS GTX 1050Ti 4GB Phoenix because it is more than capable to run at 1080p games. ASUS is also a reputable brand with good customer service. With its 4GB of GDDR5 memory, you can turn on most of the effects and textures in games without worries. The 1050’s tiny 2GB memory will not be suitable in this case. Of course, if you are going to upgrade your monitor to higher resolution (1440p, 4K) in the near future, you should buy the GTX 1060 or even GTX 1070.

Storage

Kingston A400 120GB SSD
(Photo from PCPartPicker.com)


For the most basic storage setup, I recommend buying an solid state drive for the operating system and some frequently used applications. For huge media files and PC games, an extra hard drive can be added. This way, both transfer speed and storage capacity can be maintain without spending a fortune on a large size SSD.

Western Digital Caviar Blue 1TB 3.5" 7200RPM Hard Drive
(Photo from PCPartPicker.com)


In this build, I choose the Kingston A400 120 GB SSD and the Western Digital Caviar Blue 1TB 7200RPM HDD.

The A400 120 GB SSD can have read speed up to 500 MB/s and write speed up to 450 MB/s. The WD Blue 1 TB HDD can reach up to 150 MB/s read and write speed. They are both manufactured by a well-known company, Kingston and Western Digital. They have high customer ratings without major issues. 

To be clear, you need to make sure all the storage devices are reliable to minimize the chance of data loss. Frequent backup is also essential to keep your data safe.

Power Supply

Corsair CXM450 Semi-Modular ATX Power Supply
(Photo from PCPartPicker.com)


Power supply is critical to every PC component. A quality power supply can regulate and provide the correct voltage or current to the required parts. A bad power supply may damage electric circuits or even cause a fire.

I pick the Corsair CX450M power supply. Corsair is one of the top power supply manufacturers with high reputation that produces quality PSU in the industry. It offers a 5-year warranty for the CX450M.

The CX450M is 80 PLUS Bronze certified, which ensure up to 85% energy efficiency. Apart from that, it uses a semi-modular interface. The motherboard 24-pin and 8-pin CPU cables are permanently attached while the other peripherals cables can be removed if you do not need them. This reduces cable clutter inside the case and can have better cable management.

Case

NZXT Source 210 PC Case
(Photo from PCPartPicker.com)

NZXT Source 210 PC Case
(Photo from PCPartPicker.com)


This is purely a personal choice. I just choose the NZXT Source 210 because it is compatible with all of the above PC parts and has decent build quality.

The Source 210 has a minimalistic design with no extra styling and a side window. It is a function-oriented case. It can support up to a full-sized ATX motherboard, with three 5.25″ and eight 3.5″ drive bays.


Conclusion

Best PC Build Under $700 USD


Part List:

  • AMD Ryzen 5 1500X
  • G.Skill Ripjaws 4 series 8GB DDR4-2400 Kit
  • MSI B350M GAMING PRO
  • Cooler Master Hyper 212 EVO
  • ASUS GTX 1050Ti 4GB Phoenix
  • Kingston A400 120GB
  • Western Digital Caviar Blue 1TB 7200RPM
  • Corsair CX450M
  • NZXT Source 210

Hope this article would help some of you build your dream computer!


Feel free to leave comments below, if you have any opinion about this website. Share the website around if you enjoy reading it. Subscribe to our Newsletter or follow our Google+, Facebook and Twitter.

Support this website simply by shopping in Amazon. It will give us small kickbacks, if you use the above affiliate links to make any purchases, which will help us grow.

AMD Vega’s Performance Unveiled by Apple’s iMac Pro

Apple iMac Pro Vega
Screen Capture of Apple’s official website


Lately, more news and specifications about AMD’s next generation graphics – Vega GPU have been unveiled by different sources. For example, the Vega Frontier Edition cards’ prices are shown on couple retailers’ websites. Since Apple’s upcoming iMac Pro will be using Vega GPU, its website also provides the details of how the Vega will perform.


Apple iMac Pro Vega
Screen Capture of Apple’s official website


The GPU that will be used in the new iMac Pro are the AMD Radeon Pro Vega 56 or Vega 64. The less powerful Vega 56 GPU will be the standard configuration. You can upgrade to the Vega 64 if you need more memory and performance.

Apple iMac Pro Vega
Screen Capture from Apple’s official website


The Radeon Pro Vega GPUs have the similar specifications to the Vega Frontier Edition. The Vega 56 has 56 compute units and 3584 stream processors. Pairing with 8 GB of HBM2 memory and 400 GB/s memory bandwidth, it can generate about 11 teraflops and 22 teraflops of performance in single precision (FP32) and half precision (FP16) respectively.

The higher end, Vega 64, has 64 compute units and 4096 stream processors. It doubles the amount of VRAM to 16 GB of HBM2. In terms of performance, it can have about 13 teraflops in single precision and 25 teraflops in half precision. The memory bandwidth of the Vega 64 is still unknown.


Sources from appleinsider and wccftech.


Feel free to leave comments below, if you have any opinion about this website. Share the website around if you enjoy reading it. Subscribe to our Newsletter or follow our Google+, Facebook and Twitter.

Support this website simply by shopping in Amazon. It will give us small kickbacks, if you use the above affiliate links to make any purchases, which will help us grow.

AMD Vega Frontier Edition’s Prices Revealed

AMD Vega Frontier Edition
AMD Vega Frontier Edition (Photo from Radeon Pro official website)


AMD has been teasing their next generation flagship – Vega for a long time. People do not know much about the specifications of the lineup, only some scattered rumours around the Internet. Until a couple weeks before, AMD introduced the Vega Frontier Edition cards, which are for 3D-rendering, machine learning and other computational tasks. Now, retailers from UK and US have revealed the price of the Vega Frontier Edition cards, and available to order.

AMD Vega Frontier Edition
AMD Vega Frontier Edition Air Cooled (Photo from Sabre PC website)

AMD Vega Frontier Edition
AMD Vega Frontier Edition Liquid-Cooled (Photo from Sabre PC website)


In Sabre PC website, the AMD Vega Frontier Edition Air-cooled card is priced at $1199 USD. The liquid-cooled version is $600 USD higher at $1799 USD. Both of the cards seems to be in stock and available to order. (in June 2017)

AMD Vega Frontier Edition


Although both cards are not at the same priced, they are in fact nearly identical in terms of specifications. Either the Vega Frontier Edition Air-cooled or the Liquid-cooled variant have the same number of Render Output Units (ROP), Stream Processors, Memory Size, Memory Type, Memory bandwidth and output ports. The only difference between the two cards is the slightly higher power consumption (TDP) of the Liquid-cooled card.

The AMD Vega Frontier Edition cards are not for gaming. The RX VEGA will be coming to the gaming market later with even higher performance (AMD claims that) and a cheaper price tag. However, we still do not have the exact specifications or release date of the product.


Apple iMac Pro will also be equipped with AMD Radeon Pro Vega GPUs.


Feel free to leave comments below, if you have any opinion about this website. Share the website around if you enjoy reading it. Subscribe to our Newsletter or follow our Google+, Facebook and Twitter.

Support this website simply by shopping in Amazon. It will give us small kickbacks, if you use the above affiliate links to make any purchases, which will help us grow.

Every tech you don’t want to miss in Computex 2017

Computex 2017
(Photo from Computex Taipei official website)


COMPUTEX Taipei is one of the largest computer hardware expo in the world. Tons of new technology and gadgets are released. It also provides us a glimpse of how technology will evolve in the future. There are quite a lot to talk about in Computex 2017.


Intel: Release of the long-waited Skylake-X, Kaby Lake-X and its X299 platform

Intel Core i9 processors
Core i9 series (Photo from Intel Official website)

In order to combat the rising competitiveness of the AMD Ryzen CPUs in both performance and price, Intel has released a brand new lineup of CPUs, which is called Core i9, in their existing extreme series processors (Core X-series).

The latest high performance series consists of the Kaby Lake-X quad-core Core i5 & Core i7, and Skylake-X Core i7 & Core i9 processors. The whole series can have multiple physical processing cores from 4 up to 18. Most of the CPUs support quad-channel DDR4 memory, except for the quad-core variants which only support dual-channel. They provides a number of PCI Express lanes from 16 up to 44. Their power consumption also increase greatly from 112W to 140W or higher. 

All of the latest Core X-series processors uses the newly introduced LGA 2066 socket and X299 chipset, instead of the old LGA 2011 v3 and X99 chipset.

Intel Core i9 processors
Core i9
Intel Core i7 and Core i5 processors
Core i7 and Core i5

It is expected that Intel will do something to respond to what AMD Ryzen has offered to the CPU market. The top level Core i9 series is a very reasonable move to compete with AMD by increasing the CPU core counts even further from last generation (Broadwell-E) 10-core i7-6950X to now 18-core i9-7980XE. This will help maintain the advantages for Intel in the professional workstation market

However, what Intel do with the two Skylake-X quad-core i7-7740X and i5-7640X are really confusing. Not only do they have just 4 cores/8 threads, but they only have 16 PCIe lanes and dual-channel memory support. Apart from the slightly higher base and turbo boost clock speed (0.1 Ghz for the i7 and 0.2 Ghz for the i5), they are no difference between the consumer level Core i7-7700K and Core i5-7600K, even without internal Intel HD Graphics to benefit from technology like Intel Quick Sync (to speed up video transcoding using internal GPU). More importantly, they need to pair with a much more expensive X299 motherboard, but still cannot use any extra features due to the lack of PCIe lanes. Why would Intel do this to hinder their own sales of lower end CPUs?

Intel Core X-series prices
Core X-series prices (MSRP)


In this generation, you can buy the processors with less money when comparing with the last generation. The prices of the 10-core to 6-core variants are about 50% to 60% cheaper than those in Broadwell-E.

You can now order most of the Intel Core-X processors in June 26.

AMD: Attack on the high-end enthusiast market with Threadripper


Although the AMD Ryzen 7 series packs quite a punch in performance, it is only a direct competitor to the Intel Core i7 series. AMD still lacks any meaningful shares in the high-end enthusiast or workstation market. Therefore, here it comes – Threadripper.

According to current information from AMD, Threadripper processors can have up to 16 cores and 32 threads. It can also support up to 2 TB of RAM with quad-channel capability. There will be a 16-core and 12-core versions. They will support up to 64 PCI Express lanes.

The CPUs will use a brand new socket called TR4, which is a LGA (land grid array) socket with 4094 pins (the first time since 2010 with the Socket G34). Along with Socket TR4, Threadripper will need to pair with the new X399 chipset.

No pricing for Ryzen Threadripper is officially announced by AMD at this time. However, it is expected to be released in summer 2017.

Phanteks: Bringing tempered glass to the mainstream

Phanteks P300 case
Phanteks Eclipse P300 case (Photo from Phanteks Official Facebook Page)


It is even more exciting to see companies pay more attention in developing new products that bring some of the high-end features to the mainstream, but at the same time do not break everybody’s bank. This is what Phanteks has done to their new budget case – Eclipse P300 with a tempered glass side panel.


The P300’s styling is very similar to the existing P400 case, with a simple industrial design. There are two intake vents at the front panel, one at the top and bottom respectively. There are two USB 3.0 ports and audio jacks on the top. The interior is very open and simple with suitable cutouts for tidy cable management. Fan filters are included for both the front intakes and the top 140 mm fan mount. The overall interior design is similar to the Eclipse P400 and NZXT S340 cases.

The tempered glass is tinted along the perimeters to prevent seeing the case edges when installed. It only covers the upper part of the case up to the power supply cover to reduce material costs.

The Eclipse P300 only costs $59 USD (MSRP), which is cheaper than the NZXT S340 without a tempered glass side panel.

Cooler Master: Higher quality peripherals in budget-friendly price tags

Cooler Master MasterSet 120
CM MS120 (Screen Capture of a video from Cooler Master Official Facebook Page)

The Cooler Master MasterSet 120 brings a more appealing design than the already very decent MasterKey Lite L Combo RGB.

The MS120 continues with the minimal industrial design language. With a more comfortable, slightly tilted shape of the keyboard frame, the MS120 should theoretically help reduce wrist stress while typing even without the need of a wrist rest. Also, it now comes with individual RGB backlight for every single keycap, replacing the five-zone RGB lighting. The keyboard still uses the Cooler Master Mem-chanical hybrid switches to provide actuation similar to Cherry MX Blue.

This combo also includes a new mouse with a more ergonomic design and three-zone RGB lighting. It has an Avago optical sensor which has a maximum of 3500 DPI. The mouse can also be bought separately as the MM520.

The MasterSet 120 will be priced at $89.99 USD (available in July 2017) , which is a price bump to the MasterKey Lite L Combo. However, the MS120 has an improved design and some added features, that still maintain a high price-to-performance ratio.

EVE: A crowd-developed Surface Pro “Killer”

EVE V
EVE V (Photo from EVE V Indiegogo website)

The EVE V is the first-developed computer, according to EVE. They collect results and feedback from the community to create a computer that the consumer would like to use.

The V is a hybrid tablet with a detachable keyboard, running on Windows 10 Home or Pro. It has a 12.3 inches IGZO LCD screen with a resolution of 2736×1824. In terms of performance, the V meets what the current premium computers do. It can have a Intel 7th gen Core m3, i5, or i7 CPU, paired with 8 to 16 GB RAM and up to 512 GB SSD.

What the EVE V shines is the I/O. It has two full-size USB 3.0 ports, one 3.5 mm audio jack. It also gets two USB-C ports, one is USB 3.0 Gen 1 and the other one supports thunderbolt 3. The lack of USB-C even on the new Surface Pro 5 makes the V more “future-proof” in the I/O department.

The EVE V will be pretty powerful and feature-packed. Not only does it has high resolution screen and high performance CPUs, but also has implemented a fingerprint scanner on the power button and a quad-speaker array with dedicated headphone jack amplifier.


InWin: New material to make a case – Wood

InWin 806 case
InWin 806 case (Photo from InWin USA Official Facebook Page)

It is not rare to see DIY guide in the Internet of people making their own computer cases out of wood. Yet, there is seldom a big case manufacturer that uses wood to mass produce their cases. InWin shows its approach in making their own wood PC cases in Computex 2017.

The InWin 806 uses the wood as the top and front panels of the case. The polished wood is bent seamlessly in one piece to give the case a rather modern look. Pairing with a tempered glass panel to show the internal components, the 806 does not look that much different when comparing with other cases.

InWin also has other design with different implementation of the material. It is interesting to see manufacturers to try new materials and technologies, which can definitely help evolve the cases’ designs over time.

Related Websites


Feel free to leave comments below, if you have any opinion about this website. Share the website around if you enjoy reading it. Subscribe to our Newsletter or follow our Google+, Facebook and Twitter.

Support this website simply by shopping in Amazon. It will give us small kickbacks, if you use the above affiliate links to make any purchases, which will help us grow.

Unboxing and Review of Cooler Master Blizzard T2 CPU Cooler

Cooler Master Blizzard T2 CPU Cooler

If you are not planning to overclock your CPU, or do not have the required hardware (K-series CPUs and Z-series motherboard chipsets for Intel), you will probably use the stock cooler included in the box.

The stock cooler, whether from Intel or AMD, will do a reasonable job to keep your CPUs cool enough under 100°C (TJ. max) with the trade-offs of both higher noise and lower cooling headroom. Is a budget air cooler, like the Cooler Master Blizzard T2, worth its money to replace the stock cooler?


Unboxing

Cooler Master Blizzard T2 CPU Cooler

Cooler Master Blizzard T2 CPU Cooler

The package outlines the features of the product in multiple languages. The specifications of the cooler are also printed on the box, such as the dimensions and supported sockets.

Cooler Master Blizzard T2 CPU Cooler

Cooler Master Blizzard T2 CPU Cooler

Mounting hardware, Screws, Thermal grease, User Manual and Warranty Card

The Blizzard T2 can support both Intel and AMD’s sockets, two different mounting hardware are included. They are designed to use like the stock cooler with push pins and latches. 4 screws are packed along with a one-time use thermal grease in a zipper bag. The screws are used to secure the Intel mounting plates on the cooler.

Review

Cooler Master Blizzard T2 CPU Cooler

Design

The Cooler Master Blizzard T2 is a budget air cooler that aims to provide better and quieter performance than stock coolers. Even with its low price tag, the cooler still some special tricks under its sleeves.

Cooler Master Blizzard T2 CPU Cooler

Cooler Master Blizzard T2 CPU Cooler

The Blizzard T2 has a patented Dual Loop design to increase heat transfer. The two 6 mm heat pipes form two loops through the aluminium fin array. The heat pipes do not end at the top of the heat sink like other normal coolers do. They wrap around and end at the base, which doubles the contact area for the heat pipes.

Cooler Master Blizzard T2 CPU Cooler

The two heat pipes are flattened and polished to form the direct contact cooper base.

Cooler Master Blizzard T2 CPU Cooler

A 92 mm fan is used in the Cooler Master Blizzard T2. This fan can spin up to 2200 RPM, creating 43 CFM of airflow and 2.2 mm H2O of air pressure. The fan performs very reasonable for a small diameter fan, and without making too much noise. However, this fan does not support PWM fan control with its 3-pin fan header. Anti-vibration rubber pads can be found on the inside of the fan frame.

Installation

Cooler Master Blizzard T2 CPU Cooler

The included mounting brackets are easy to use. They use the same push pins system to secure the cooler, which also makes the cooler compatible with almost every platforms (sockets).

For Intel, you just use the four screws to secure the mounting brackets. Then, you can apply the bag of thermal paste to the CPU (pea method or line method). Unfortunately, the thermal paste comes in a bag instead of a needle, making it slightly harder to control. Finally, you can align the cooler and push the four pins in a diagonal order.

It is even simpler for AMD, no screw is needed. You need to put the mounting latch into the ridges in the middle of the base. Then, you can push down the lever to secure the cooler after applying the thermal paste.

Cooler Master Blizzard T2 CPU Cooler

Remember to peel the protective plastic cover off before applying the thermal paste and plug the fan into the motherboard after securing the cooler.


Performance

Cooler Master Blizzard T2 CPU Cooler

We need a baseline reading for how good the stock cooler can do. For testing the Cooler Master Blizzard T2, I compared it with the Intel LGA775 stock cooler to see the performance difference.

Cooler Master Blizzard T2 CPU Cooler

Test Bench:
  • Case: Cooler Master Testbench V1.0 (its review here)
  • Motherboard: Magic-Pro MP-G31-MSS
  • CPU: Intel Pentium E5400
  • RAM: Kingston DDR2-800 2GB
  • Cooler: Intel LGA775 stock cooler/Cooler Master Blizzard T2

This test bench is made out of the spare computer components lying around, so it is not quite up-to-date. However, the Intel Pentium E5400 is a 65W TDP CPU. To generate maximum heat from the CPU, all the tests are based on the System Stability Stress Test in AIDA64. For CPU cooler, both the CPU, FPU and cache will be stressed. Also, all the tests were performed in full fan speed unless stated otherwise to show the maximum performance potential of each cooler.

Cooler Master Blizzard T2 CPU Cooler

As the chart shows, the Intel stock cooler can keep the CPU under control in slightly less than 60°C in full load.

Cooler Master Blizzard T2 CPU Cooler

For the Cooler Master Blizzard T2, the idle temperature is similar to the stock cooler, but it starts to shine when in full load. It keeps the CPU under 50°C without any problem.

Cooler Master Blizzard T2 CPU Cooler

To test the heat sink performance, the fan is completely switched off. (Strongly NOT recommend) The idle temperature shows no difference at all, but the load temperature rises up to little over 70°C. This is in fact quite impressive with a dual heat pipes air cooler to keep the CPU well below 100°C without any airflow.

Conclusion

Cooler Master Blizzard T2 CPU Cooler

Cooler Master Blizzard T2 CPU Cooler

In terms of idle temperature, both the Cooler Master Blizzard T2 and the Intel LGA775 stock cooler perform similarly at around 27°C. The Blizzard T2 has a slight 8.3% lower idle temperature for CPU package.

The Blizzard T2 beats the Intel stock cooler by a large margin in load temperature. For CPU package, the Blizzard T2 has 23.4% lower temperature at 47°C. Also, the Blizzard T2 has 23.9% lower temperature at 46°C in the hottest core.

Overall, Cooler Master Blizzard T2 has over 20% improvement when comparing to the Intel stock cooler. This makes the Blizzard T2 a very reasonable budget air cooler. You can achieve the same or better performance of the stock cooler in lower fan speed (equals quieter performance). With its low price tag, I recommend the Cooler Master Blizzard T2 as a nice replacement to the stock cooler.

Feel free to leave comments below, if you have any opinion about this website. Share the website around if you enjoy reading it. Subscribe to our Newsletter or follow our Twitter, Facebook and Instagram.

Support this website simply by shopping in Amazon and Newegg. It will give us small kickbacks, if you use the above affiliate links to make any purchases, which will help us grow.

Unboxing and Review of the Cooler Master Test Bench V1.0

Cooler Master Test Bench V1.0

An open air test bench will be a handy tool if you have to change your hardware very frequently for some reasons (engineers, PC overclockers, etc) or you just want to show off your computer’s component to everyone. A test bench allows you to have direct access to the PC, speeding up your working processes.

This time, I will review the Cooler Master Test Bench Lab V1.0. Cooler Master released this test bench in 2009. It is pretty hard to get hands on one now because of the 8 years long sales period. Not many stores have the test bench available on stock, leading to a much higher price. You may need to pay more for ordering and shipping from other countries. Keep that in mind if you want to get one.


Unboxing

Cooler Master Test Bench V1.0
Brown Cardboard Package of the Test Bench V1.0

The test bench is shipped inside a big brown cardboard box. There is a specifications list on the side, indicating the compatible motherboard sizes, power supply standards and the drive options. On the other side, there are pictures showing the test bench itself and the look after installing everything on it.

Cooler Master Test Bench V1.0

After opening the box, the Cooler Master Test Bench V1.0 is neatly and safely packed inside with soft foam at each corner. There are not much accessories given out of the box. There is no user manual and warranty card. All the necessary screws and standoffs are included in one plastic zipper bag.

Cooler Master Test Bench V1.0
Included screws and motherboard standoffs

There are total 4 types of screws and standoffs.

  • 8 6-32 UNC screws for mounting the power supply
  • About 20 M3 screws for mounting everything, like HDD, SSD and the standoffs.
  • 9 plastic motherboard standoffs for tool-less mounting/li>
  • 4 metal motherboard standoffs

It is appreciated that Cooler Master has included more than enough screws in the bag, but why only 4 metal standoffs? 9 standoffs are needed for a full-sized ATX motherboard. This limits the option for people to secure their motherboards using screws only.

Review

Cooler Master Test Bench V1.0

Design

The Cooler Master Test Bench V1.0 is made out of black coated sheet steel (SECC), which feels pretty rigid and strong. It does flex a little bit above the power supply mount when pressing down on the frame, due to lack of vertical support at that point. However, this does not affect the overall building experience at all.

Cooler Master Test Bench V1.0

Cooler Master Test Bench V1.0
Power Supply’s Fan Cutout
Cooler Master Test Bench V1.0
Large Anti-Slip Rubber Feet at the bottom

The test bench has a very minimalistic design style with appropriate cutouts for cable management, motherboard backplate installation. With large circle cutout and high anti-vibration rubber feet on all four corners, ample ventilation is provided for the power supply. There are only the “Cooler Master Lab” logos on the chassis, which is not exactly the product name. It is a little confusing.

The Cooler Master Test Bench V1.0 support ATX, m-ATX, Mini-ITX, Pico-ITX, Nano-ITX motherboard. It is very efficient in the use of space. The whole chassis is slightly larger than a full-sized ATX motherboard, with only the mountings for necessary parts to run a system.

Cooler Master Test Bench V1.0

An on/off switch and a reset switch are included, which not every motherboards on the market have their own power buttons on the board itself.

The test bench has reasonable drives mounting options. It supports one 5.25 inch, one 3.5 inch, and one 2.5 inch drives. Or one 5.25 inch and two 2.5 inch drives. It provides a lot of flexibility while packing them into a compact chassis. Although it does not have much drives expandability, large storage capacity is not required for test bench. It is not designed to use like a workstation or server.

Mounting Methods and Options

Cooler Master Test Bench V1.0

Motherboard

Cooler Master Test Bench V1.0

For the Cooler Master Test Bench V1.0, you can use either the plastic or metal standoffs to mount the motherboard, but only 4 metal standoffs are included.

Cooler Master Test Bench V1.0

The plastic standoffs are in fact very convenient if you have to swap motherboard often. The standoffs are tool-less, so you can just press the board in place. They can hold the motherboard with no problem. You can pick up the whole test bench by grabbing the motherboard with the plastic standoffs. (NOT recommend)

However, the plastic standoffs are not in very high quality. Its plastic does not feel very strong and can easily break. A thicker base at the bottom of the standoffs can solve this small issue. Or simply provide a few extra standoffs in the box, in case they break.

PCIe Expansion Slots

The Cooler Master Test Bench V1.0 does not have the support for expansion cards. The installed card will wobble, which makes you harder to firmly plug the cables without holding the card itself. This may cause bigger problem if you are installing a large, full-length graphics card. You need to be careful not to put too much stress on the card when working on the machine.

Cooler Master Test Bench V1.0

To install any drives, you need to use the standard M3 screws. No tool-less mounting solution is provided. For most of the time, the mounting process is normal and does not have any special problems. However, if you are mounting drives to the bottom like I did in the above photo, it is hard to get the screws in the bottom of the chassis. Also, there are no anti-vibration rubber grommets if you opt to use mechanical hard drives.

Cooling

If you want to have extra cooling for your motherboard components (VRM, Ram, etc.) or multiple graphics cards, you would be disappointed. The Cooler Master Test Bench V1.0 does not have any extra fan, all-in-one liquid cooler and radiator mounts. In my opinion, at least one fan mount should be included. The mount can be implemented as a flexible arm for fans and small AIO coolers, like what the Dimastech do to their test benches. It will allow users to choose to cool any specific areas on the motherboard.

Power Supply

Cooler Master Test Bench V1.0

Cooler Master Test Bench V1.0

The power supply is firmly secured by three 6-32 UNC screws. The power supply sits flat to the chassis. However, I think the power supply mount should be reversed. The distance of the 24-pin connector and the cables of the PSU is too great. If your 24-pin cable is not long enough, you will have to route the cable over the motherboard, like I did. This problem will be worsen if you have a wider ATX motherboard. Though, you can route the cables underneath the motherboard to reach connectors at further distance.

Cooler Master Test Bench V1.0

Apart from that, the current power supply mounting makes the power cable comes out in the front, where the power and reset switches sit, opposite to the I/O ports of the motherboard. This makes there are cables sticking out in different directions, which is not good for tidy cable management.

User Experience
Cooler Master Test Bench V1.0
The Indications of The Switches Are Reversed

In my test bench, the cables of the on/off switch and reset switch are not connected correctly. The power switch cables are connected to the reset switch plug, while reset switch cables are connected to the power switch plug. This is not a big deal, but it costs me time to figure out what happened.

It is easy to install all the PC components and get everything working. The chassis is made out of high quality steel and feels very rigid. It would be a welcome change to include a quick start guide or user manual in the package. There is no user manual even on the Cooler Master product page. It would not be a problem for experience users, but it is still nice to have one.

Conclusion

Unboxing Treatment Recommendation

The Cooler Master Test Bench V1.0 provides an acceptable platform for users to work on their PC hardware with ease. The test bench is in great build quality with some accessories requiring tighter quality control.

A Cooler Master Test Bench V1.1/2.0 would be a great product to improve the user experience based on the existing one.

  • Higher quality tool-less standoffs. Use metal as material will be the best.
  • Add tool-less mounting solutions for drives.
  • Better cable management solution. A more reasonable placement of the power supply will be helpful. A slightly bigger frame to accommodate the cutout for full-sized ATX motherboard, as the existing cutout will be blocked by the board itself.
  • Add support to PCIe expansion cards for a more secure mounting.
  • Add a flexible arm for extra cooling capability. It will be more versatile if AIO coolers and radiators can be fitted.

For more information about the test bench, you can visit Cooler Master website.


Feel free to leave comments below, if you have any opinion about this website. Share the website around if you enjoy reading it. Subscribe to our Newsletter or follow our Google+, Facebook and Twitter.

Support this website simply by shopping in Amazon. It will give us small kickbacks, if you use the above affiliate links to make any purchases, which will help us grow.

Follow Us on Social Media

583FansLike
635FollowersFollow
494FollowersFollow
1,494FollowersFollow
43SubscribersSubscribe

More Articles