As Android 8.0 Oreo finally arrived with numerous new improvements, the big question for every Android users appears again. Every year when the latest software version is released, people want to know if their existing smartphones would be able to update. We have created a list of compatible Android devices, that their manufacturers would provide update to Android 8.0 Oreo.
ASUS confirms that both their ZenFone 4 and ZenFone 3 series will get Android 8.0 updates with the new ZenUI 4, in the ZenFone 4 launch event. It is expected to deliver by the second half of 2018.
ASUS ZenFone 4
ASUS ZenFone 4 Pro
ASUS ZenFone 4 Max
ASUS ZenFone 4 Max Pro
ASUS ZenFone 4 Max Plus
ASUS ZenFone 4 Selfie
ASUS ZenFone 4 Selfie Pro
ASUS ZenFone 3
ASUS ZenFone 3 Ultra
ASUS ZenFone 3 Deluxe
ASUS ZenFone 3 Zoom
ASUS ZenFone 3 Max
ASUS ZenFone 3 Laser
ASUS ZenFone AR (not confirmed)
BlackBerry
The only flagship phone from BlackBerry will also be able to update to 8.0.
BlackBerry KEYone
Essential
The newly established phone company promises to have Android OS updates for 2 years. We can definitely expect Android 8.0 Oreo to come on its near stock-Android phone.
Essential Phone PH-1
HTC
A tweet from HTC USA confirms that Android 8.0 Oreo is coming to recently launched HTC phones.
HTC U11
HTC U Ultra
HTC 10
OnePlus
Oneplus’s reply on Reddit promises to receive Android O updates by the end of 2017. With its previous track record, we can expect pretty fast updates.
OnePlus 5
OnePlus 3T
OnePlus 3
Motorola
We can expect Android 8.0 updates for phones that are not more than 2 years old. Motorola does not announce any official statements about the updates yet.
Moto Z2 Play
Moto Z2 Force
Moto Z
Moto Z Play
Moto G5
Moto G5 Plus
Moto E4
Moto E4 Plus
Moto C
Moto C Plus
LG
LG also has not been announcing their updating timetable for Android 8.0. However, we can expect most flagship models are getting the latest updates.
The CPO of HMD Global (Nokia’s affiliate company to sell phones) replied to a tweet that confirms Android O update of the Nokia 3. It would be reasonable to also update the higher-end models in the Nokia lineup.
Nokia 8
Nokia 6
Nokia 5
Nokia 3
Sony
We do not have any information confirmed by Sony about the Android 8.0 updates. According to the leak from Gazyekichi, it suggests most high-end models are the receiving updates.
Sony Xperia XZ Premium
Sony Xperia XZs
Sony Xperia XZ
Sony Xperia X
Sony Xperia X Performance
Sony Xperia X Compact
Sony Xperia XA1
Sony Xperia XA1 Ultra
Sony Xperia L1
Samsung
No official announcement from Samsung, but we can expect their top-tier models to have Android 8.0 updates.
Google has been improving the delivery of their software updates, working closely with the smartphone manufacturers. Most compatible phones will be receiving their updates by the end of 2017 or early 2018.
Feel free to leave comments below, if you have any opinion about this website. Share the website around if you enjoy reading it. Subscribe to our Newsletter or follow our Google+, Facebook and Twitter. Support this website simply by shopping in Amazon. It will give us small kickbacks, if you use the above affiliate links to make any purchases, which will help us grow.
In early August, the long-waited AMD’s Threadripper processors, 1920X and 1950X, were finally available for everyone to purchase. This is the first move for AMD to take on the high-end desktop (HEDT) processors, PC enthusiasts market. Moreover, AMD announced a new member in the Threadripper lineup in late July, the 1900X. It is a 8 cores, 16 threads CPU that fits in the more powerful X399 chipset. Now, it is opened for sale in India, which is slightly earlier than the expected release date (31 August).
Prices shown are the MSRP
The Threadripper 1900X is of course using the same TR4 CPU socket like the 1920X. Same as the mainstream Ryzen 7 1700X and 1800X, it has 8 cores, 16 threads, paired with 16 MB of L3 cache. The main difference between the three processors are clock speed, memory channel setup, and number of PCIe lanes. The Threadripper 1900X is equipped with 64 PCIe lanes and quad-channel memory. It is clocked a little higher in the base frequency at 3.80 GHz. You may want to know why pay more to get the same 8-core CPU (1900X). Although the Threadripper 1900X has the same number of cores and threads as the Ryzen 7 CPUs, you can get more than double the amount of PCIe lanes and quad-channel memory support. It is extremely helpful for people requiring tons of expansion cards, such as graphics cards and PCIe NVMe SSDs. You can utilize those add-in cards with more flexibility, without the need to purchase more CPU cores than necessary and more power consumption. In the India’s online computer hardware store, PrimeABGB, the Threadripper 1900X is priced at ₹45,699 (Indian Rupee), which is equal to about $715 USD. The price is much higher than the MSRP. This may due to higher profit margins of retailers and taxes. The other two Threadripper processors are also priced pretty high at ₹65,488 (1920X) and ₹82,999 (1950X) respectively. Sources from PrimeABGB and TechPowerUp. Feel free to leave comments below, if you have any opinion about this website. Share the website around if you enjoy reading it. Subscribe to our Newsletter or follow our Google+, Facebook and Twitter. Support this website simply by shopping in Amazon. It will give us small kickbacks, if you use the above affiliate links to make any purchases, which will help us grow.
When everyone in the United States was waiting to see the total solar eclipse on 21 August 2017, Google officially launched their latest Android operating system. It is called Android 8.0 Oreo. At the same time, compatible Google’s Pixel and Nexus devices will be receiving the updates very soon.
This version of Android is mainly focusing on behind-the-scenes updates, with a little visual changes to the user interface (UI). For example, the system will now limit how background applications operate. It hopes to prevent applications to keep pulling data in the background unnecessarily and consume precious battery life. New Google Play Protect is available to scan any harmful activities inside your applications. It is aimed to stop your devices, data, and applications from compromising. The main UI changes are in the settings application and the notification drawer. The whole UI is still using material design. The settings app has been reorganized completely with a new black and white colour theme. It gets a lot less sub-menus and a more compact list of settings. Everything is a little bit cleaner and simpler, which is easier for users to navigate around. A picture-in-picture mode is also supported for users to run two applications simultaneously. It is not only limited to Google’s applications, but also other third-parties applications. A “new” adaptive notification dots feature is added to Android 8.0 Oreo. It is similar to what Apple iOS’s notification badge offers. It shows a dot at the top right corner of the applications’ icons, when notifications come. There are more background tweaks and features inside Android 8.0 Oreo, such as better auto-fill support, notification channels and redesigned emojis. You can check out Android’s Developers website to know more, and our compatible devices list to see if you can update to Android 8.0 Oreo.
Source from Google Android. Feel free to leave comments below, if you have any opinion about this website. Share the website around if you enjoy reading it. Subscribe to our Newsletter or follow our Google+, Facebook and Twitter. Support this website simply by shopping in Amazon. It will give us small kickbacks, if you use the above affiliate links to make any purchases, which will help us grow.
In today’s world, we rely more heavily on artificial intelligence to complete human-like actions. For example, there are Google’s board game AI (AlphaGo), Tesla self-driving cars, and Autopilot in airplanes. AI has already been widely using in our daily life, which is a lot more popular than most people think. Your smartphones, cars, and houses have implemented machine learning to do the assigned tasks.
However, normal AI with complex neural networks requires developers to have advanced coding knowledge and skills. Now (August 2017), Sony may be able to remove this limitation by releasing a neural network design tool with a simple graphical user interface (GUI).
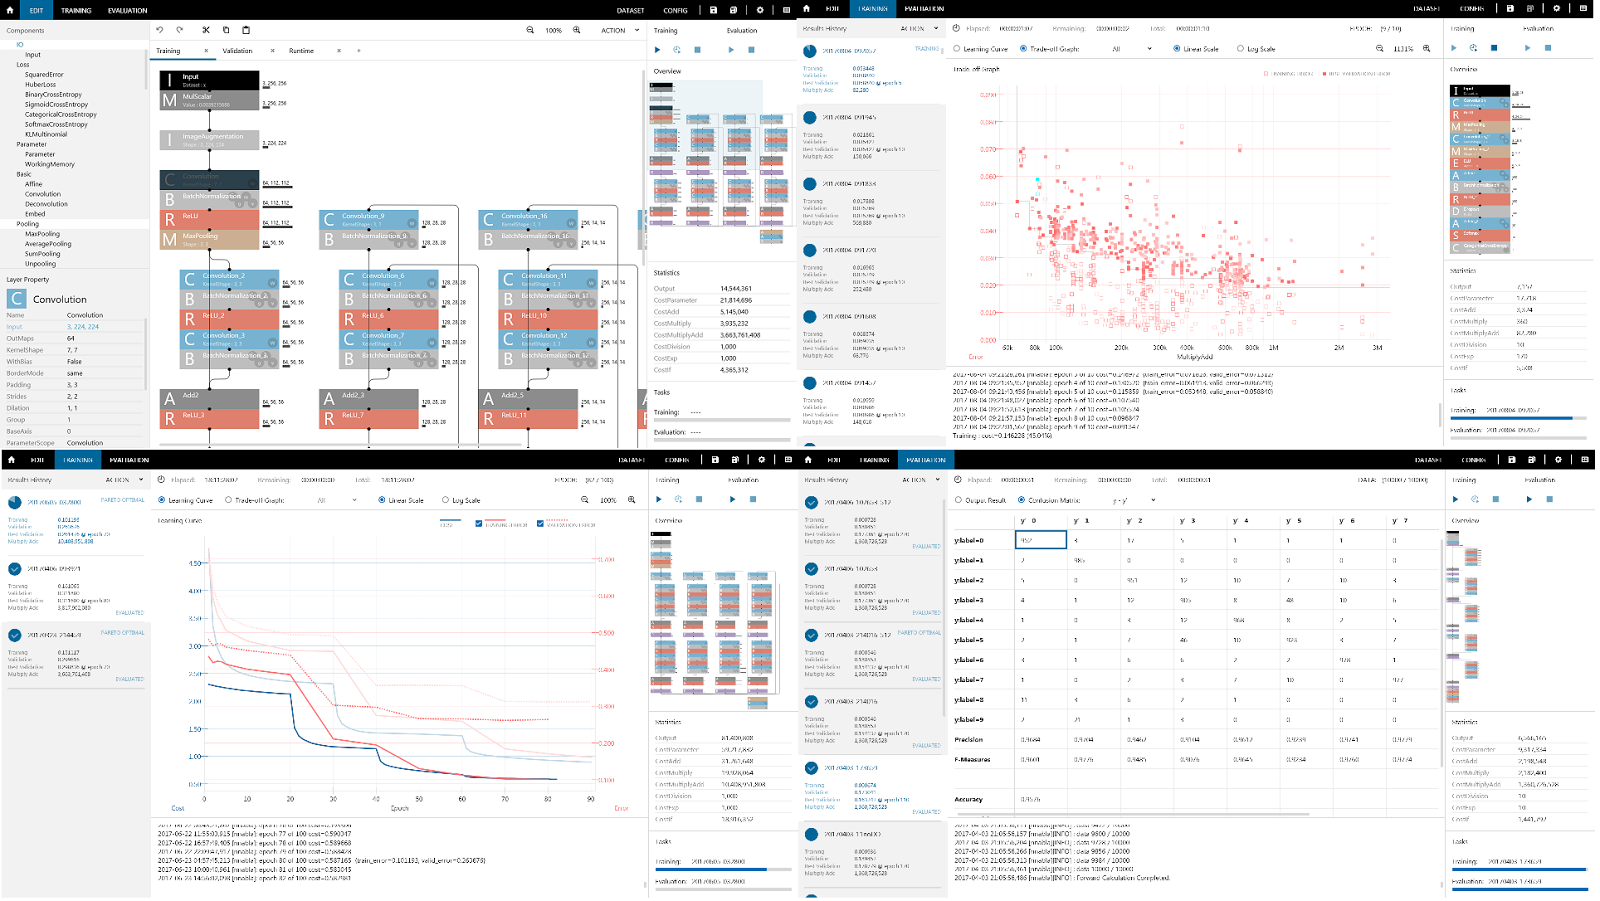
The Neural Network Console is a tool for designing deep learning neural networks by Sony. Neural Network is a computer system that is structured like a human brain and neural system. The machine can “learn” to do certain tasks after studying thousands of examples, without specifying any instructions. This characteristic makes AI excel at analyzing huge amount of data, such as photo/speech recognition, prediction and data processing.
The Neural Network Console can generate programs, that are capable of deep learning. Unlike Google’s TensorFlow, you do not need to enter code in the Console. It works like any ordinary computer program with a full graphical user interface. You only need to organize the neural network’s logic in a systematic way using your mouse (e.g drag and drop). After that, the Neural Network Console will export the resulting program using C++ and Python as the programming languages.
According to Sony, they have been using this tool to develop in-house deep learning software since 2015. A Real Estate Price Estimate Engine, the Xperia Ear’s gesture sensing function, and hand-writing recognition on the DPT-RP1 digital paper are some of the examples.
I think the Neural Network Console simplifies the process of modelling complex neural networks, making designing AI a lot more accessible to the general public. Not only trained specialists, but also anyone who are interested can try experiencing AI. This will definitely help in promoting AI around the globe.
Feel free to leave comments below, if you have any opinion about this website. Share the website around if you enjoy reading it. Subscribe to our Newsletter or follow our Google+, Facebook and Twitter.
Support this website simply by shopping in Amazon. It will give us small kickbacks, if you use the above affiliate links to make any purchases, which will help us grow.
Thank you for supporting the website! We are hosting our 1st Giveaway. We are giving away the review unit provided by Noctua, a NF-F12 iPPC-2000 PWM PC Fan.
Announcement (This giveaway has ended)
A great thank you to everyone’s support, that helped make this giveaway a huge success. Keep supporting our website for more amazing content! Also, congratulation to this giveaway’s winner, Angel Barajas.
Terms and Conditions:
1. There will be ONE winner in this Giveaway. The winner will be randomly chosen, using Gleam.
2. We are using Gleam to host this Giveaway, which Gleam has a separate and independent privacy policy. We hold no responsibility and liability for content and actions of any third-party websites.
3. This Giveaway starts from 20-08-2017 12:00:00 PM to 03-09-2017 11:59:59 PM in Pacific Time. (TWO weeks)
4. This is a worldwide giveaway with NO age restrictions. Shipping costs will be covered by the shipper, but any duties/taxes/other fees upon delivery will be the sole responsibility of the winner.
5. NO Purchase Necessary.
6. Winner will have 48 hours to respond to the E-mail ([email protected]) sent from us. A new winner will be drawn, if the original one does not respond within that time.
7. The winner will be announced at this post, our social media, and our Newsletter after the NF-F12 iPPC fan is shipped to the winner.
To get noticed as quickly as possible, you can join our Newsletter for immediate update about this giveaway, as well as weekly updates about the websites.
If you do not want to wait for this giveaway, you can purchase your own Noctua NF-F12 iPPC fan.
Good Luck to all of you!
Feel free to leave comments below, if you have any opinion about this website. Share the website around if you enjoy reading it. Subscribe to our Newsletter or follow our Twitter, Facebook and Instagram.
Support this website simply by shopping in Amazon and Newegg. It will give us small kickbacks, if you use the above affiliate links to make any purchases, which will help us grow.
There are a lot of different models of computer fans in the market. Some of them only cost a couple dollars, but turn into turbines after switching on. While some premium fans can cost up to $30 USD, with carefully engineered blade and motor designs. However, are they worth it? In this review/comparison, we will take a look at Noctua’s NF-F12 iPPC-2000 PWM and Noiseblocker’s NB B12-P fans.
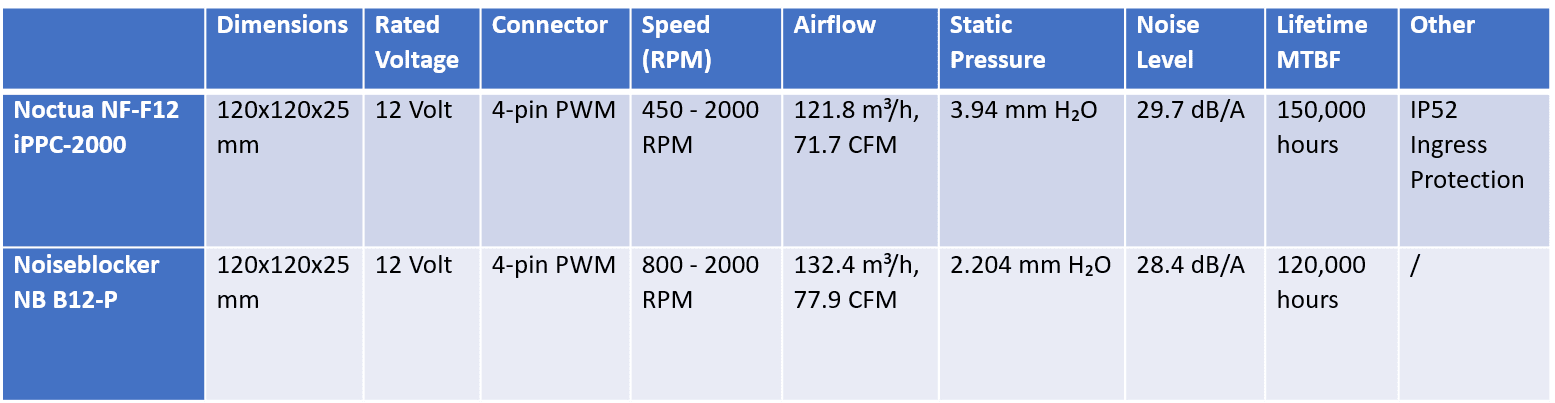
Specifications
The two fans have very similar specifications. Both fans are PWM-controlled (Pulse-Width Modulation), and capable of spinning up to 2000 RPM. Both of them have comparable noise level, at around 29 dB/A.
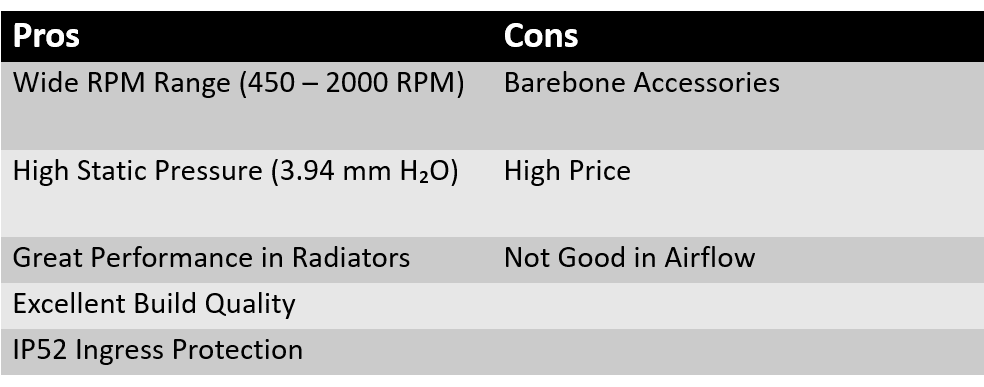
However, the Noctua NF-F12 iPPC has a higher static pressure performance, which may benefit in restricted environment (hard drive cages and radiators). Also, the NF-F12 fan is designed for heavy duty applications, with IP52 Ingress Protection and a longer MTBF (Mean Time Between Failures). The Noiseblocker B12-P has a better airflow performance at 77.9 CFM, which moves air in a larger volume.
Unboxing
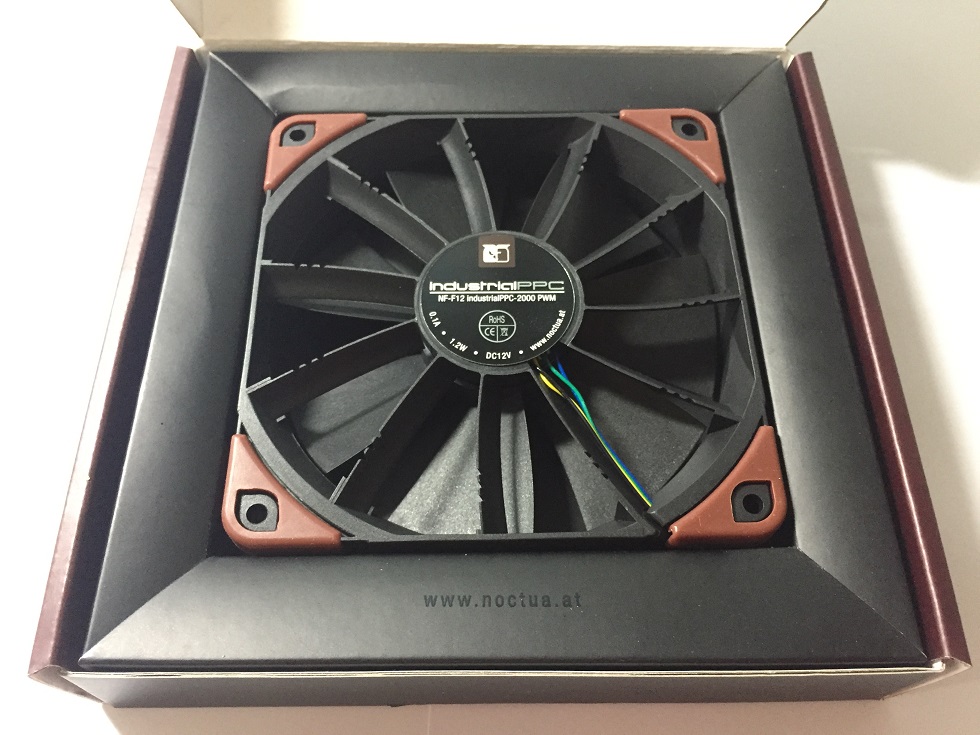
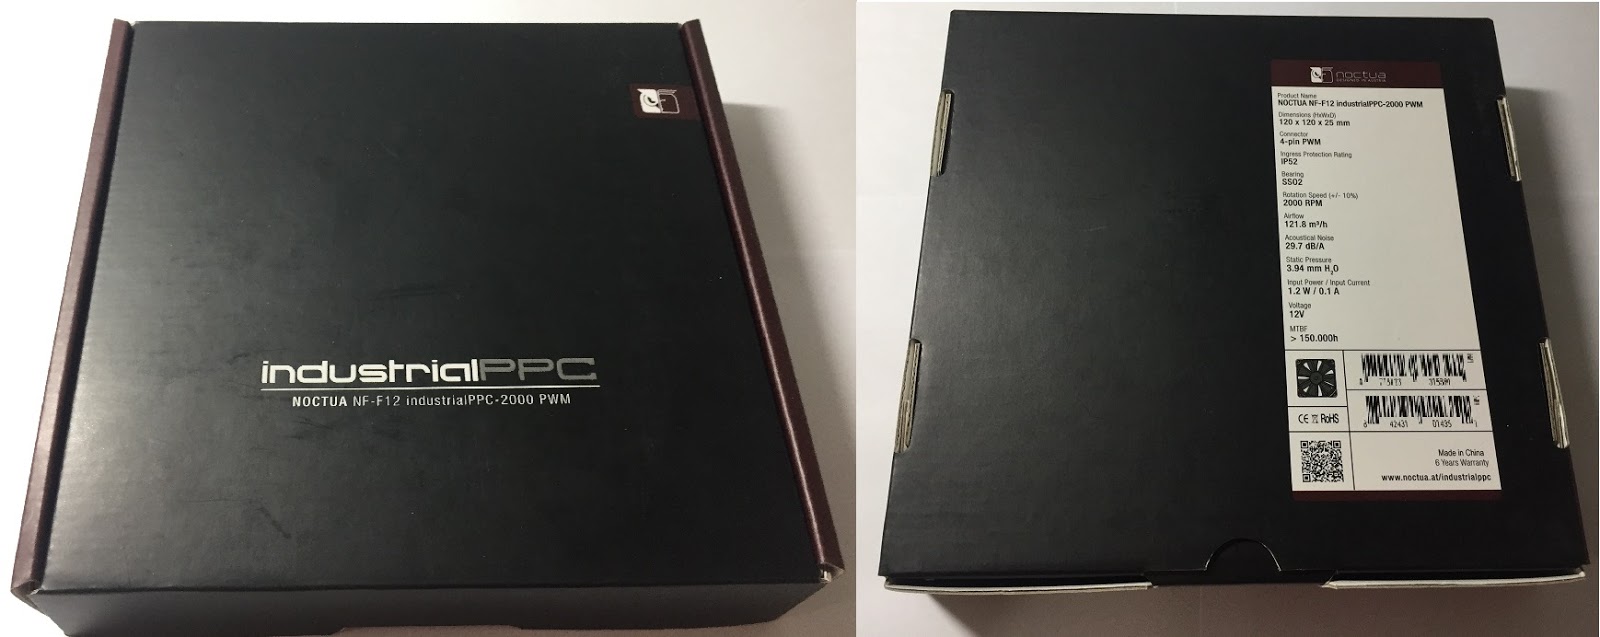
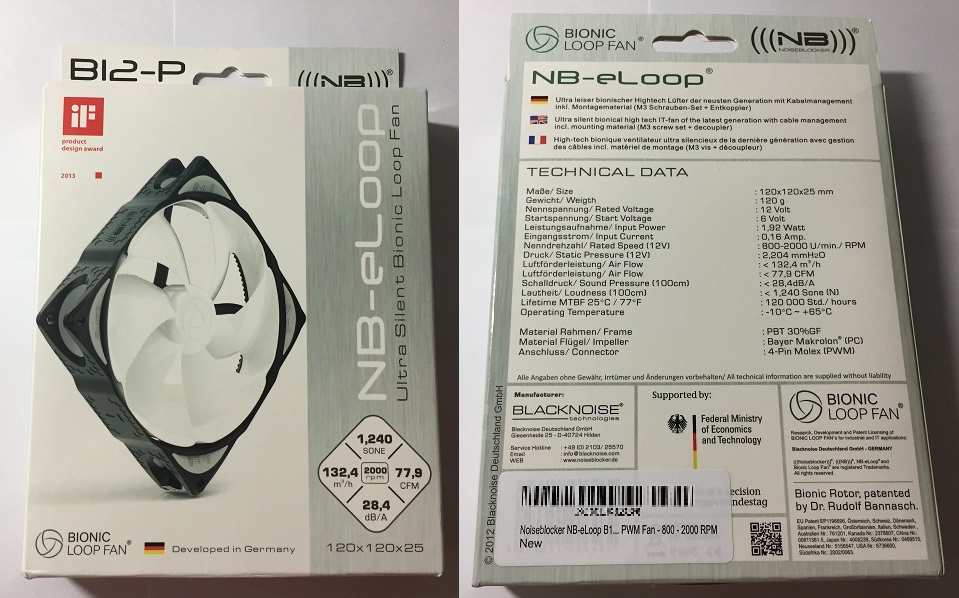
The Noctua NF-F12 iPPC is packed in a hard cardboard box. The model name is printed in the center, with the Noctua logo on the top right. Flipping to the bottom, detailed specifications and a tiny picture of the fan are located here.
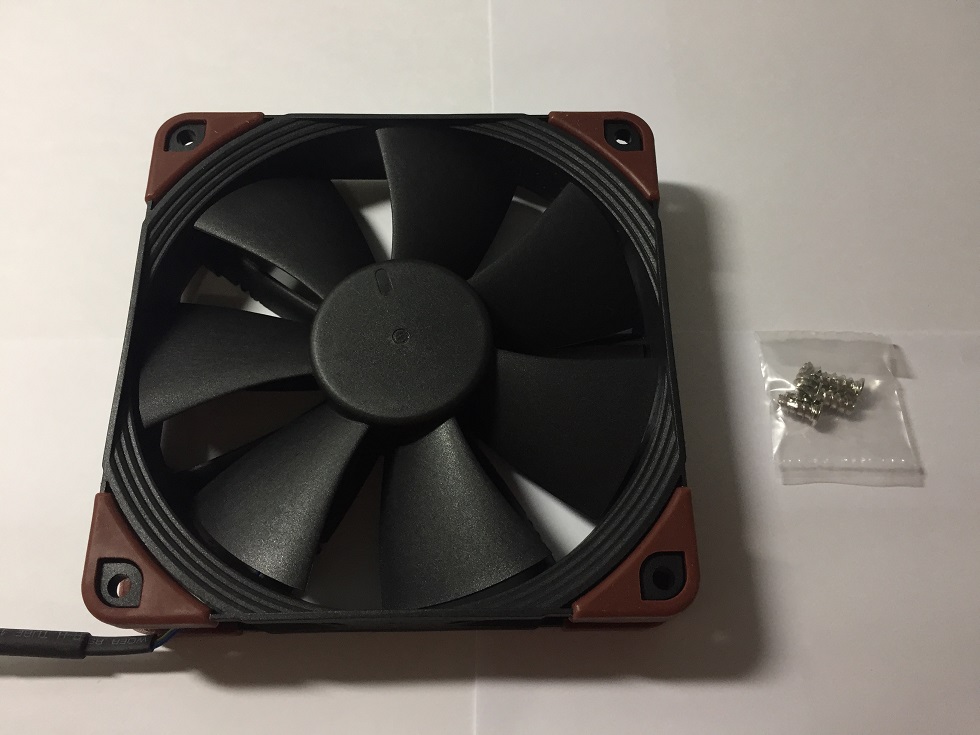
Inside the box are the NF-F12 iPPC fan and four standard fan mounting screws. The attached braided 4-pin PWM cable is about 40 cm (15.7 inches) long. Unlike the normal NF-F12 fan, Y-cable, extension cable, low-noise adapter and anti-vibration mounting screws (vibration-compensators) are not included.
The NoiseBlocker B12-P is in a white thin cardboard packaging. At the front, a photo of the fan is shown, along with some important features. A long list of technical data is printed on the back.
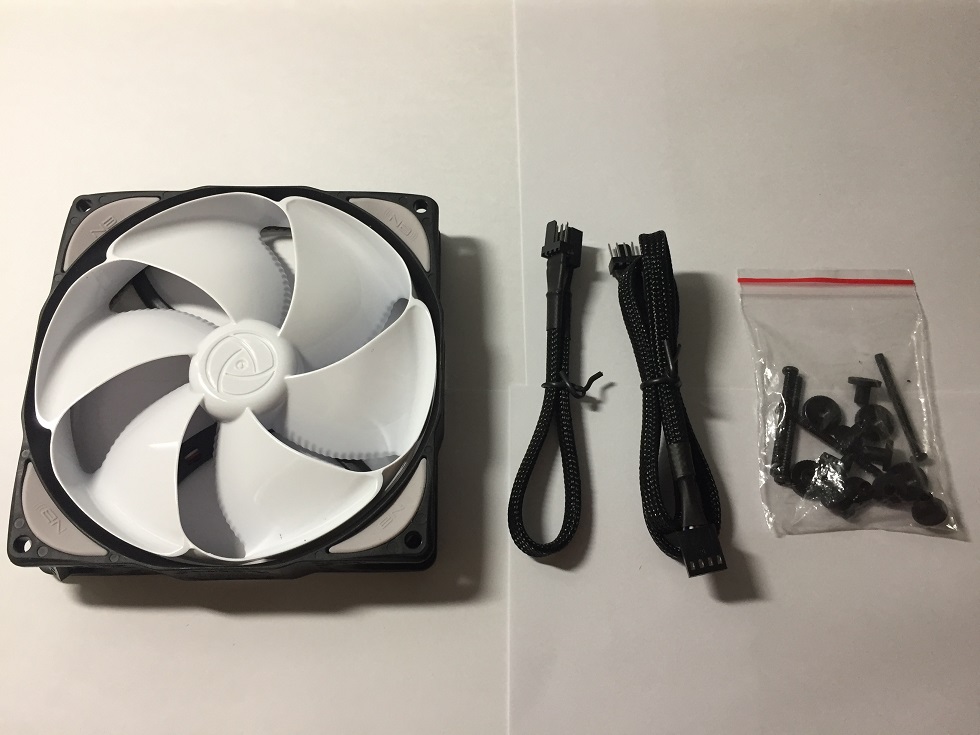
The B12-P gets more accessories than the NF-F12 iPPC. A 50 cm and a 20 cm long 4-pin PWM cables are included. Four long fan screws, four knurled nuts and eight silicon pads are packed inside a small zipper bag.
Design
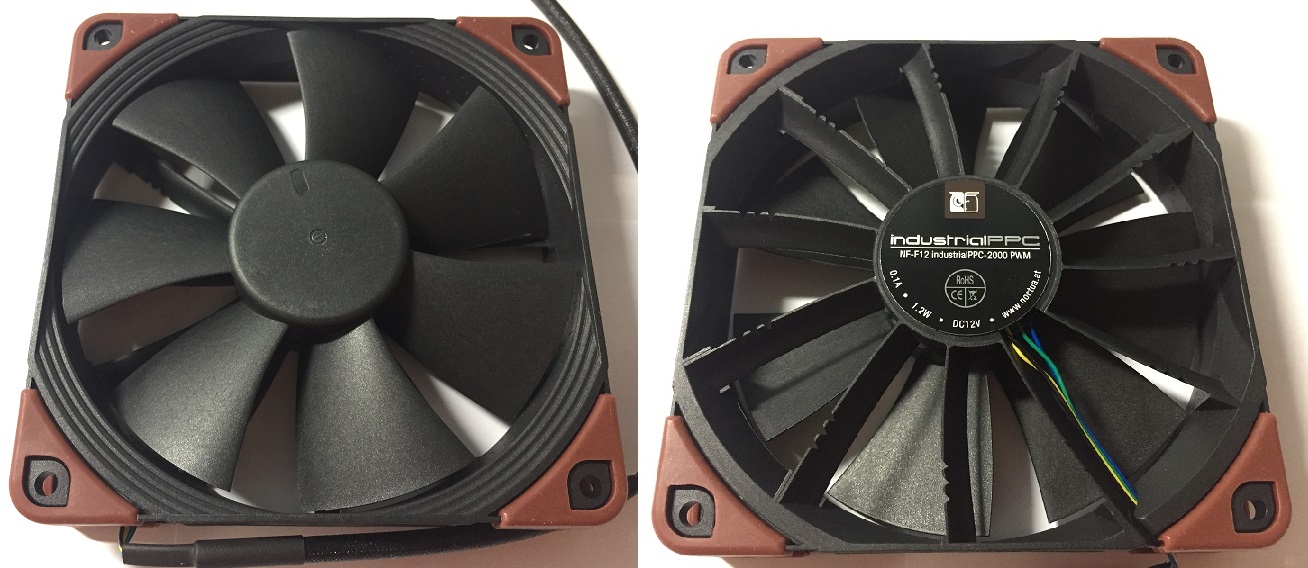
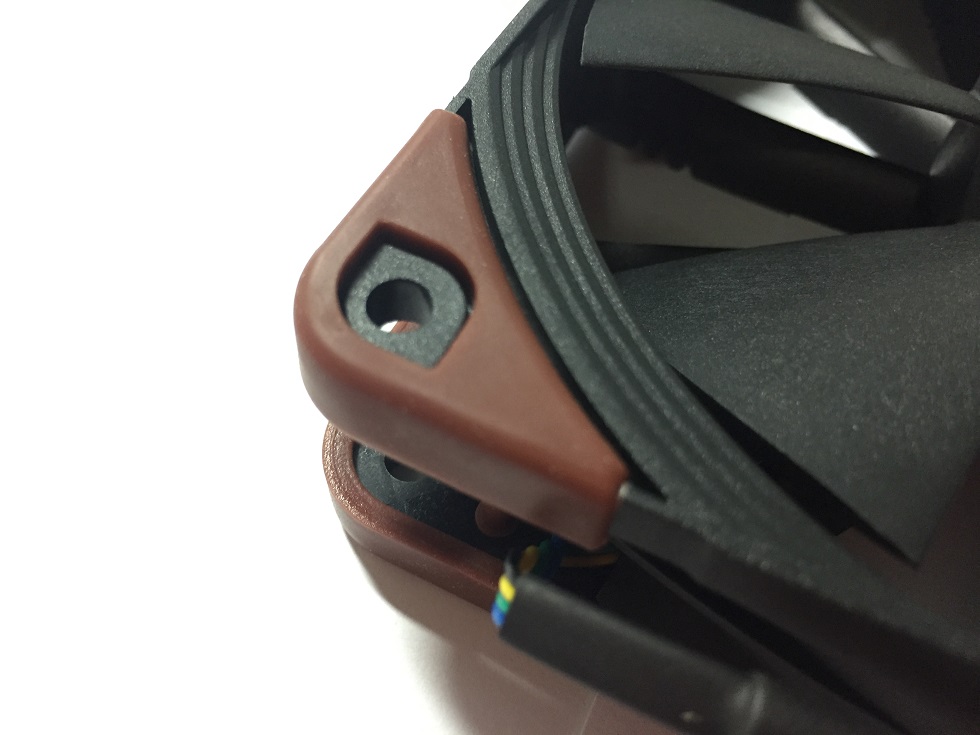
The NF-F12 iPPC is constructed entirely from fibre-glass reinforced polyamide, which Noctua claims the material can withstand up to 140°C and less prone to break. The fan is based on the design and technologies of the original NF-F12, that is proven to be performing exceptional well. The RPM range of the three-phase motor and the SSO2 bearing is pretty wide, with a very low power draw (1.2W/0.1A).
There are removable anti-vibration pads on every corner, coloured in brown. The 4-pin cable is sleeved, but it is not all the way up to the end. About 2 cm of the cable will be visible.
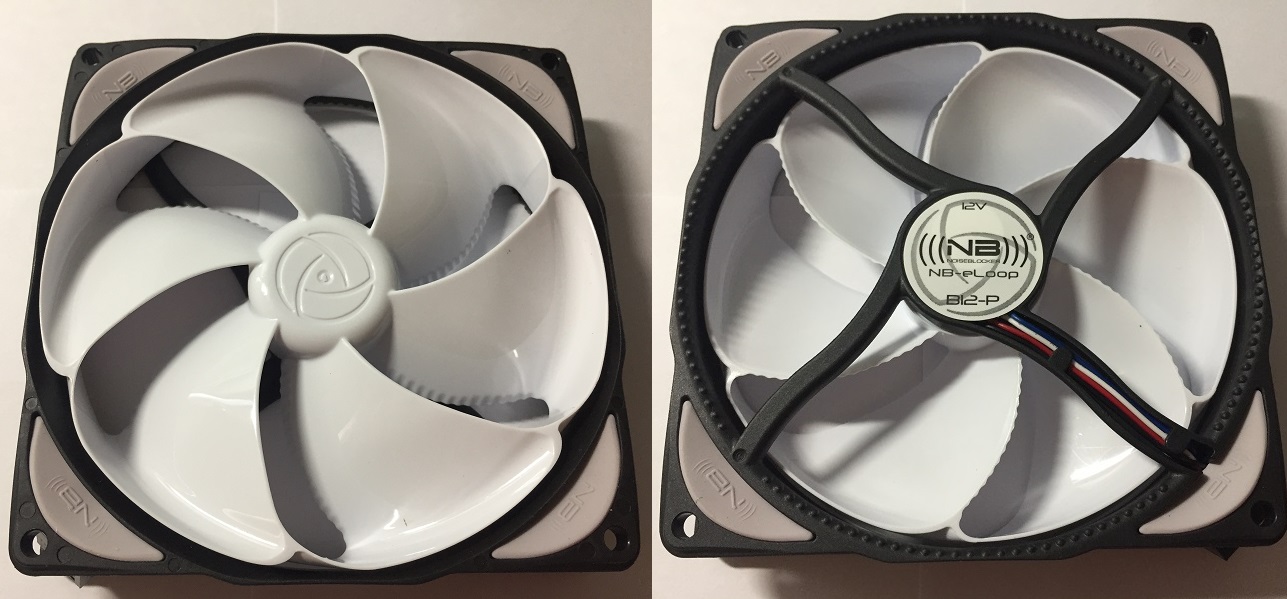
The Noiseblcoker NB B12-P is made out of reinforced fibreglass PBT. Different from any conventional PC fans, the B12-P has a very innovative blade design. Each single blade connects with one another, which is called the Bionic fan. Noiseblocker claims it helps dissolve the air vortexes at the blades’ tips. Hence, it reduces both noise level and power usage.
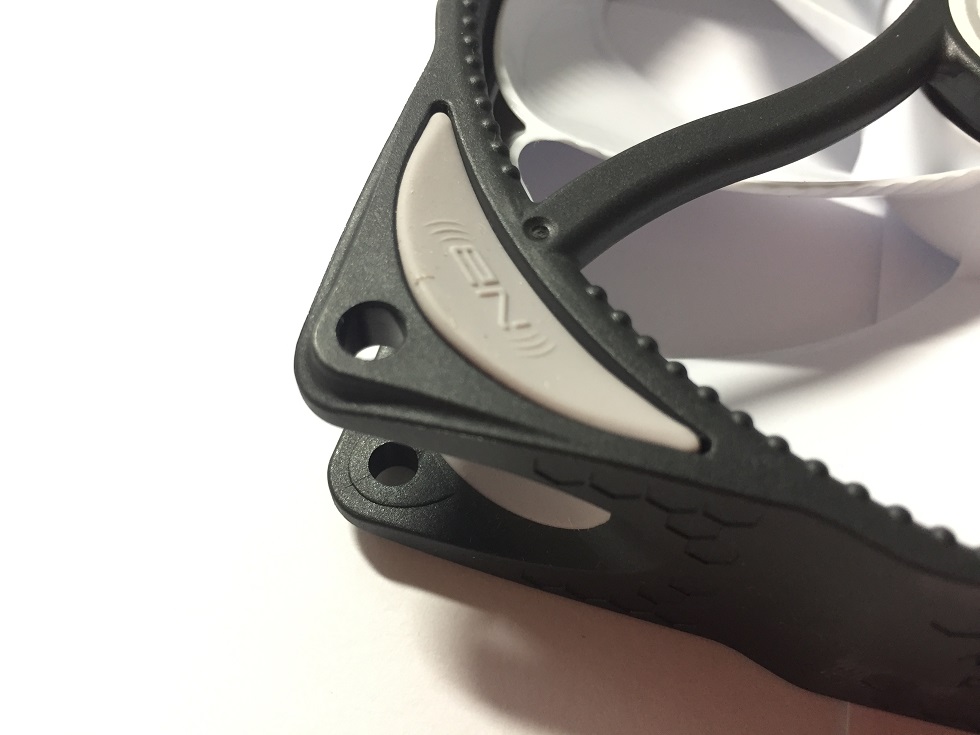
There are also anti-vibration pads on each corner. However, the pads are integrated into the fan frame, and cannot be removed. In addition, the cable of the B12-P is detachable. You can choose between a 20 cm and a 50 cm cable, or even a custom length cable. Although the cables in the packaging is fully sleeved, the connector at the fan is not, showing about 2 cm of colored cables.
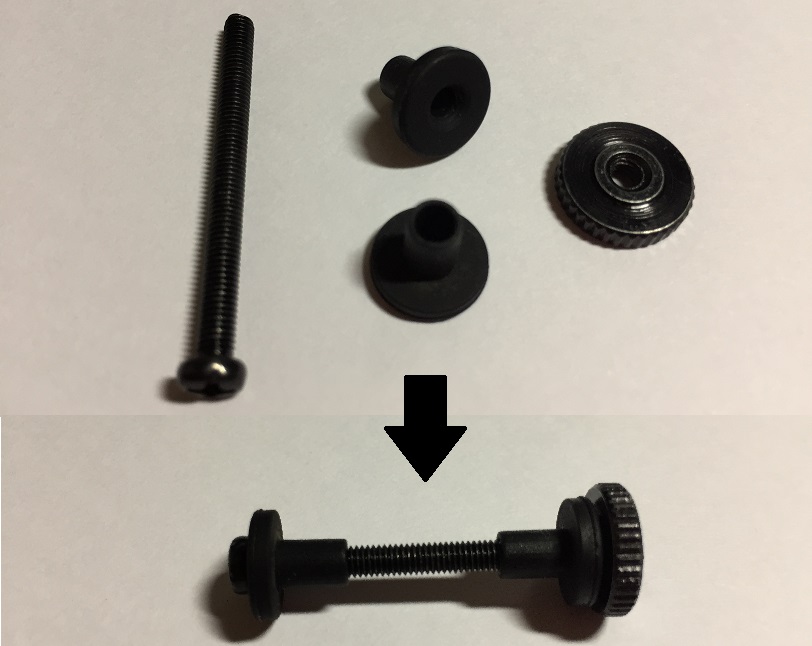
The B12-P uses a tool-free fan mounting method. There are four pairs of a long fine thread screw, a knurled nut and two silicon pads. This method is extremely easy to install, while providing great vibration absorption (the screw and fan frame only make contact with the pads).
Without considering the performance, both the NF-F12 iPPC and the NB B12-P fans have excellent build quality and a lot of technologies and engineering efforts are put into designing the fans.
Review
Testing Methodology
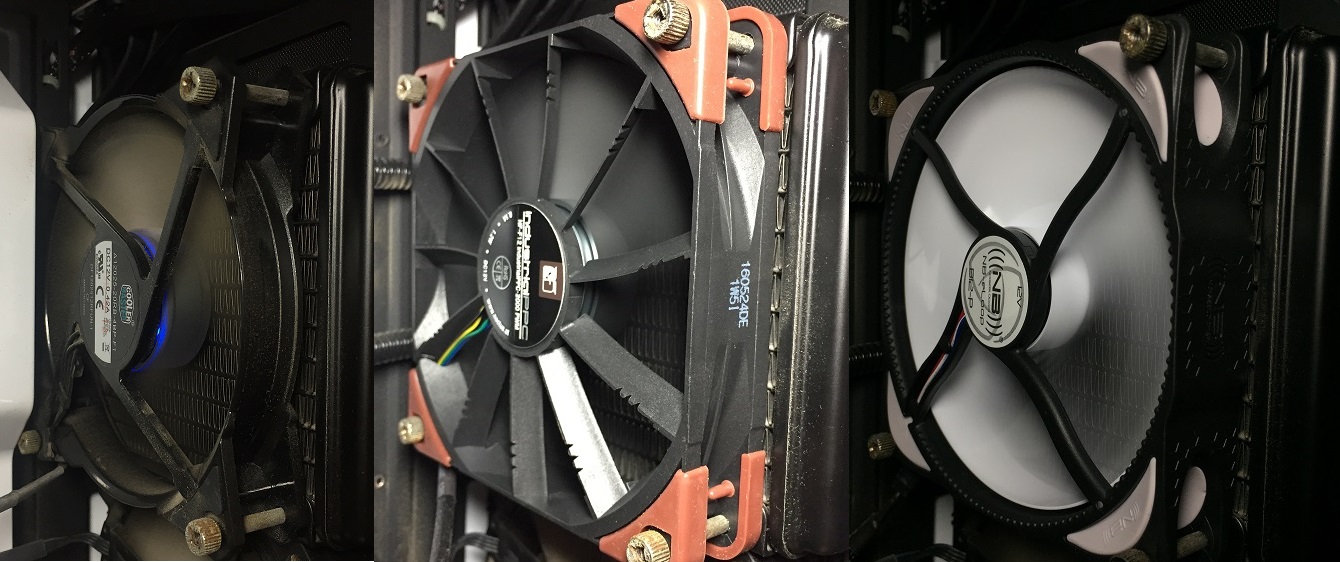
To find out how the two PC fans perform, the benchmarks are done using AIDA64 to run a CPU stress test. The fans are put onto the 120 mm slim radiator of an all-in-one liquid cooler (Cooler Master Seidon 120V Plus). CPU, FPU and system cache are stressed during the test. Ambient temperature is around 28°C.
Results will be taken at two different RPM, 1000 RPM and 2000 RPM. The fan speeds will be controlled via PWM using SpeedFan. At idle, the hottest CPU core temperature will be recorded. Both the temperature of the CPU package and the hottest core will be recorded at full load. For reference, the default fan of the cooler (Cooler Master Jeflo 120) will also be included.
CPU: Intel Xeon E3-1230 v3 @ 3.3 GHz
RAM: 16 GB HyperX Fury DDR3-1600
Performance
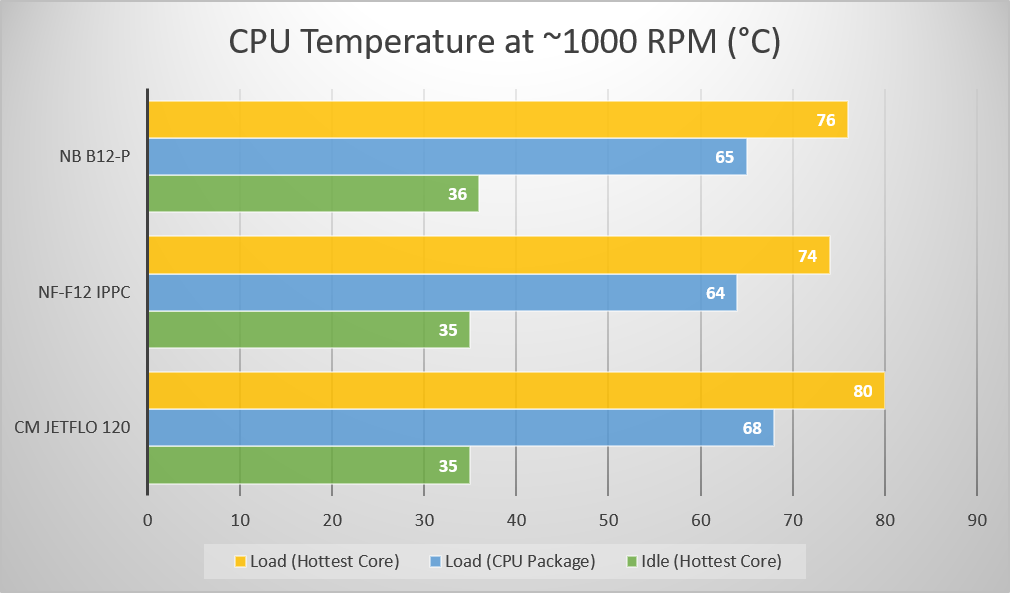
At idle, all three fans did the same at around 35°C for the hottest CPU core. The Noctua NF-F12 iPPC performed the best at load, with a 64°C CPU package and 74°C CPU core. It took a 7.5% lead from the CM Jetflo 120 and about 2% from the Noiseblocker B12-P. The B12-P cooled about 5% better than the Jetflo 120.
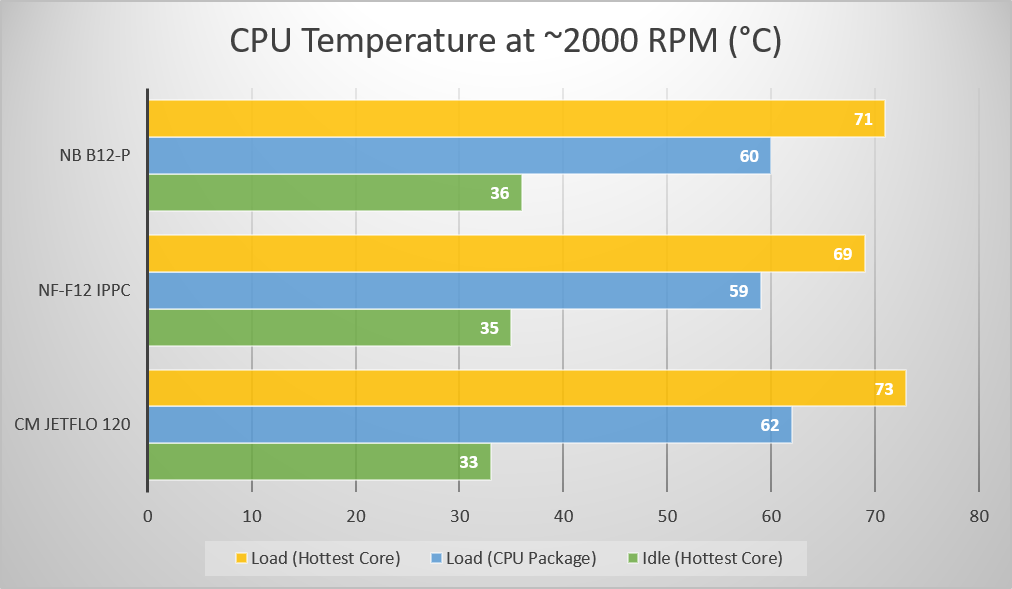
When the fans’ speeds were increased to 2000 RPM, the idle temperature remained at low 30s. Again, the NF-F12 iPPC did the best across the three fans, but the margins reduced. The CPU package was at 59°C and the hottest CPU core was at 69°C. It was a 5.7% and a 2.8% advantage over the Jetflo 120 and B12-P. At the same time, the B12-P performed 2.7% better than the Jetflo 120.
Overall, the Noctua NF-F12 iPPC and the Noiseblocker B12-P have a similar cooling performance, with Noctua’s performing slightly better. The NF-F12 iPPC did get a little louder when at full speed, not noticeable in normal use. The B12-P stayed relatively quiet across the RPM range, with little audible wind noise at higher speed.
Conclusion
For the Noctua NF-F12 iPPC, it performs exceptionally well when using it on radiators. The higher rated static pressure performance does contribute in better cooling. The fan’s more durable construction and its IP52 dust resistance rating are useful, especially for servers or other industrial uses.
The Noiseblocker B12-P is a well-balanced design, that have a decent airflow and static pressure performance. Although it does not perform as well as the NF-F12 iPPC, it still has a significant advantage over many cheaper priced PC fans.
Both of the two fans have an astounding 6-year warranty by Noctua and Blacknoise, and a long MTBF. I think if you need reliable and powerful fans, they can definitely meet your requirements in most of the situations and environments.
Noctua NF-F12 iPPCNoiseblocker NB B12-P
You can check where to buy these two computer fans from their websites (Noctua, Noiseblocker). Or use the links below to purchase them from Amazon US.
Thanks Noctua for providing us the NF-F12 iPPC-2000 PWM for review. (Review Sample)
(Closed) We will be giving away this Noctua NF-F12 iPPC-2000 PWM to one of our readers. All details are in another separate post. Click HERE to enter the giveaway. Good Luck!
Feel free to leave comments below, if you have any opinion about this website. Share the website around if you enjoy reading it. Subscribe to our Newsletter or follow our Twitter, Facebook and Instagram.
Support this website simply by shopping in Amazon. It will give us small kickbacks, if you use the above affiliate links to make any purchases, which will help us grow.
Although solid-state drives (SSD) are gaining popularity quickly in mainstream computers, their capacities are no where near a normal mechanical hard drive (HDD). To keep the cost down, a lot of people now will include a small SSD for the operating system and frequently used applications, and a large HDD for other files in their PC builds. The Western Digital Blue 1TB HDD is one of the top choices in the PC community.
Specifications
[table id=427 /]
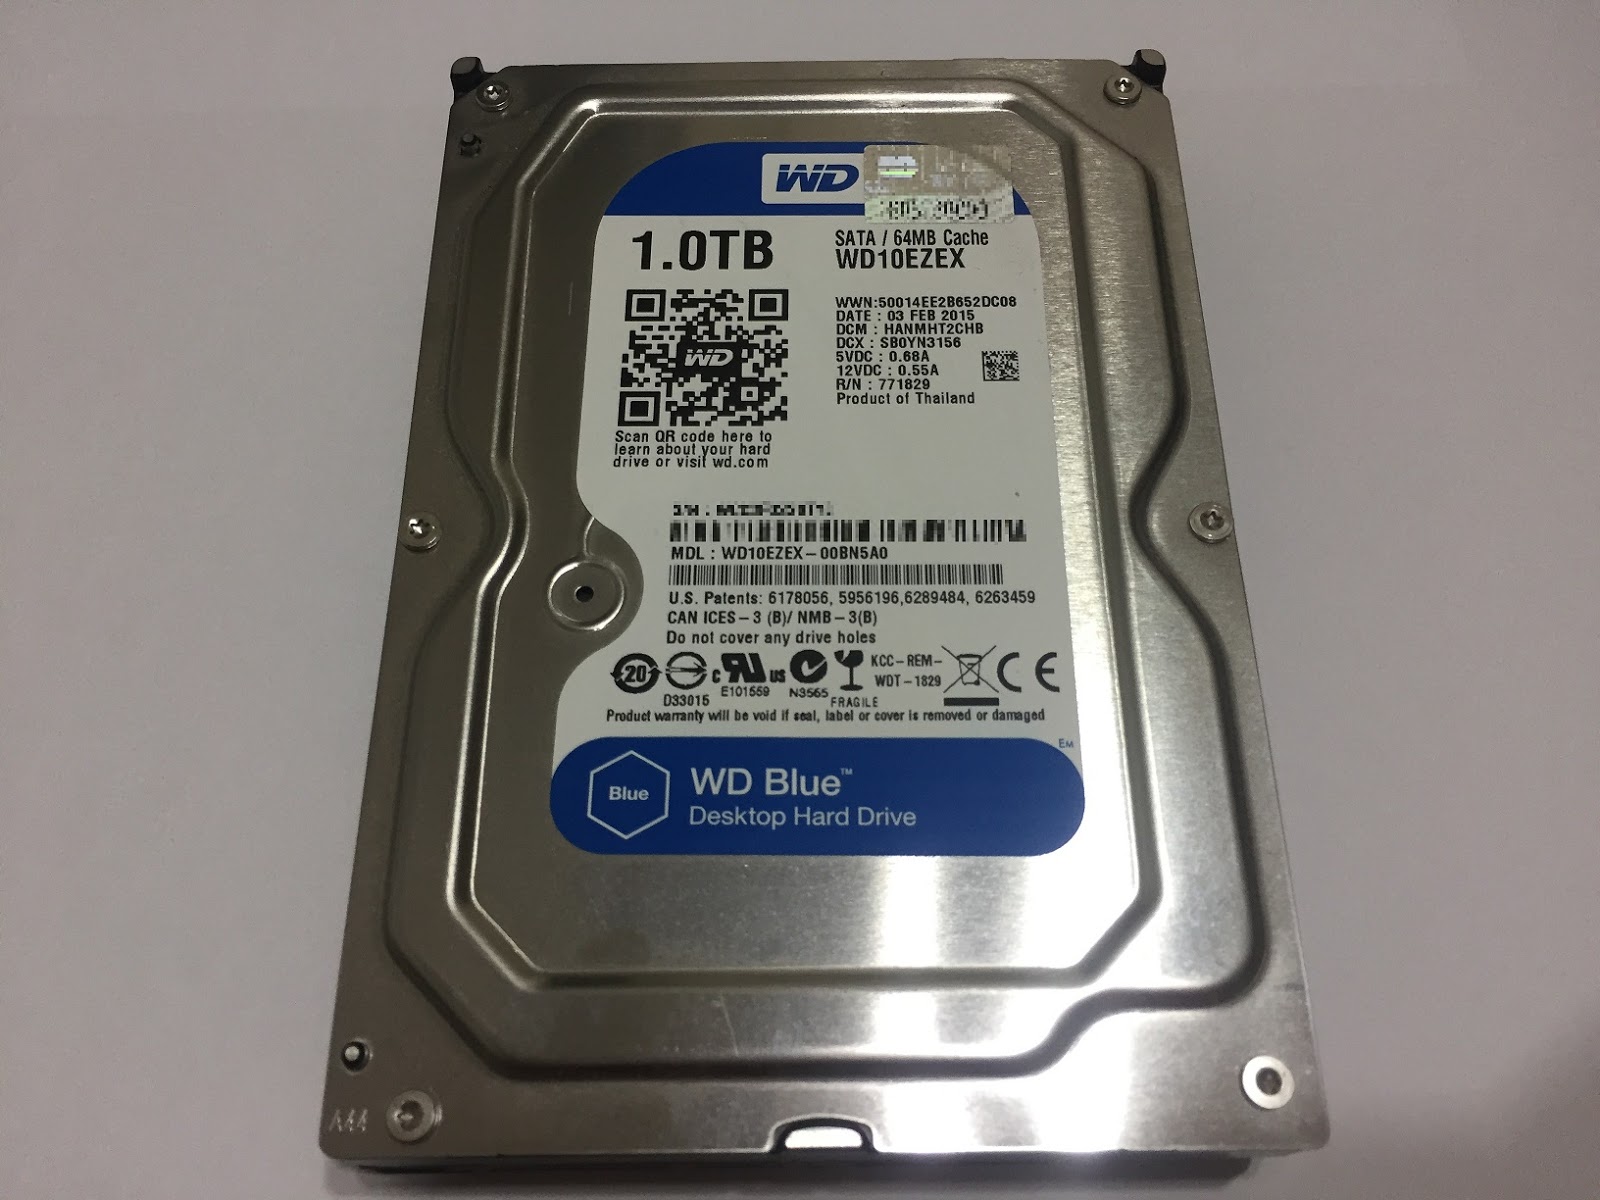
The WD Blue 1 TB hard drive is designed for normal desktop use, using the 3.5-inch form factor. The drive spins at 7200 RPM with a single platter. The drive is paired with 64 MB of cache. It is rated to transfer data at 150 MB/s. The WD Blue HDD lineup also offers different capacities, from 500 GB up to 6 TB.
All information is printed on the top of the drive, including the model number, drive capacity and serial number.
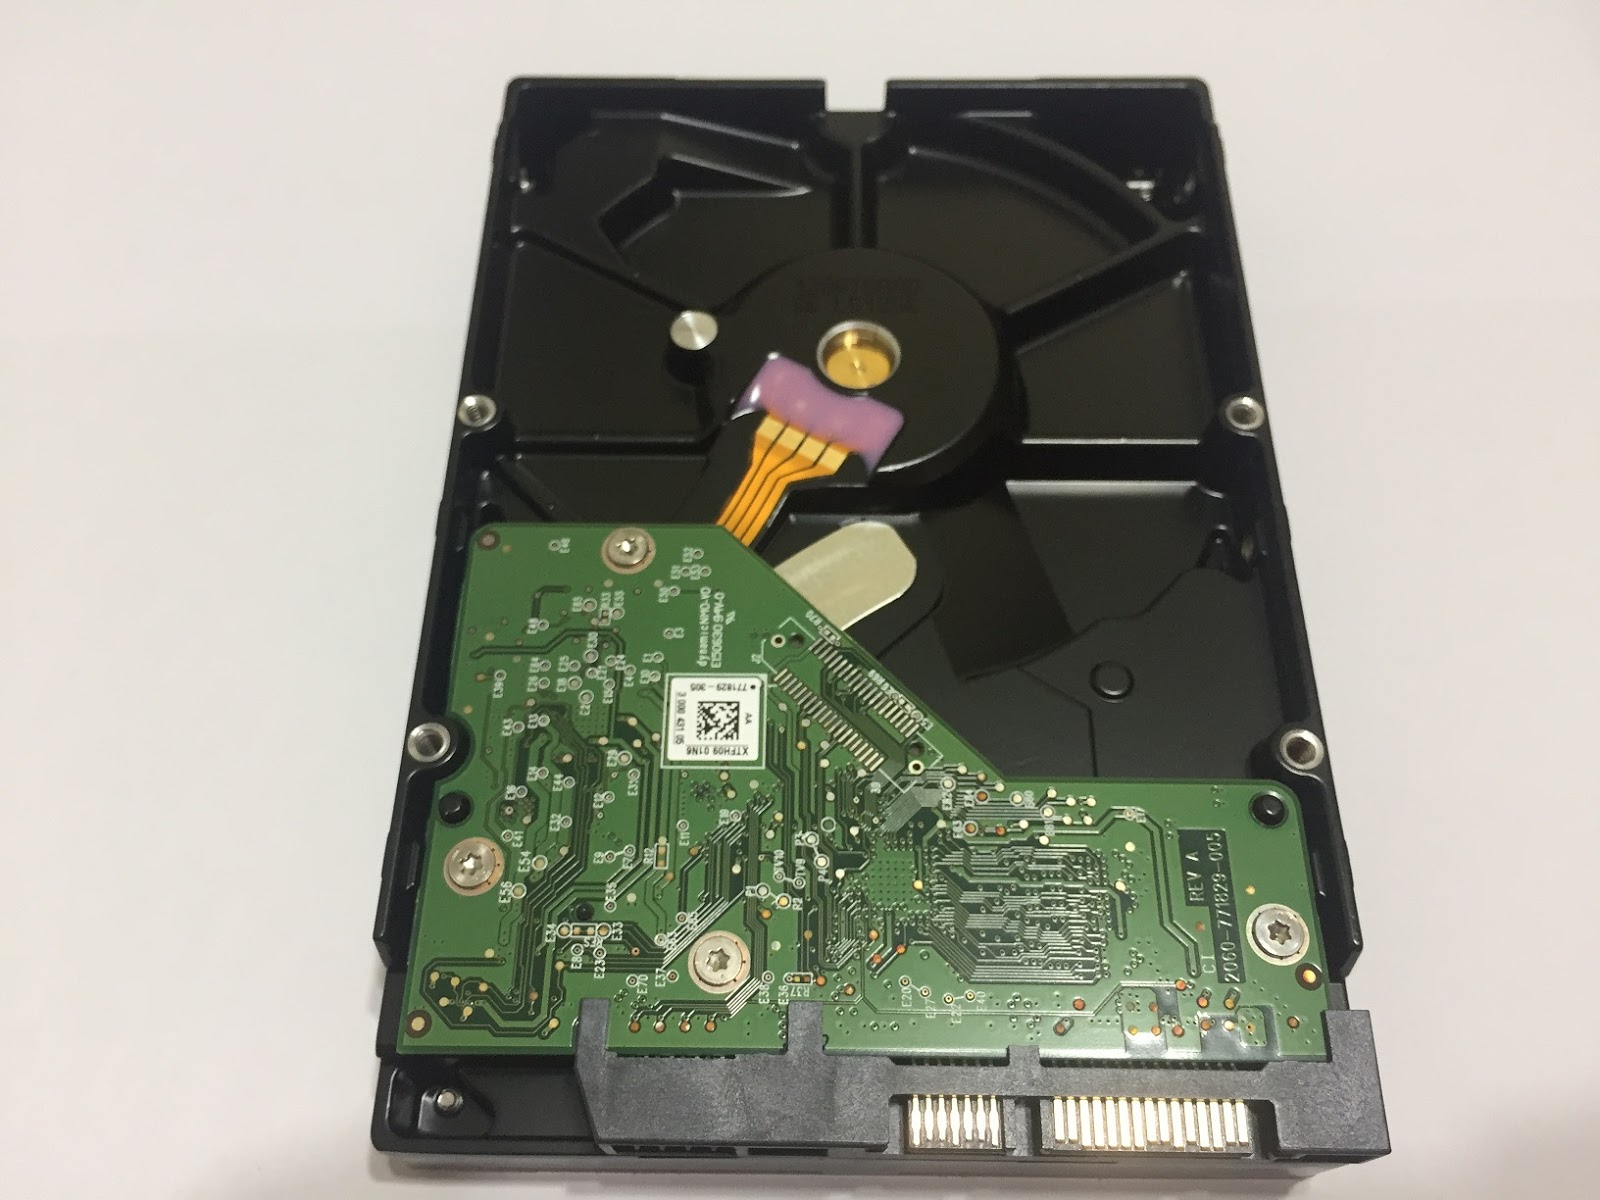
The printed circuit board (PCB) is located at the back of the drive, with the Serial ATA 6 Gb/s (SATA) connector. Standard mounting holes are at both the bottom and the sides.
Review
Testing Methodology
To test the performance of the hard drive, we use three well-established storage benchmarking softwares. They are CrystalDiskMark, ATTO Disk Benchmark, as well as AS SSD Benchmark.
CrystalDiskMark can measure both sequential and random 4KB read/write speeds with a queue depth of 32. ATTO Disk Benchmark can test how the drive performs across different transfer block sizes, mostly in a sequential environment. AS SSD Benchmark can provide both normal read/write speed and the IOPS performance of the drive.
Performance
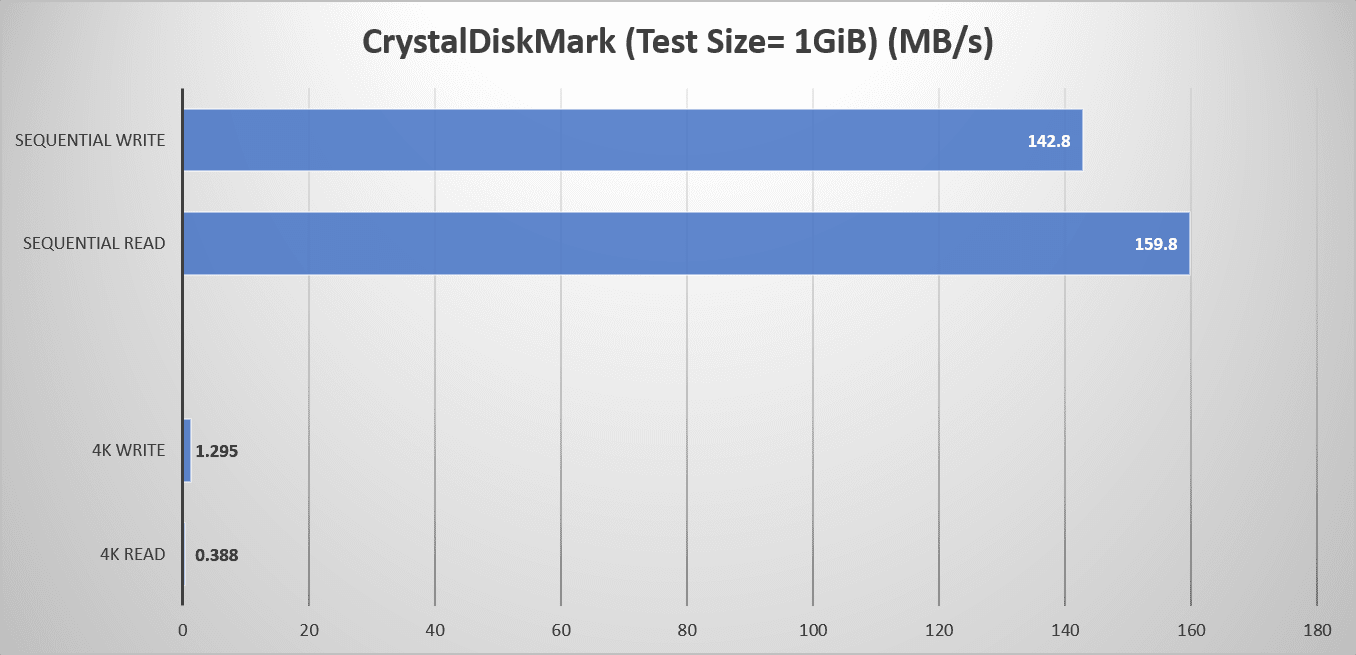
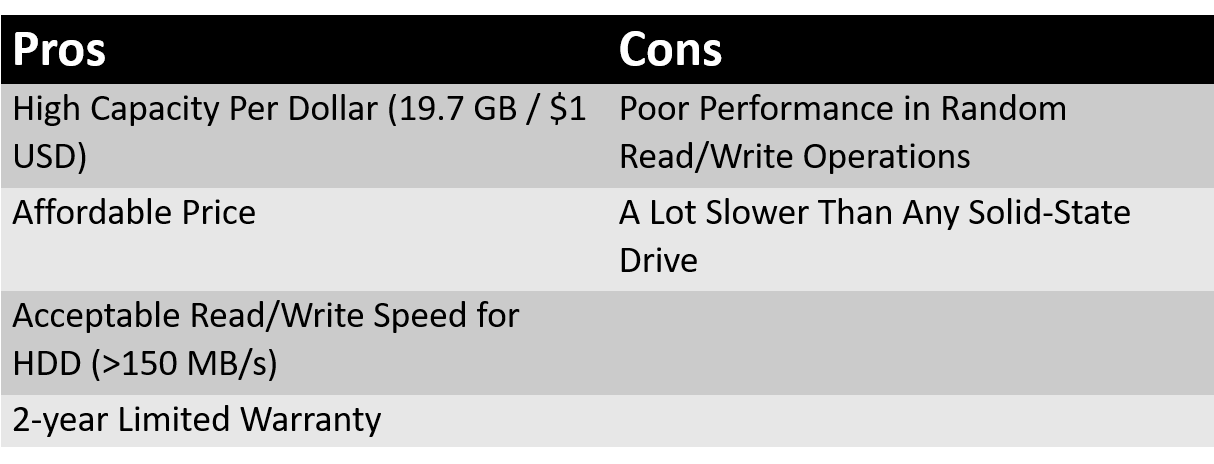
As we can see, in CrystalDiskMark, the WD Blue 1TB HDD performs as advertised in sequential read and write speeds, at about 142.8 MB/s and 159.8 MB/s respectively. However, the hard drive did not do well in 4KB random read and write. Its speeds dropped to 0.388 MB/s and 1.295 MB/s for read and write. This is to be expected for a traditional hard drive to deal with random operations, due to the limitation of the read/write head moving across the platter.
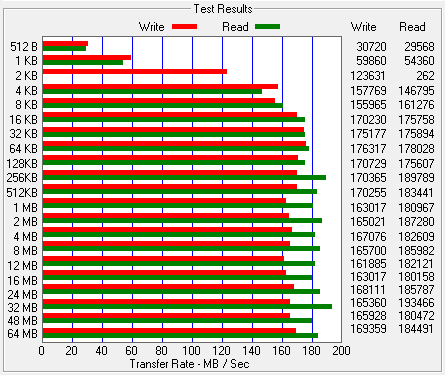
In ATTO Disk Benchmark, a similar result can be observed. When the file size is lower than 4 KB, the read and write speeds will decrease significantly. For larger file sizes, the speeds rise up to 193 MB/s (32 MB size), exceeding its rated 150 MB/s.
Comparison
[visualizer id=”2840″]
The WD Blue did comparably well as a HDD, but no where matched the performance of any solid-state drives. SSDs have marginally better random 4K read/write speeds, which makes accessing small-sized files more responsive.
Conclusion
The Western Digital Blue 1TB HDD (10EZEX) strikes a great balance between price, capacity and performance. It will be an awesome companion drive for a fast solid-state drive in a computer. You can store a lot more content and have decent read/write speeds (about 150 MB/s to 190 MB/s), without spending a fortune. Moreover, the drive is shipped with a two-year limited warranty, by a reputable brand. There is a reason why it stays as the top seller hard drive for a long time.
Feel free to leave comments below, if you have any opinion about this website. Share the website around if you enjoy reading it. Subscribe to our Newsletter or follow our Google+, Facebook and Twitter.
Support this website simply by shopping in Amazon. It will give us small kickbacks, if you use the above affiliate links to make any purchases, which will help us grow.
Apple announced its next generation mobile operating system, iOS 11, at WWDC in June 2017. iOS 11 brings a revamped control center, new file manger and a lot more improvements. It is expected to officially release in the coming fall. However, Apple provides both a developer beta and a public beta for people to help testing the software. The beta gives you a chance to try new features in iOS 11. Then, how to install it on your iOS devices?
The iOS 11 public beta has been released in July, but the first few betas still contains a number of bugs and glitches. Now (August 2017), Apple updated the public beta to version 5, which runs notably smoother and faster than previous versions.
Preparation
Installing the iOS 11 public beta is actually very simple. You first need to back up all your data in your iOS devices to iTunes, in case something weird happen during installation. You can check out this support guide from Apple about iTunes backup.
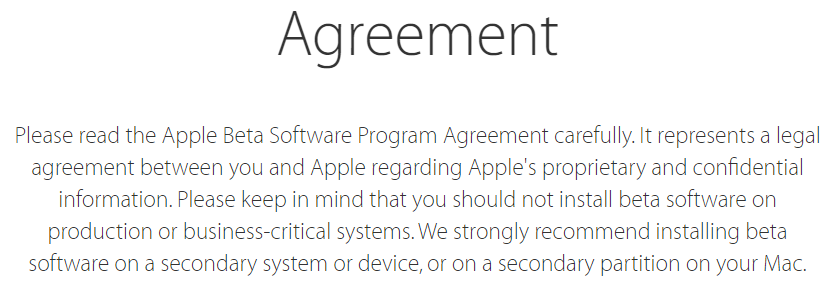
Carefully read the Agreement before accepting. I do NOT recommend you install iOS 11 public beta on your main devices, or any devices that do something mission-critical/important. You are advised to install the beta software on secondary systems or devices. Think twice before installing the beta.
On your iOS device
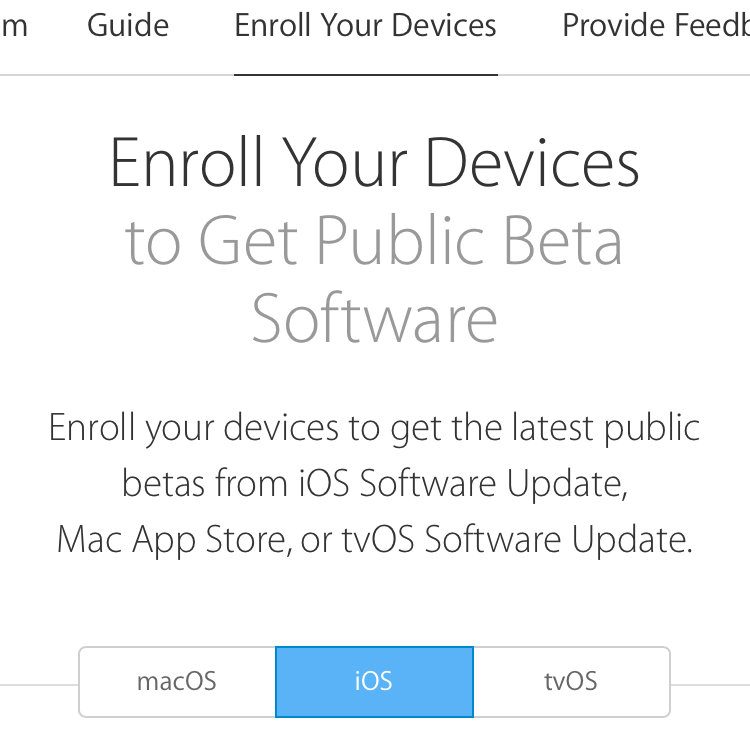
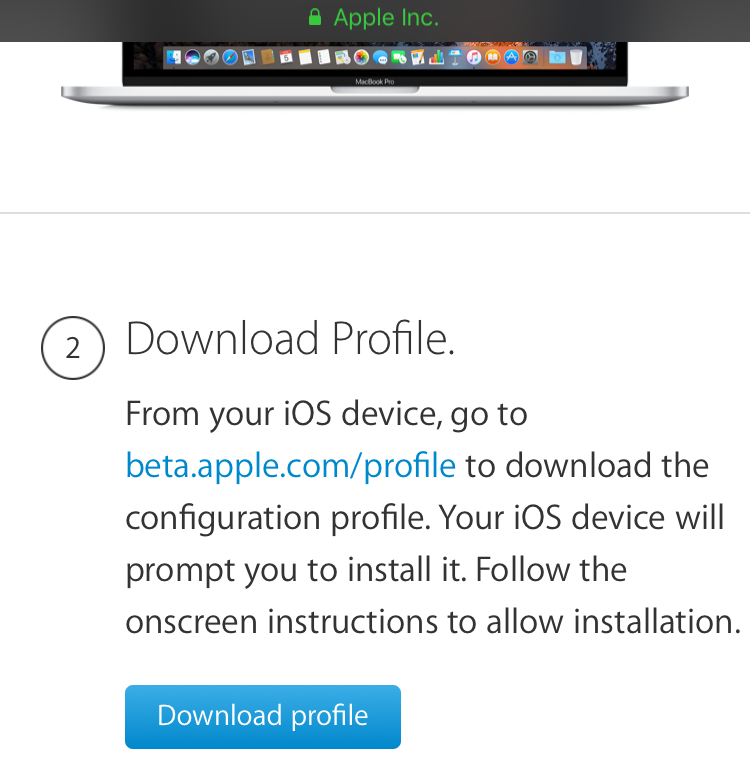
Go to the same Apple Beta Software Program page on your iOS devices. Click the “Enroll your devices” tab at the top. Select iOS and scroll down until you see a blue “Download Profile” button.
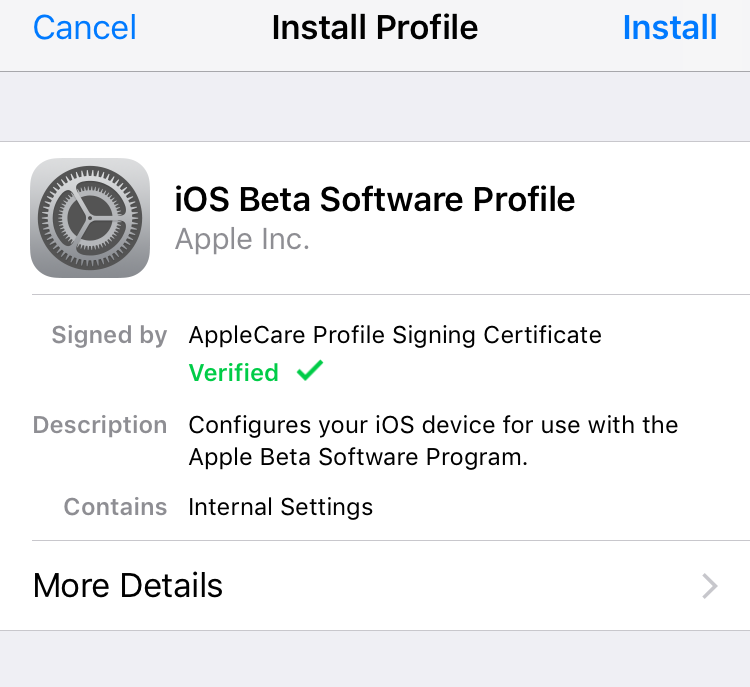
Click “Download Profile”. You will be asked to open Settings to show a configuration profile. Allow it and the iOS Beta Software Profile will be shown.
Install the profile and you will need to restart your iOS device. After you have rebooted, navigate to the Software Update session in Settings (General). A new iOS 11 Public Beta file will appear. Click “Download and Install”. You can now install the public beta like normal iOS over-the-air (OTA) updates.
The installation will take about half an hour or more, depending on your internet connection/speed. Once the installation is completed, you will be greeted by the new iOS 11 Public Beta.
Feel free to leave comments below, if you have any opinion about this website. Share the website around if you enjoy reading it. Subscribe to our Newsletter or follow our Twitter, Facebook and Instagram.
Support this website simply by shopping in Amazon and Newegg. It will give us small kickbacks, if you use the above affiliate links to make any purchases, which will help us grow.


 Explained")


")


