Home Blog Page 129

How to Take A Screenshot in Your Motherboard BIOS

A BIOS (Basic Input/Output System) is the important firmware, that provides instructions to the computer’s hardware for basic functions, such as boot priority of multiple storage devices. It is usually stored in a small memory chip on the motherboard and is independent of of any operating systems (Windows, macOS or Linux).

BIOS is useful for configuring how each component works and troubleshooting a problem. Sometimes, you may be asked by tech support/specialists to capture a screenshot of your BIOS settings to help locate the source of the malfunctions. But, how can you do that without an additional video capturing device.

Take Screenshot in Motherboard BIOS
Formatting your USB flash drive to FAT32 file system

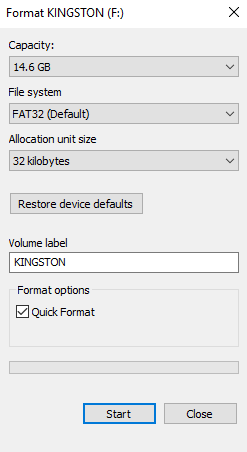
Nowadays, motherboard manufacturers have made their BIOS more refined and easy-to-use. It is now possible to take a screenshot within the BIOS, if your motherboard is relatively modern with newer chipsets. All you need to have is a USB flash drive, which is required to be formatted in FAT32 file system. This should be the default file system of most USB drives, but you can easily quick format the drive in Windows.

  • Open “This PC” in Windows File Explorer.
  • Right-Click on your USB flash drive and select “Format…”.
  • A prompt will appear and make sure to choose “FAT32” in “File system”, while others can remain as default. Then, press “Start”.
  • Wait a few minutes for the process to finish and your USB drive is ready to be used.
Take Screenshot in Motherboard BIOS
Screenshot taken on a Gigabyte H97 motherboard

It is very simple to capture a screenshot in BIOS.

  • Restart your computer in order to get into BIOS. You can usually enter BIOS by pressing either “F2” or “DELETE” on the keyboard, when you see the prompt.
  • Make sure that your USB flash drive is detected by the BIOS.
  • Go to the page you want to take a screenshot. Press the “F12” or “Print Screen” button on the keyboard. If the screenshot is captured successfully, a confirmation message should appear immediately. The screenshot will then be stored in your USB drive as a .BMP extension image file.
Take Screenshot in Motherboard BIOS
Screenshot confirmation message

Note that this method may not be supported in older generation motherboard BIOS.

Feel free to leave comments below. Share the article if you enjoy reading it. Follow us on Twitter, Facebook, Instagram and Pinterest.

Support this website simply by shopping on Amazon and Newegg. We will receive small kickbacks, if the above affiliate links are used to make any purchases.

How to Change The DNS in Your Network

How to Change DNS in Network

Cloudflare recently (April 2017) launched its new free public DNS service (1.1.1.1). They claimed to be the fastest DNS directory in the Internet, with strict privacy policy to protect users. However, what steps need to be taken to change your DNS, if you want to try Cloudflare or other public DNS services for quicker Internet speed and better privacy?


What is a DNS?

A DNS (Domain Name System) is an essential system that converts a human-understandable domain name, such as UnbxTech.com or Google.com, into a machine-understandable IP address. The browsers, routers and switches will utilize that resolved IP address to connect to the required web servers in the Internet.

Normally, you will be using your Internet Service Provider’s (ISP) default DNS servers, but there are some disadvantages, like concerns about privacy and Internet Censorship. Fortunately, alternative public DNS options are available.

Reputable and Popular public DNS servers

All above IP address are in IPv4.

How to change devices’ settings to use the new DNS servers?

The easiest way to let all the connected devices in your private/home network to use the new DNS servers will be directly modifying your router’s settings (recommended). Alternatively, you can change the DNS on individual devices (smartphones, tablets, computers).

Router

First, you will have to connect a computer to its network through Wi-Fi or Ethernet cable. To access the settings panel of the router, type in the gateway IP address in any browsers. The default should be 192.168.1.1, but yours may vary from different router models. You may be asked to enter username and password.

Once in the settings, find the DNS server settings. If there are already a set of IP addresses, you can write them down for future reference. Then, replace the two IP address, both the primary and secondary, of the free public DNS service (Google, Cloudflare, etc) you desired to the settings.

For Example, using Google Public DNS:

  • DNS 1: 8.8.8.8
  • DNS 2: 8.8.8.4

Finally, save the settings and restart the routers to apply the changes.

Windows 10

First, right-click at the start menu and select “Network Connection”. Then, click “Change adapter options” and choose the network you are currently using. Right-click it and select “Properties”.

A prompt will appear, and locate the “Internet Protocol Version 4 (TCP/IPv4)” and double-click it. Click “Use The Following DNS Server Addresses” and enter the two IP address, both the primary and secondary, of the free public DNS service you desired below.

Finally, click “OK”, then “Close”, then “Close” to save and apply the changes.

macOS

First, go to “System Preference” and search for “DNS Server” on the top right. It will directly take you to the specific settings page. Or you can click “Network”, then “Advanced” and “DNS”.

After that, press the little “+” icon in the bottom left. Add the two IP address, both the primary and secondary, of the free public DNS service you desired.

Finally, click “Ok”, then “Apply” to save the settings.

iOS

Go to settings and select “Wi-Fi”. Press the blue “i” icon of the network you want to modify. Select “Configure DNS” and set it to manual. Remove any existing DNS entires by tapping the “-” icon. Then, tap the “+” button to add the two IP address, both the primary and secondary, of the free public DNS service you desired.

Finally, please remember to click the “Save” button on the top right to apply the changes.

Android

To use custom DNS servers, Android will need to have a static IP address, which will have to modify in your router’s settings. Therefore, configuring the DNS settings in the router instead is recommended.

Go to settings and click “Wi-Fi”. Long press the specified Wi-Fi network, and choose “Modify network”. Add the two IP address, both the primary and secondary, of the free public DNS service you desired at the “DNS 1” and “DNS 2” fields. You may need to find these settings in the advanced section, which will vary depends on the versions of the Android operating system.

Finally, click “Save” to apply the settings.

Feel free to leave comments below, if you have any opinion about this website. Share the website around if you enjoy reading it. Subscribe to our Newsletter or follow our Google+, Facebook and Twitter.

Support this website simply by shopping in Amazon. It will give us small kickbacks, if you use the above affiliate links to make any purchases, which will help us grow.

Cloudflare Announced The Free 1.1.1.1 Public DNS Service, Claiming to Be Faster Than Google’s

Cloudflare Public DNS
Photo from Cloudflare

On 1 April, the web performance and security provider, Cloudflare, announced their own free public DNS service for consumers (1.1.1.1). NO, this is not an April Fool’s joke. Compare to what other companies’ offerings, Cloudflare focuses on providing a fast and private public DNS service.


In short, DNS (Domain Name System) is used to resolve a domain name, such as Unboxingtreatment.com and Google.com, into an IP address that your browsers, routers and switches understand. The resolved IP address will be used to direct users to the exact website’s server. Normally, you will be connected to your Internet Service Providers’ DNS servers, which are often slow and raise concerns about privacy and Internet Censorship. Therefore, a bunch of free public DNS servers are available. Google Public DNS and OpenDNS are some of the most reputable and famous servers in the industry.

Update: To learn how to change DNS in your network, check out our How-to guide.

Cloudflare new DNS service will be offered through 1.1.1.1 or 1.0.0.1 (alternative). It is a partnership between Cloudflare and APNIC. Cloudflare is making the 1.1.1.1 DNS compatible with modern protocols, supporting both DNS-over-TLS and DNS-over-HTTPS. These protocols add encryption during transmission for better security, as well as improving response speed.

For privacy, Cloudflare promises to remove all logs of DNS queries within 24 hours. Some logging is still required to prevent abuse and debug issues, but will soon be deleted. They will not use personal data to tracking users or selling advertising.

Cloudflare Public DNS

Moreover, Cloudflare claimed to be the fastest DNS service in the market. Currently, it seems to be true with Google Public DNS responses at around 25 ms, OpenDNS at 20ms, while Cloudflare DNS at only 13 ms (48% quicker than Google’s). However, there are not much traffic to Cloudflare DNS yet, because it just launched a few days before, but this is still an impressive start.

For more information about the DNS service, you can visit Cloudflare’s blog or at https://1.1.1.1/.

Feel free to leave comments below, if you have any opinion about this website. Share the website around if you enjoy reading it. Subscribe to our Newsletter or follow our Google+, Facebook and Twitter.

Support this website simply by shopping in Amazon. It will give us small kickbacks, if you use the above affiliate links to make any purchases, which will help us grow.

Apple Now Adds External GPU Support in macOS 10.13.4 Update

Apple macOS External GPU support
Photo from Apple (A new menu icon will show up if the eGPU is activated)

Apple’s MacBooks are not well-known for its repairability and upgradabililty, with most of its components soldered into the motherboard. The inclusion of Thunderbolt 3 port and external GPU box can allow users to increase grahpics performance of the MacBook easily. However, macOS did not have official support for eGPU, until the latest 10.13.4 update yesterday (March 29).


Users would have to boot up in Windows to properly use a external GPU on MacBooks previously. Now, Apple has debuted more details about using the eGPU on its website. In short, you will need to update an Thunderbolt 3-equipped Mac computer, that was released in 2016 or later, to macOS 10.13.4.

Only AMD’s GPUs are supported by Apple at this moment, including either Polaris architecture (Radeon RX 570/ RX 580) or Vega architecture (RX Vega 56 and Vega 64.). Apple recommends certain models of eGPU Thunderbolt 3 chassis, which can provide sufficient power to run both the GPU and MacBook.

Metal, OpenGL, and OpenCL applications are expected to have better performance when being used with eGPU in macOS. You should be able to see benefits when rendering videos and 3D models, running games and VR applications. Please note that macOS 10.13.4 doesn’t support eGPUs in Windows using Boot Camp, when in macOS Recovery or when installing system updates.

macOS 10.13.4 also includes other improvements in stability, peformance and security. For more information, you can head to Apple’s website about the update and the eGPU support.

Feel free to leave comments below, if you have any opinion about this website. Share the website around if you enjoy reading it. Subscribe to our Newsletter or follow our Google+, Facebook and Twitter.

Support this website simply by shopping in Amazon. It will give us small kickbacks, if you use the above affiliate links to make any purchases, which will help us grow.

Unboxing and Review of dbrand Pixel 2 XL Skin

dbrand Skins for Pixel 2 XL

Most of the people would immediately get a case after they purchase a new smartphone, for either protection or looks. However, a case does add quite a bit of bulk and hide the original design of the smartphone. Is a skin/vinyl wrap, like dbrand, a great alternative? Let’s check it out.


dbrand is one of the most well-known company in the industry, specialized in providing skins for digital gadgets. It aims to provide a huge range of customization and let users to de-brand their gadgets. This time, we are reviewing the dbrand skin for the Pixel 2 XL.

dbrand Skins for Pixel 2 XL

What I ordered were a matte white back skin and a red logo for my Pixel 2 XL. The back skin cost $9.95 USD, while the logo skin cost $0.95 USD at that time. There are also a skin for the glass on the upper half of the phone.

Unboxing

dbrand Skins for Pixel 2 XL

The dbrand skin came inside an small envelope. If you order skins for larger devices, such as a notebook or tablet, a larger version will be used. The outside is printed with specially designed graphic, which shows a robot factory (dbrand).

dbrand Skins for Pixel 2 XL

At the back of the package, you will see two pull tapes in both sides. There is the Flag of Canada printed on the left side, which represents the origin of dbrand. You can easily take out the content using those pull tapes.

dbrand Skins for Pixel 2 XL

You will find a white dbrand-branded microfiber cloth and a plastic sleeve with the skins inside.

dbrand Skins for Pixel 2 XL

There are two matte white back skins in different types, as well as a set of red logo skins. One of the back skin (precision cut) will cover every side of the phone, including the curve edges, but will require more effort to apply. The logo skin comes with three sizes, which users can choose the size that fits better.


dbrand Skins for Pixel 2 XL

Application

To apply the dbrand skin, you will need a microfiber cloth (included) to wipe away dust/fingerprints on the phone and a hair dryer to heat up the skin around curved corners. Most parts fo the application is simple and easy to follow. You can easily undo any imperfections by immediately peel back part of the skin and reapply. The only step that requires special attention is when you need to wrap the skin around the edges, if the precision fit skin is used.

Appearance (Precision Fit)

dbrand Skins for Pixel 2 XL

The dbrand skin covers most of the back of the phone, and wraps around all the necessary cutouts (camera lens, fingerprint sensor, buttons) perfectly. The laser autofoucs sensor and flashlight will also work without issues.

dbrand Skins for Pixel 2 XL
USB-C charging port and the red Google logo

The bottom USB-C charging port will not be obstructed by the skin.

dbrand Skins for Pixel 2 XL

To prevent having small gaps around the corners of the phone like this, you should definitely follow dbrand’s instruction videos carefully and patiently.

Durability

The dbrand skin for Pixel 2 XL performed pretty well in terms of durability. It can help prevent any scratches on the outside of the smartphone. The matte white skin remains clean and does not have any discoloring after about 2 months of usage.

Conclusion

Unboxing Treatment Recommendation

The dbrand skin for Pixel 2 XL offers users tons of color combinations and customizations, while without increasing the bulk of the smartphone like a normal phone case and still maintaining the overall design of the phone. Though it cannot provide any forms of drop/impact protection, you do not have to worry about minor scratches. For the price, the dbrand skin is a great alternative option to pimp your smartphone up.

Feel free to leave comments below, if you have any opinion about this website. Share the website around if you enjoy reading it. Subscribe to our Newsletter or follow our Google+, Facebook and Twitter.

Support this website simply by shopping in Amazon. It will give us small kickbacks, if you use the above affiliate links to make any purchases, which will help us grow.

Qualcomm Says Their Snapdragon-Powered Laptops Run Cooler And Longer

Earlier this year (2018), there are a few models of always-connected laptops appeared on the market. Those laptops are powered by Qualcomm Snapdragon SoC with 4G LTE connectivity, and are running a version of Windows 10 opearting system.


When comparing with traditional x86-based processors from Intel or AMD, an ARM-based processor (just like the Snapdragon SoC) may not be able to achieve the same level of raw compute performance yet, but the laptops will get much better battery life and thermal performance, due to the characteristic of less power consumption and heat output. Qualcomm therefore posted a few videos about these two distinct advantages.

In the first video, Qualcomm put an normal notebook, which seemed to be from Dell XPS lineup, side by side with another Snapdragon-Powered Windows PC. They left the screens of both devices on with video playing constantly, until the batteries ran out. The Dell notebook shut off after 13 hours and 9 minutes, while the other did it after 21 hours and 56 minutes. The Snapdragon-Powered Laptop performed about 66.8% better.

After that, Qualcomm compared the two devices’ thermal performance. Both of the laptops were playing a youtube video on one side, and playing a game (Asphalt 8) on the other side. After 15 minutes, the traditional laptop had higher temperature at where the CPU was installed, while the Snapdragon-equipped one stayed reasonably cooler and can sustain better performance (higher frames per second). The Dell notebook would need to thermal throttle (leads to slower clock speed) to control the heat.

These are incredible achievements for pushing ARM-based devices to run more productive and convenient operating systems. However, there are still a number of limitations that need some time to tackle. Please note that all the above tests were performed by Qualcomm in-house. We do not know if specific applications or backgroud processes would affect the results.

Qualcomm also has another video about the quick wake up time for their Snapdragon-powered machines. For more information, you can check out their youtube channel or website.

Feel free to leave comments below, if you have any opinion about this website. Share the website around if you enjoy reading it. Subscribe to our Newsletter or follow our Google+, Facebook and Twitter.

Support this website simply by shopping in Amazon. It will give us small kickbacks, if you use the above affiliate links to make any purchases, which will help us grow.

Microsoft Has Managed to Reduce Windows Update Time to 30 Minutes

Microsoft Windows 10 Update
Photo from Microsoft

Windows updates normally take quite a large amount of time to download and install, temporarily making your computer unusable (offline). This becomes more annoying when Windows 10 will force users to update automatically. Apparently, Microsoft also notices the issue and announces that future Windows update installation will need significantly less time than before.


According to Microsoft, the average offline installation time for current Windows updates is about 82 minutes. The Fall Creators Update released in October 2017 required 58 minutes. Now, Microsoft is able to further reduce the time to 30 minutes, by moving more portions of the installation process online, instead of offline. When Windows update is in its online phase, every task is done in the background and users can continue to use the computer normally. On the other hand, users will have to stop their work, because the operating system is not available during the offline phase.

Microsoft says these changes in Windows update installation should not be noticeable to the majority of users. The setup process will be run at low priority to reduce system performance or battery life impact.

The new implementation for the Windows update is currently only available for the Insider Program. Microsoft is expected to rollout the new changes to the public in the upcoming Spring Creators Update. For more information about this, you can visit Microsoft’s blog post.

Feel free to leave comments below, if you have any opinion about this website. Share the website around if you enjoy reading it. Subscribe to our Newsletter or follow our Google+, Facebook and Twitter.

Support this website simply by shopping in Amazon. It will give us small kickbacks, if you use the above affiliate links to make any purchases, which will help us grow.

ASRock Is Going To Launch The Phantom Gaming Graphics Card Series

ASRock Phantom Gaming Graphics Card
Screen Capture from ASRock

Earlier this year (2018), there were rumors about ASRock stepping into the graphics cards market. ASRock is well-known and established as a company that offers budget-friendly and feature-packed motherboards to consumers. However, the rumors were confirmed recently by an official teaser from ASRock.


Update: ASRock announced their Phantom Gaming RX500 series graphics cards on 28 March. You can head to their product pages for more information.

ASRock posted a teaser in varios social media platforms stating the mystery will come real soon. Inside the 30-second video, we can see part of the exterior design of the new graphics card. The card seems to feature a open cooler design with two large fans, instead of a closed/blower cooler. It is painted in mostly black and silver with logos on both the sides and the fans. Also, the card will be launched under the Phantom Gaming brand.

We do not have information about the specification of the card, but the rumors are leaning more towards an AMD Radeon-based GPU and will be launched in some time next month (April). It may include the latest Radeon Vega 64 and 56 GPUs, as well as the mid-range RX500 series GPUs.

Feel free to leave comments below, if you have any opinion about this website. Share the website around if you enjoy reading it. Subscribe to our Newsletter or follow our Google+, Facebook and Twitter.

Support this website simply by shopping in Amazon. It will give us small kickbacks, if you use the above affiliate links to make any purchases, which will help us grow.

Follow Us on Social Media

583FansLike
635FollowersFollow
494FollowersFollow
1,494FollowersFollow
43SubscribersSubscribe

More Articles