The iCUE NEXUS is a very unique accessory, being a companion touch screen for most Corsair’s products and software ecosystem. It allows for quick access to customization controls and more. Corsair touted it as the personalized “command center” for PC enthusiasts and gamers.
Unboxing
The iCUE NEXUS comes in a black and yellow cardboard box. Three sample screenshots are printed at the back with short descriptions translated into four different languages. Corsair is also partnered with Rainbow Six Siege to provide custom in-game actions for the iCUE NEXUS. The device can only be used on a Windows 10 PC with a USB 2.0 port and the iCUE software installed.
The side of the box has Corsair’s tagline for its accessories – “GET CONNECTED”.
Inside the packaging, you have the warranty guide, user manual, a plastic base/stand, three keyboard adapters and a plastic spudger (prying tool).
Corsair iCUE NEXUS Companion Touch Screen
The main unit of the iCUE NEXUS is about 154 mm long, 35 mm wide and 16 mm tall. There is a short, non-detachable USB Type-A cable for power and data connection, which is designed to be directly connected to the USB passthrough port at the back of most Corsair’s keyboards. The 5-inch touch-capable TFT LCD display has a resolution of 640 x 48 with an unusual aspect ratio of 40:3.
You can install the iCUE NEXUS on the top of the keyboard, using the included three adaptors and pre-applied double-sided 3M VHB tapes. The adaptors support the K70 MK.2 Low Profile, K70 MK.2, K95 Platinum and K100 RGB series mechanical keyboards.
You can also choose to use the iCUE NEXUS as a standalone display without attaching it to a keyboard. The plastic base has a longer 1.8-meter USB Type-A cable to run the connection to your PC tower, as well as a large rubber pad at the bottom to prevent it from sliding on your desk.
Before clipping the main unit to the base, you will have to plug the cable into the USB Type-A port inside.
The base will angle the screen slightly upwards, so users can view the display’s content more easily when placed on a desk.
Review
Software
Identical to other Corsair products, the iCUE NEXUS will be automatically shown on the iCUE 4 software’s homepage, once it is plugged into the computer. You can add customizable scenes and sensor readings in the left sidebar.
The “Manual Setup” section is the place where you customize all the screens and buttons on the iCUE NEXUS. Each screen can hold up to six rectangle buttons or widgets (100 x 48), which can be assigned as a macro, keyboard and mouse clicks, or to launch applications. You can set the button’s background and icon colors/images. For widgets, they can be used to display system information, such as CPU/GPU temperatures and fan speeds.
If you have other iCUE-compatible devices in the computer, there will be unique screens available for that particular device (i.e. the K70 RGB TKL keyboard). You can also edit, copy or temporarily disable certain screens in the “Libraries” tab.
As the name implies, the “Import/Export Screens” can be used to import screens created by community members or third-party companies. You can also export your own screens to share them to other iCUE NEXUS’s users. You can update firmware, configure the display timeout time and brightness in the settings menu.
The iCUE NEXUS relies heavily on the iCUE 4 software and all the iCUE-compatible hardware to act as a “command center”. The software is required to be running at all times in the background. At the time of my testing, more works can be done to improve the device’s usability and functionality. For example, more widgets should be added as soon as possible. A timer and stopwatch would be useful tools, that can be quickly accessed from the display. If the iCUE NEXUS is able to show Windows notifications, it would be extremely helpful when you are using a full screen application. I was surprised to see there is no Elgato Stream Deck integration on the device, which will further expand its capability to control streaming-related functions.
There is no support for launching applications installed from the Microsoft Store in the iCUE software. It may not be the fault for Corsair, because of the strange way Microsoft chooses to install its UWP apps. However, you should be able to find some workarounds by setting up some .bat files or marcos.
Although Corsair has provided a starter pack for newcomers with a few screens and gifs, it would be more convenient for everyone to download user-created screens or widgets in one place, if Corsair can build a library page, similar to that for the iCUE lighting profiles.
Hardware
The iCUE NEXUS is constructed primarily from molded plastic, similar to the material used in their keyboards, but the build quality still feels decent and solid. The touch screen is covered with glass, which should help protect it from most scratches under normal circumstances (i.e. fingernails, small bumps from keyboard and mouse).
The 5-inch LCD display is not only the key selling point of the iCUE NEXUS, but is also the major disappointment of this accessory. In terms of pure specifications, it is by no means up to today’s standards. Touch responsiveness is actually good, but animations may seem a bit laggy because of the panel’s 24 Hz refresh rate. Color contrast and vibrancy is restricted to 6-bit colors (up to a total of 262,144 colors) with low maximum brightness. Display viewing angle can be better, but is acceptable for the iCUE NEXUS’s use cases, as you are always looking at it head on at the same position. Pixel density at around 128 PPI is alright from the normal viewing distance.
In my opinion, the display on the iCUE NEXUS can be larger with slimmer side bezels, while maintaining the same physical dimensions. A bigger screen can allows for more versatility in software layout and functionality, for example, showing two rows of buttons or information. The current display size is fine, if it is integrated into a keyboard with limited internal space, not as a standalone accessory.
Conclusion
The concept of Corsair iCUE NEXUS is a long-standing dream for many gamers to have an additional display for all their peripherals and computers. The ability to control devices and launch applications are very useful features to have. Improvements in both the hardware and software aspects are necessary to realize the true potential at its current form, from a larger, sharper display to more widgets and tools in iCUE.
The iCUE NEXUS is priced at $99.99 USD (MSRP) with a 2-year warranty. There is no direct competitor in the market, considering it is locked to only iCUE-compatible devices. You can still get the Logitech G19/G19s keyboards or the EVGA Z10 keyboard, though they are relatively old and lack any comparable features. The iCUE NEXUS is an awesome option, if you are into the Corsair ecosystem.
You can purchase the accessory from your local/online retailers or the links below from Amazon and Newegg.
Thanks Corsair for providing us the accessory for review. (Review Sample)
Feel free to leave comments below. Share the article if you enjoy reading it. Follow us on Twitter, Facebook, Instagram and Pinterest.
Support this website simply by shopping on Amazon and Newegg. We will receive small kickbacks, if the above affiliate links are used to make any purchases. Or you can directly donate to us via our Buy Me a Coffee page.
Released together with the XD80 NVMe SSD in April 2021, the Zenith RGB DDR4 RAM is the latest addition to the XPOWER lineup, Silicon Power’s gaming-focused division. It appears to have a more simplistic and refined heatsink design than the XPOWER Turbine RGB.
Unboxing
The XPOWER Zenith RGB is shipped inside a plastic clamshell packaging, which cannot be easily-opened without a pair of scissors or razer blade. We would love to see a more user-friendly and recyclable packaging in the future. Short descriptions in 14 languages are listed on the back, alongside the contact information about Silicon Power’s service center.
Our particular sample is a dual-channel 16 GB kit (SP016GXLZU320BDD), which includes two 8 GB memory sticks at 3200 MHz (SP008GXLZU320BSD). Single stick capacity ranges from 8 GB to 32 GB, with corresponding dual-channel kits up to 64 GB. You can choose to have frequency at 3200 MHz, 3600 MHz or 4133 MHz.
Silicon Power XPOWER Zenith RGB DDR4-3200 16GB Kit
The Zenith RGB DDR4 RAM sports a similar heat spreader design as the XD80 SSD, which is made from aluminum, painted in dark grey with a brushed metal finish. It covers most of the black printed circuit board (PCB) underneath, apart from the 288 golden pins at the bottom for data and power. The memory module will draw 1.35 volts for the 3200 MHz and 3600 MHz models, but 1.4 volts for the 4133 MHz model (in XMP profiles). The memory stick is 133.4 mm long, 38.5 mm tall and 8.0 mm thick, which is relatively low profile for a RGB RAM, about 7.2 mm higher than bare PCB.
A RGB LED light bar spans across the top of the memory stick, with a full-length translucent plastic diffuser. The tiny XPOWER logo is printed at the center.
Review
Testing Methodology
To evaluate the performance of the particular memory kit, we use a total of five benchmarking software. AIDA64‘s internal “Cache and Memory Benchmark” and MaxxPI²’s MaxxMem² are used to determine the read, write and copy speeds, as well as the latency. Cinebench R15 and Cinebench R20 are perfect for testing how the memory kit affects CPU performance. SiSoftware Sandra can show the total bandwidth. The memory kit will be tested in two different settings/profiles.
Default: 2666 MHz at 19-19-19-43 @ 1.20 V
XMP 2.0 Profile 1: 3200 MHz at 16-18-18-38 @ 1.35 V
The Zenith RGB was able to beat both the XPOWER Turbine RGB and AirCool RAMs at 2666 MHz in AIDA64. While it was only winning by a slight margin in the read and write test, it was about 15.7% to 16.6% faster in the copy test. The Turbine RGB retook the crown at 3200 MHz, leading the Zenith RGB by around 200 MB/s in all three categories.
The Zenith RGB is the best-performing RAM kit at 3200 MHz in the MaxxMem2 benchmark. It achieved over 26400 MB/s in read, 35800 MB/s in write and 29900 MB/s in copy. It was about 0.12% to 2.09% better than the Turbine RGB.
In SiSoftware Sandra, the available bandwidth increased from 25.34 GB/s to 29.78 GB/s (+17.5%), by bumping up the frequency to 3200 MHz. It was lower than the Tubrine RGB and HyperX Fury RGB.
We could observe a significant reduction in latency when the XMP profile was applied to the memory. In AIDA64 and MaxxMem2, it decreased from 55.9 ns and 62.8 ns to 48.3 ns and 55.1 ns.
The RGB lighting is sharp and vivid with smooth effect transitions. The LEDs are bright, but hotspots can be seen, due to just five LED modules on the PCB, same as the Turbine RGB.
Conclusion
The Silicon Power XPOWER Zenith RGB had comparable performance as the Turbine RGB, which is significantly faster at 2666 MHz and almost identical (within the tests’ margin of error) at 3200 MHz. No instability was discovered after applying the XMP profile to the memory. The overall style and design of the heat spreader is minimalistic and neutral, that should make the RAM kit fit in most PC builds’ color scheme.
The Zenith RGB is priced at around $72.97 USD for the 16 GB (3200 MHz) kit, at the time of this review. Compared to other memory kits in the market, the G.Skill Trident Z RGB, Kingston FURY Beast RGB and GeIL Orion RGB costs about $82.99 USD, $79.99 USD and $72.99 USD (MSRP) respectively. The Zenith RGB is in fact one of the cheapest memory kits with onboard RGB lighting, which is perfect if you are on a tight budget.
You can purchase the memory from your local/online retailers or the links below from Amazon and Newegg.
Thanks Silicon Power for providing us the memory for review. (Review Sample)
Feel free to leave comments below. Share the article if you enjoy reading it. Follow us on Twitter, Facebook, Instagram and Pinterest.
Support this website simply by shopping on Amazon and Newegg. We will receive small kickbacks, if the above affiliate links are used to make any purchases. Or you can directly donate to us via our Buy Me a Coffee page.
Silicon Power released the XD80 PCIe 3.0 NVMe SSD in April 2021, which is an update over the now more than 2-year-old P34A80. With an almost identical hardware specification, will the XD80 outperform the P34A80 in our benchmark results?
Specifications
[table id=445 /]
Same as the P34A80, the XD80 is only available in M.2 2280 form factor. You can choose to have capacity from 256 GB to 2 TB. Via the PCIe 3.0×4 interface, the SSD is said to have sequential read/write speeds up to 3400 MB/s and 3000 MB/s. Smaller-sized models will have slower write speeds, as low as 1100 MB/s. All drives are rated to have a MTBF of 2 million hours and write endurance from 200 TBW to 1600 TBW.
Unboxing
The overall packaging of the XD80 is extremely simple with a cardboard and plastic clamshell. There is not much information, other than the contact details for Silicon Power’s service center.
Silicon Power XD80 PCIe NVMe SSD
Our 2 TB XD80 sample has a part number of SP002TBP34XD8005. Both sides of the blue printed circuit board (PCB) are occupied by the components. A thin aluminum heatsink is installed on the top of the drive for better heat dissipation, when under intense load. The white sticker at the back contains information, like model name and serial number.
The XD80 is powered by the Phsion PS5012-E12 memory controller, which is an unsurprising choice for a PCIe Gen 3 SSD. A single 8 Gb/1 GB DDR4-2666 DRAM chip from SK hynix (H5AN8G8NCJR) and two 64-Layer BiCS3 3D TLC NAND flash modules from KIOXIA (TPBHG55AIV) are fitted on each side of the PCB.
This is where I got a bit confused. I originally thought the XD80 drives will all use the newer, higher-density 96-Layer BiSC4 NAND flash. But our particular sample is equipped with the 64-Layer BiCS3 NAND flash. A quick google search finds that other tech review sites’ XD80 samples do have the BiSC4 NAND flash installed (e.g. Guru3D, NikkTech and TechPowerUp). On their 2 TB drives, the PCB is single-sided and has the smaller PS5012-E12S controller. They do have a different part/lot number of SLA80D29P, instead of SLA80D09P, if you want to distinguish between the two versions.
I understand that manufacturers sometimes need to switch or mix components on an existing SSD model, due to part availability and cost constraint. Personally, I am fine with different capacity drives having different components, as long as they meet the advertised performance and are clearly-labeled on the product itself. For the XD80, I think Silicon Power should inform the customer better by having a notice on the product page.
The M.2 (M-Key) connector at the end can allow a maximum theoretical bandwidth of up to 32 GT/s or 3.94 GB/s.
Review
Testing Methodology
To test the performance of the solid-state drive, we use four well-established storage benchmarking software. They are CrystalDiskMark, ATTO Disk Benchmark, AS SSD Benchmark, as well as HD Tune Pro.
CrystalDiskMark can measure both sequential and random 4KB read/write speeds with a queue depth of 32. ATTO Disk Benchmark can test how the drive performs across different transfer block sizes, mostly in a sequential environment. AS SSD Benchmark can provide both normal read/write speed and the IOPS performance of the drive. HD Tune Pro can be used to simulate a large file transfer of up to 100 GB.
We also recorded the time to copy three files of 10 GB, 500 MB and 250 MB from a RAM disk to the SSD, to simulate a real-world situation.
The XD80 was able to have sequential read/write speeds at around 3480 MB/s and 2910 MB/s in CrystalDiskMark. Random 4K operations at queue depth 32 lowered the speeds to 690 MB/s and 330 MB/s.
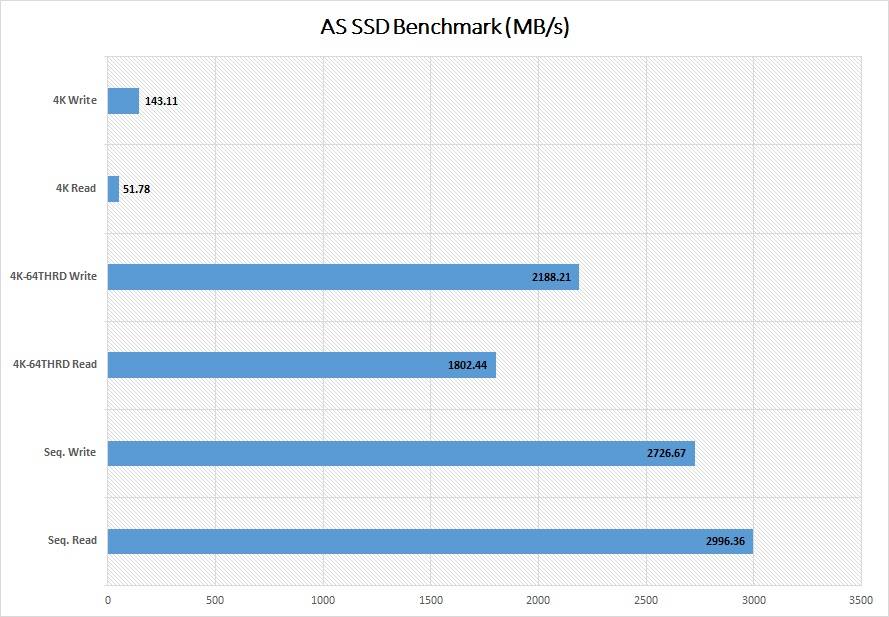
Sequential performance was slower in AS SSD Benchmark, at about 3000 MB/s for read and 2730 MB/s for write. Higher random 4K speeds were observed at 1800 MB/s and 2190 MB/s, when queue depth increased to 64.
IOPS number represents how well a drive handles random input and output operations. The XD80 scored 5847 in the benchmark. It reached 461424 IOPS for read and 560181 IOPS for write.
Speeds plateaued after the test file size increased to 128 KB. It was able to achieve read/write speeds at 3200 MB/s and 2710 MB/s in ATTO Disk Benchmark.
Despite the larger capacity at 2 TB, the XD80 does not seem to have allocated more storage space for the pseudo-SLC cache, which is only about 25 GB big. In HD Tune Pro’s 100 GB test, the sequential write speed dropped from 3000 MB/s down to 1700 MB/s, once the SLC cache is saturated.
The SSD took approximately 5.75 seconds to complete the copying of three files, sized around 15 GB. The write speed topped out at about 1.93 GB/s during the transfer.
Comparison
[visualizer id=”2840″ lazy=”no” class=””]
[visualizer id=”2842″ lazy=”no” class=””]
[visualizer id=”4796″ lazy=”no” class=””]
In spite of the identical memory controller and NAND flash, the XD80 managed to beat the P34A80 in AS SSD Benchmark with about 481 MB/s and 255 MB/s higher sequential read/write speeds. But it is slightly slower in writing large-sized file, losing in HD Tune Pro. The XD80 has comparable overall performance to other similarly-spec’d PCIe 3.0 SSDs, such as the OWC Aura P12 and Sabrent Rocket, but with inferior random 4K write and sustained write speeds.
Conclusion
As a whole, the Silicon Power XD80 is a decent PCIe Gen 3 SSD with adequate read/write speeds for most users. The smaller SLC cache does affect its ability to be as quick when transferring huge files. I was unable to know whether there is any noticeable difference in performance on the 96-Layer BiCS4 NAND flash-equipped version. Again, it would be way better if Silicon Power can maintain component consistency at least in the same capacity SKU to prevent future customers’ confusions and frustrations.
The XD80 costs $197.99 USD (MSRP) for the 2 TB model, also provided with a 5-year warranty. At the moment of this review, this price is similar as other competitors in the market. For comparison, the Sabrent Rocket, Western Digital SN750 and Samsung 970 EVO PLUS are all priced at $199.99 USD (MSRP), but the XD80 has stronger endurance rating than the SN750 and 970 EVO PLUS (1600 TBW vs 1200 TBW).
The 512 GB and 1 TB versions of the XD80 are priced at $68.99 USD and $102.99 USD (MSRP).
You can purchase the SSD from your local/online retailers or the links below from Amazon and Newegg.
Thanks Silicon Power for providing the SSD for review. (Review Sample)
Feel free to leave comments below. Share the article if you enjoy reading it. Follow us on Twitter, Facebook, Instagram and Pinterest.
Support this website simply by shopping on Amazon and Newegg. We will receive small kickbacks, if the above affiliate links are used to make any purchases. Or you can directly donate to us via our Buy Me a Coffee page.


 Explained")


")