Home Blog Page 85

Unboxing and Review of Silicon Power P34A60 512GB PCIe NVMe SSD

Silicon Power P34A60 PCIe NVMe SSD

The P34A60 is the latest entry-level NVMe SSD from Silicon Power, that incorporates a DRAM-less design. Compared to the P34A80 (its review here), it has slower performance but a more affordable price tag, which should be perfect for less demanding users.


Specifications

[table id=317 /]

The Silicon Power P34A60 features a PCIe 3.0×4 interface and NVMe 1.3 protocol for data transfer. It is available in four capacities from 256 GB to 2 TB and only in M.2 2280 form factor. The SSD is advertised to be capable of maximum sequential read/write speeds at 2200 MB/s and 1600 MB/s.

All models have a rated MTBF of around 2 million hours and endurance from 150 TBW to 1200 TBW, as well as a 5-year warranty.

Unboxing

Silicon Power P34A60 PCIe NVMe SSD

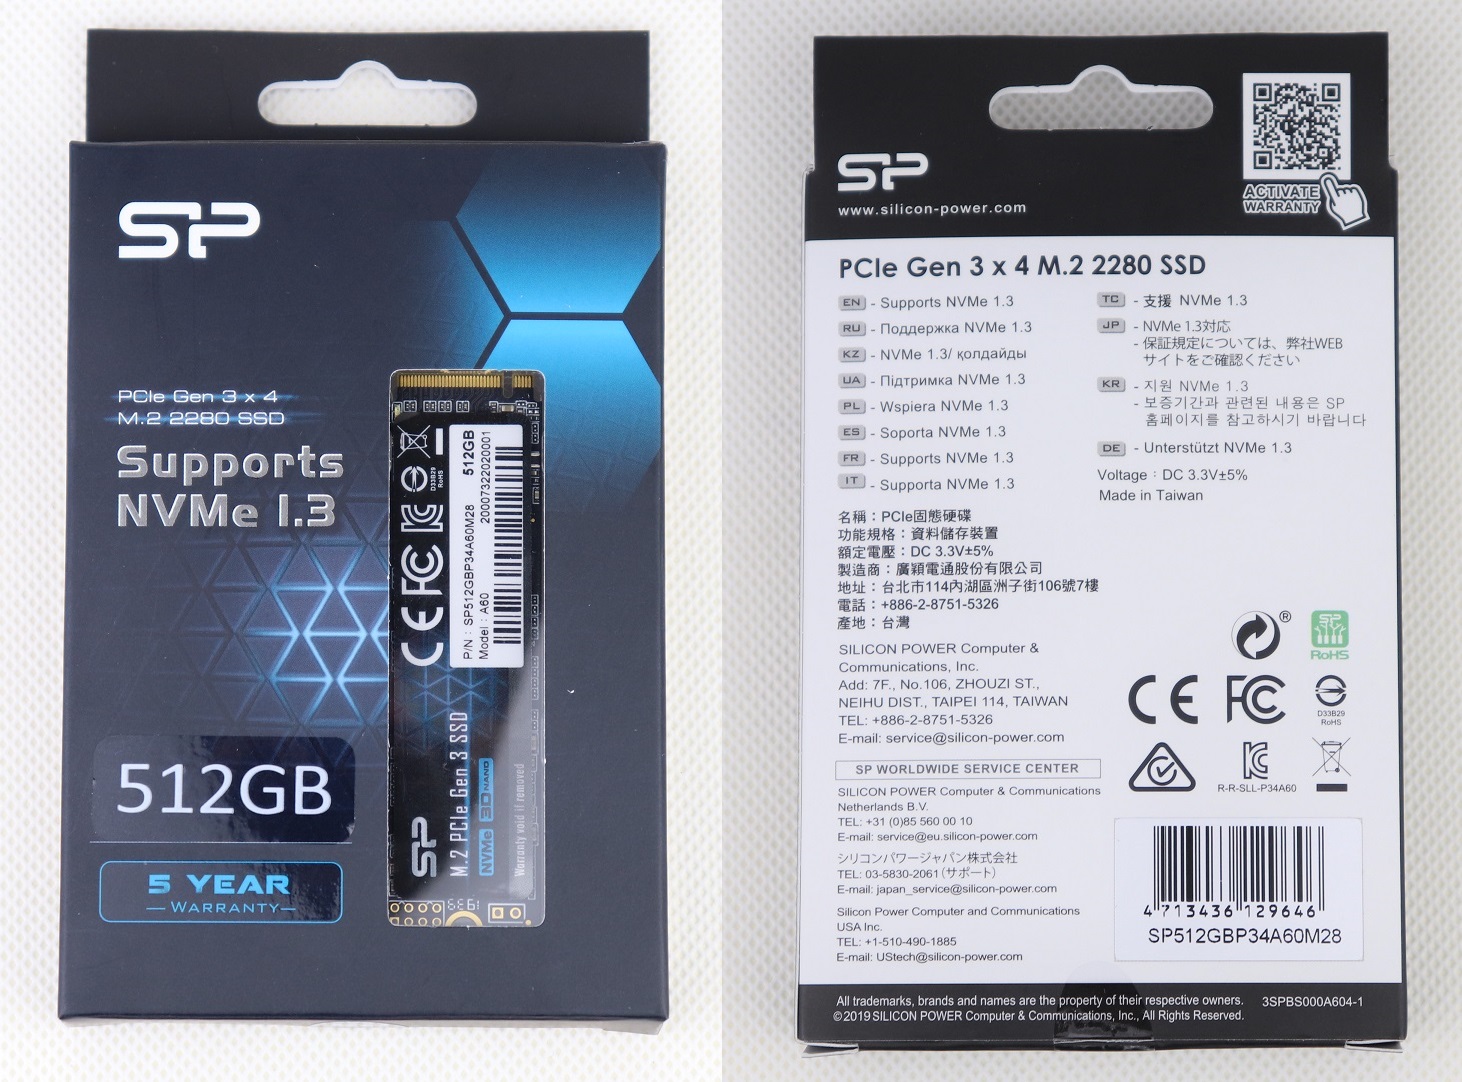
Like its bigger brother, the P34A60 is transported with relatively basic packaging. You can see the actual drive through a clear plastic window, as well as the capacity on the front of the box. Contact information for Silicon Power can be found at the back, in case you need tech support.

Silicon Power P34A60 PCIe NVMe SSD

Silicon Power P34A60 PCIe NVMe SSD

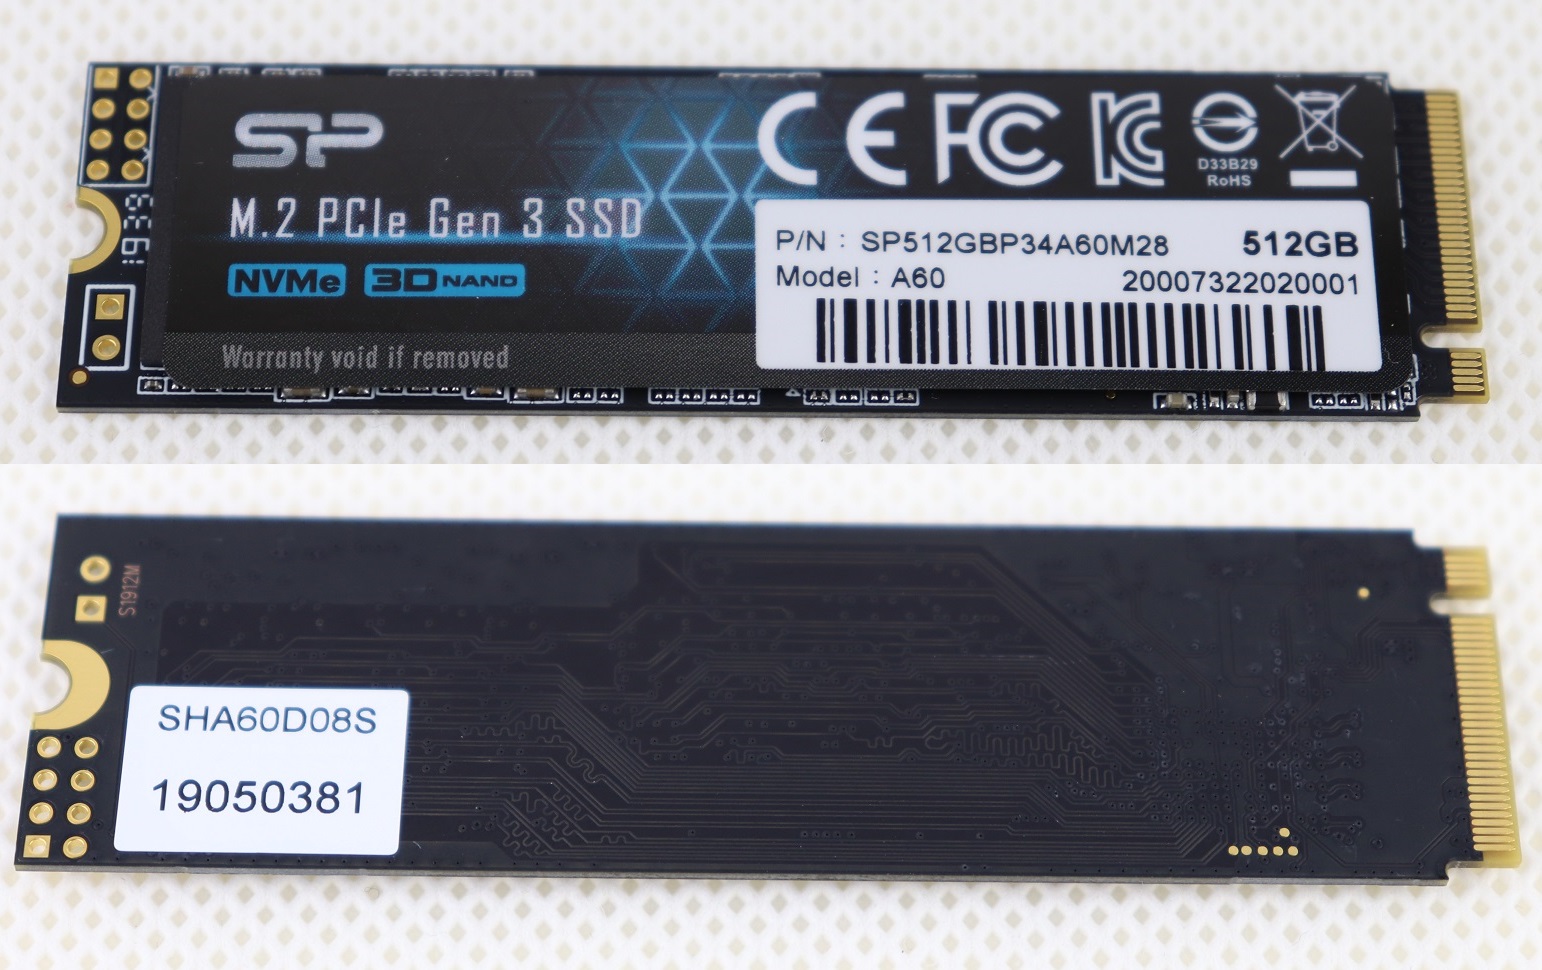
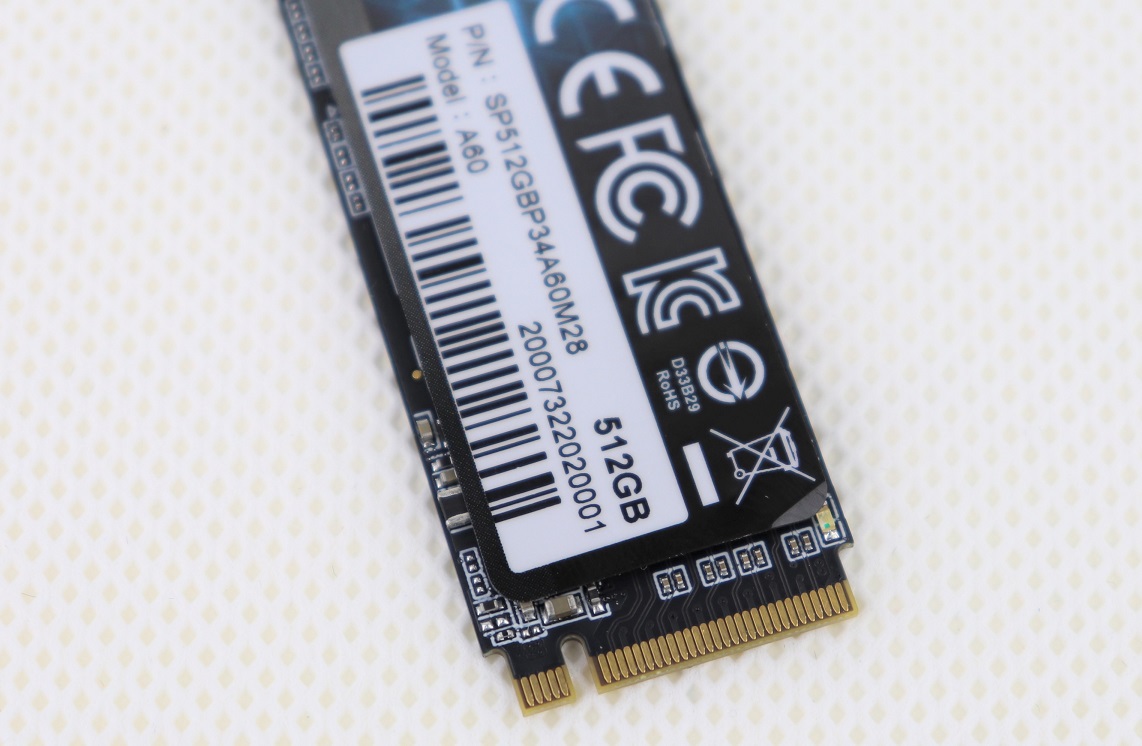
The P34A60 does not come with a heatsink or enclosure. A sticker is on the top with information like part number, serial number and capacity. The back side of the printed circuit board (PCB) is free of any components for our 512 GB sample.

Silicon Power P34A60 PCIe NVMe SSD

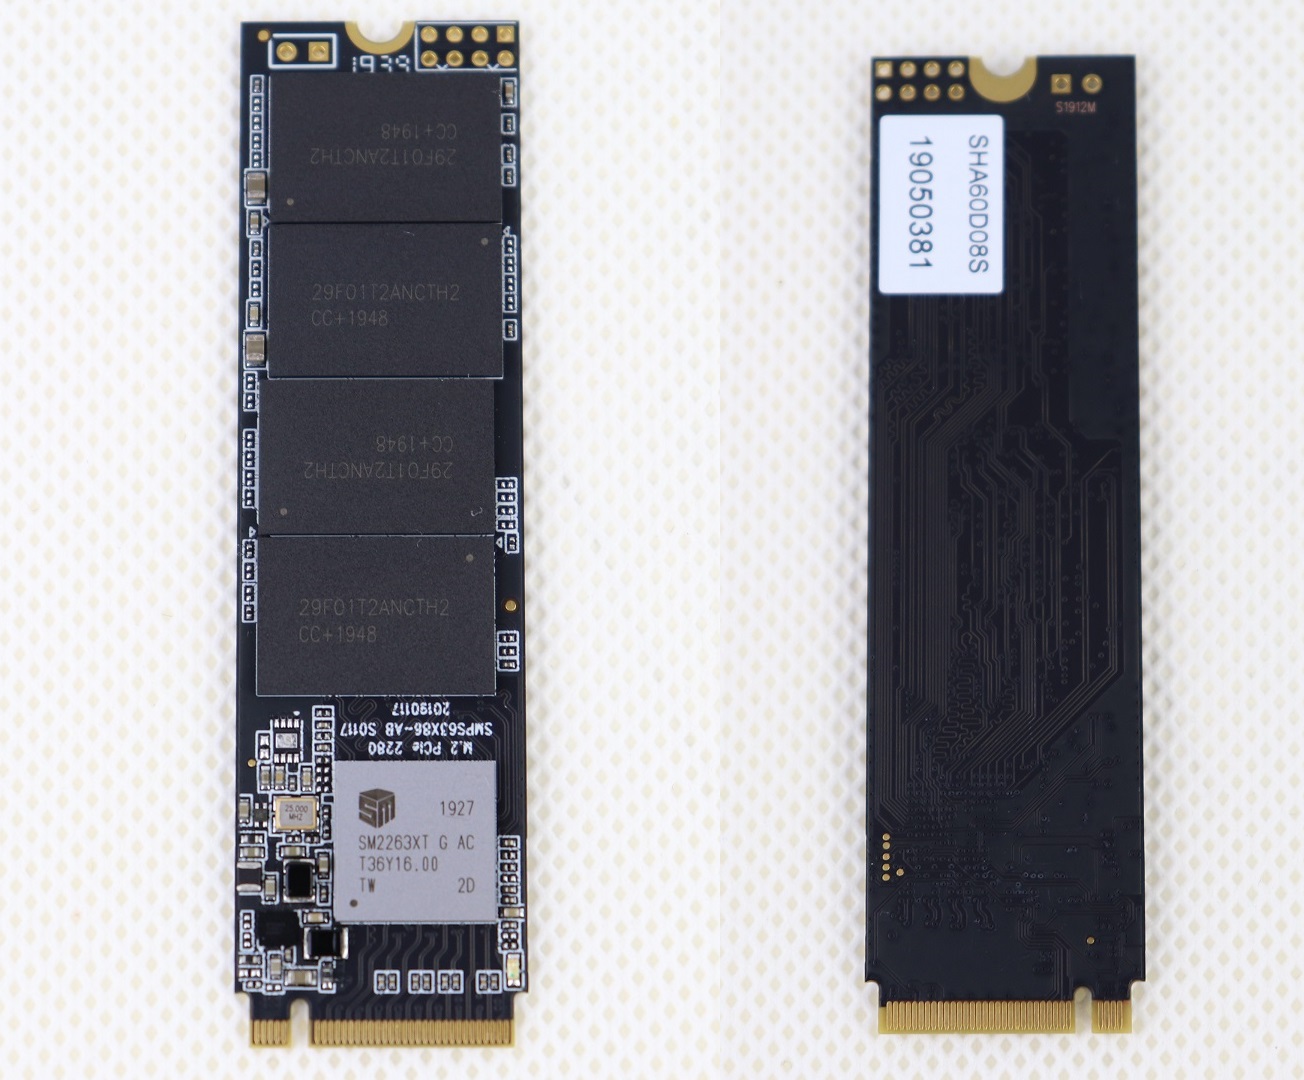
The P34A60 is powered by the 4-channel Silicon Motion SM2263XT memory controller and Mircon’s 64-Layer 3D TLC NAND flash (29F01T2ANCTH2). Different from the P34A80, DRAM chips are absent from this SSD to keep the production costs down.

Onboard DRAM cache is often used to store a translation table about the locations of the written data for the controller. Without dedicated DRAM chips, the SSD will have to put the information directly to the NAND flash, which will decrease performance, durability and increase overall latency. Therefore, the P34A60 is implemented with the new Host Memory Buffer (HMB) technology, which allocates part of your system’s DDR3/DDR4 memory to mitigate the disadvantages of the DRAM-less design.

Silicon Power P34A60 PCIe NVMe SSD

The P34A60 transfers data and gets power via a M.2 connector (M key). Combined with the PCIe 3.0×4 interface, the maximum theoretical bandwidth available to the SSD is 32 GT/s or 3.94 GB/s.


Review

Testing Methodology

To test the performance of the solid-state drive, we use four well-established storage benchmarking software. They are CrystalDiskMark, ATTO Disk Benchmark, AS SSD Benchmark, as well as HD Tune Pro.

CrystalDiskMark can measure both sequential and random 4KB read/write speeds with a queue depth of 32. ATTO Disk Benchmark can test how the drive performs across different transfer block sizes, mostly in a sequential environment. AS SSD Benchmark can provide both normal read/write speed and the IOPS performance of the drive. HD Tune Pro can be used to simulate a large file transfer of up to 100 GB.

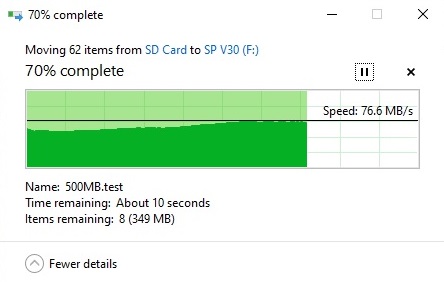
We also recorded the time to copy three files of 10 GB, 500 MB and 250 MB from a RAM disk to the SSD, to simulate a real-world situation.

Performance

Silicon Power P34A60 PCIe NVMe SSD

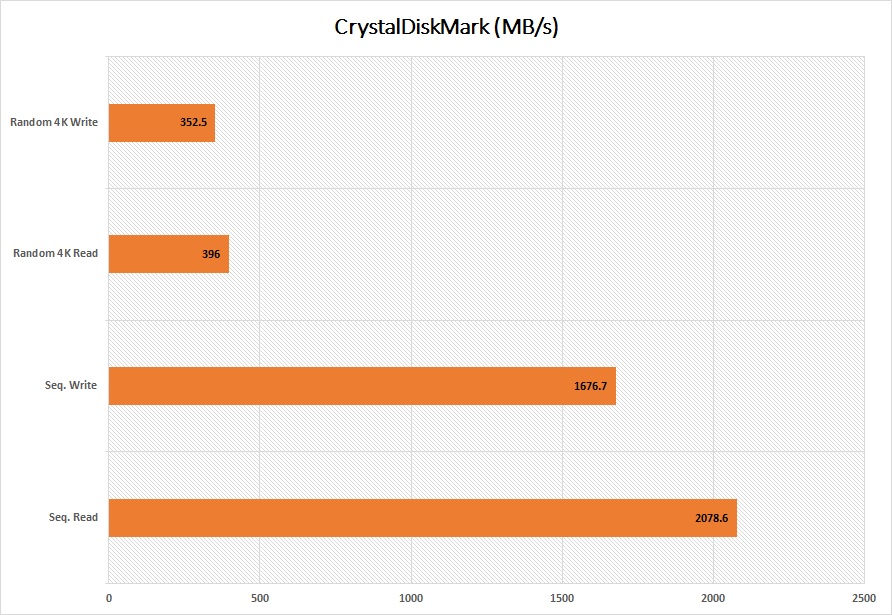
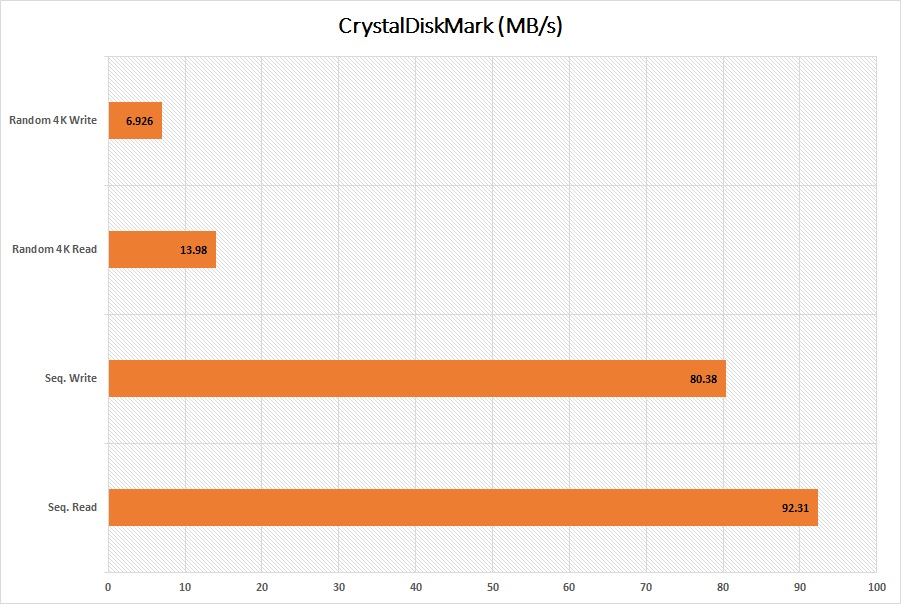
Similar read/write sequential performance as the claimed values could be observed in CrystalDiskMark, at about 2080 MB/s and 1680 MB/s. Random 4K (at queue depth 32) speeds usually hovers around 300 MB/s for SATA-based SSDs, while the P34A60 did significantly higher at 396 MB/s and 352 MB/s.

Silicon Power P34A60 PCIe NVMe SSD

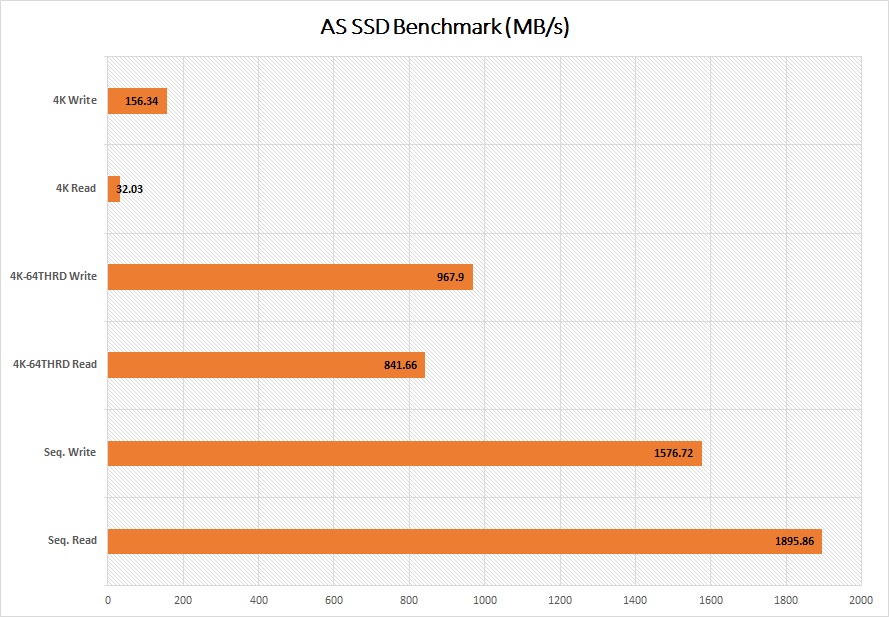
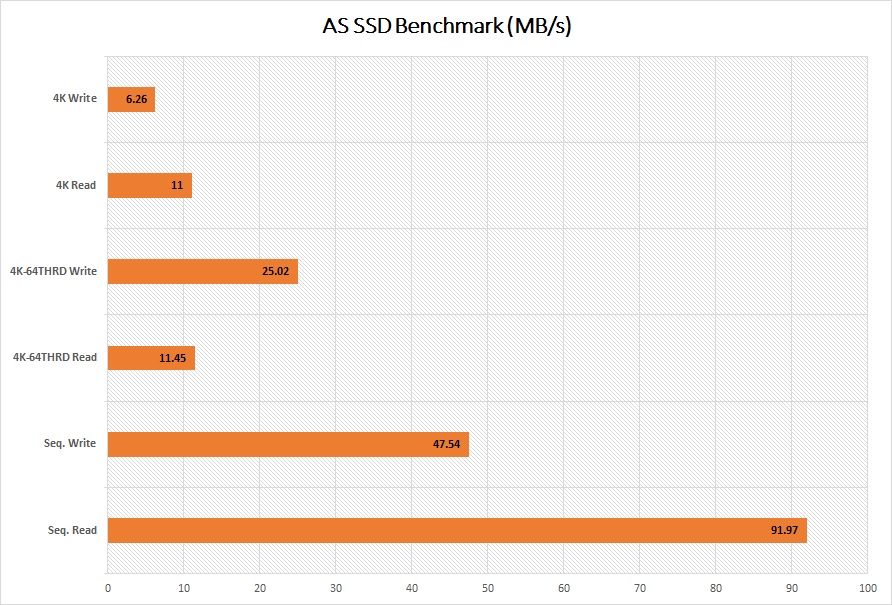
We saw marginally lower speeds in AS SSD Benchmark. Sequential read/write speeds decreased 1895 MB/s and 1576 MB/s. Improvements for random 4K operations can be seen with increased queue depth at 64, at 967 MB/s and 841 MB/s respectively.

Silicon Power P34A60 PCIe NVMe SSD

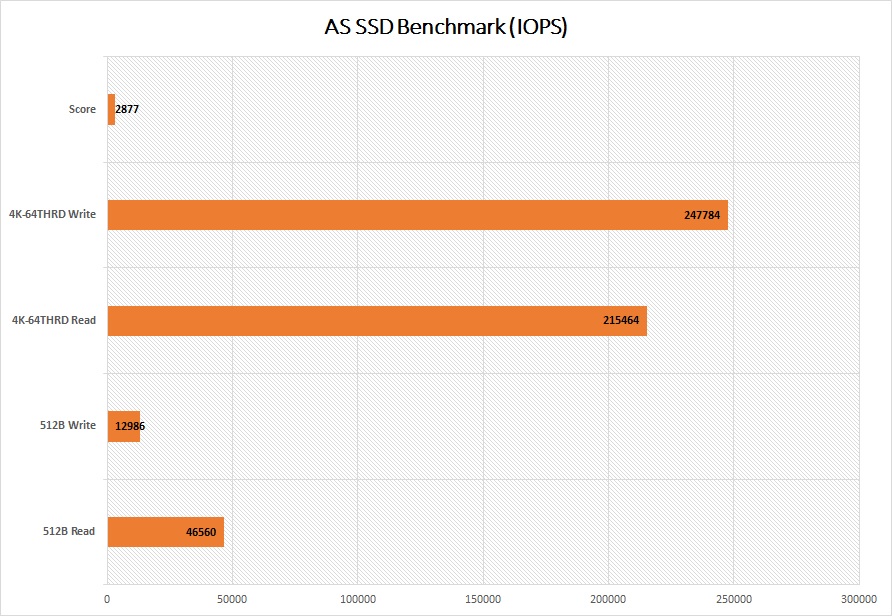
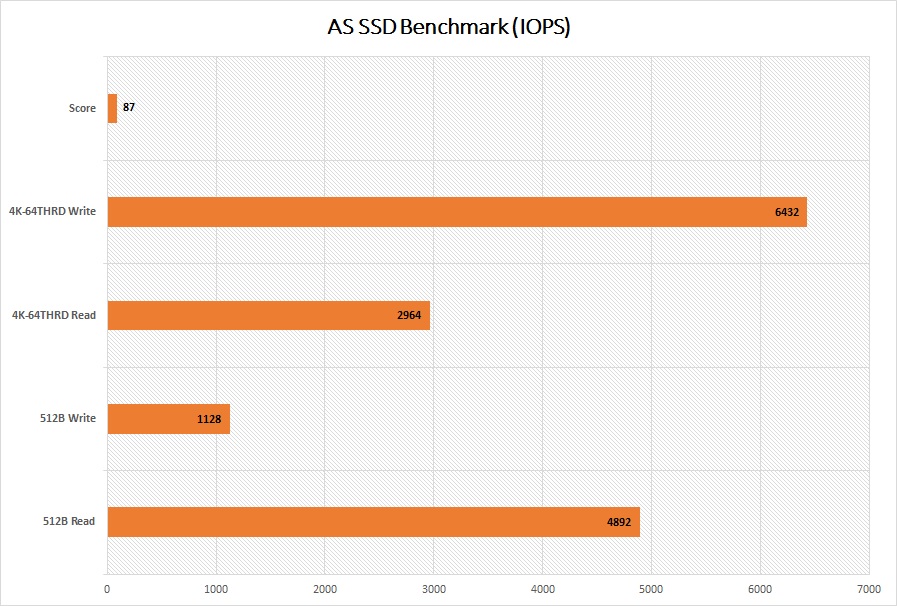
IOPS number represents how well a drive handles random input and output operations. The P34A60 got a score of 2877 in the benchmark. It reached up to 247784 IOPS and 215464 IOPS for random 4K read/write.

Silicon Power P34A60 PCIe NVMe SSD

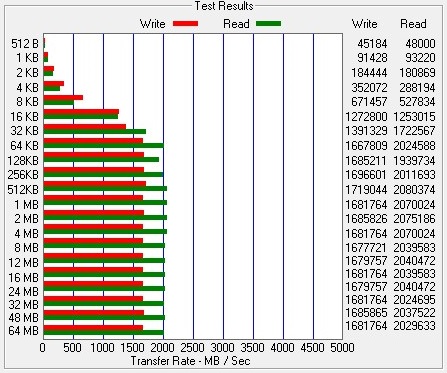
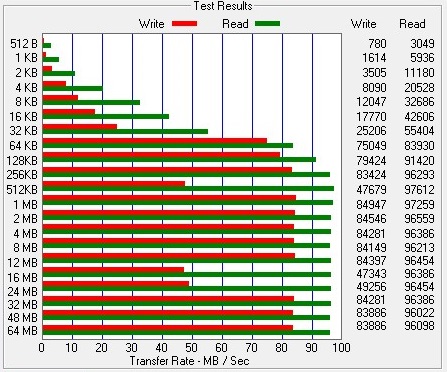
When the test file sizes climbed up to 64 KB, the read/write speeds would level off to around 2000 MB/s and 1600 MB/s in ATTO Disk Benchmark.

Silicon Power P34A60 PCIe NVMe SSD

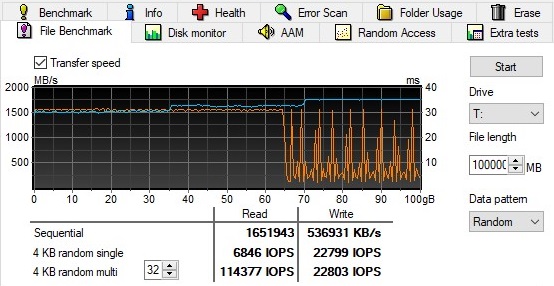
In HD Tune Pro, we wrote a gigantic 100 GB file tranfer to the P34A60. The SSD was able to sustain its rated maximum speed at around 1500 MB/s for the first 65 GB. It then began to fluctuate, after the internal SLC and DRAM cache was overloaded.

Silicon Power P34A60 PCIe NVMe SSD

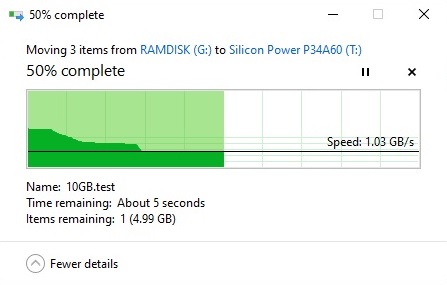
It took the P34A60 around 8.01 seconds to complete the transfer of the three files (sized approximately 15 GB), which is 2.37 seconds slower than the P34A80. It was able to maintain write speed at over 1.03 GB/s for most of the time.

Comparison

[visualizer id=”2840″]

[visualizer id=”2842″]

The P34A60 performed right in the middle of the charts in CrystalDiskMark and AS SSD Benchmark, between the higher-end NVMe SSDs and normal SATA SSDs. It almost matched the Kingston A2000 (its review here) in sequential read speed, but trailed behind in write.

[visualizer id=”4796″]

The DRAM-less design of the P34A60 fell short when users need to transfer large amount of data at once. It only had a slight advantage over a SATA SSD in write speeds, averaging about 530 MB/s.

Conclusion

Unboxing Treatment Recommendation

The Silicon Power P34A60 provides a lot of performance and value as an affordable, mid-range NVMe SSD. It could mostly reach the advertised sequential read/write speeds in our benchmarks. The only major drawback is the slower sustained write speed with larger-sized files, due to the lack of DRAM cache on the SSD. Though, average consumers will not transfer this much data at a time very often. The P34A60 was still faster than SATA-based and QLC-equipped NVMe SSDs.

The P34A60 costs $54.99 USD (MSRP) for the 512 GB model, along with a 5-year warranty. Compared to the Kingston A2000, it is about $5 USD cheaper across different capacities. It is also priced very competitively against most QLC NVMe SSDs in the market, such as the Intel 660p and Western Digital SN550. But it should be more durable with the 3D TLC NAND flash.

*The P34A60 is priced at $34.99 USD for 256 GB and $94.99 USD for 1TB (MSRP). At the time of this review, they are slightly more expensive, possibly because of the current global supply issues.

You can purchase the SSD from your local/online resellers or the links below from Amazon and Newegg.


Thanks Silicon Power for providing us the SSD for review. (Review Sample)

Feel free to leave comments below, if you have any opinion about this website. Share the website around if you enjoy reading it. Subscribe to our Newsletter or follow our Twitter, Facebook and Instagram.

Support this website simply by shopping in Amazon and Newegg. It will give us small kickbacks, if you use the above affiliate links to make any purchases, which will help us grow.

Crucial Introduces New P5 PCIe NVMe SSD

Crucial P5 PCIe NVMe SSD
Photo from Crucial

A couple weeks earlier, Crucial just updated the P1 QLC NVMe SSD with the P2. Now, they are also expanding the lineup with the higher-performance P5, that is designed for enthusiasts and professionals.


The P5 NVMe SSD is equipped with Micron’s 3D TLC NAND flash and a PCIe 3.0×4 interface. Paired with an unknown memory controller, the P5 is able to reach a maximum read/write speeds of 3400 MB/s and 3000 MB/s. Five storage capacities are available only in a M.2 2280 form factor, from 250 GB to 2 TB.

All P5 models comes with a 5-year warranty, with a MTBF of about 1.8 million hours and rated endurance of 150 TBW to 1200 TBW. Pricing and availability have not been revealed by the company at the moment.

Feel free to leave comments below, if you have any opinion about this website. Share the website around if you enjoy reading it. Subscribe to our Newsletter or follow our Twitter, Facebook and Instagram.

Support this website simply by shopping in Amazon and Newegg. It will give us small kickbacks, if you use the above affiliate links to make any purchases, which will help us grow.

How to Create A Virtual Machine in FreeNAS 11 (TrueNAS)

A FreeNAS server can do a lot more than only storing and sharing files over the network. If you have a decently-powered machine, you can take advantage of the free resources via virtual machines, instead of leaving them at idle. In this article, we will guide you through creating your own VM in FreeNAS.


Basic Requirement

A virtual machine (VM) is emulated on top of the actual hardware, that acts as a separate computer. You can install multiple and different operating systems into a single physical machine. bhyve, or BSD hypervisor, is used to provide the feature in FreeNAS. Not all processors are compatible with bhyve, but you can check if yours will work using Shell.

  • AMD: grep POPCNT /var/run/dmesg.boot
  • Intel: grep VT-x /var/run/dmesg.boot

Type the above command in Shell. Make sure the features POPCNT (AMD) or EPT and UG (Intel) are listed.

Also, you will have to download an ISO image file of your operating system of choice. You can install basically any OS to the virtual machine, whether it is Windows or Linux. We are using elementary OS 5.1 as an example in this particular guide.

Installation Procedures

FreeNAS 11

First of all, a dedicated storage space will need to be allocated for the virtual machines. You should have already created a storage pool from one or more drives for file-sharing over the network. Add a new Zvol (ZFS volume) to the preferred pool by clicking the vertical ellipsis menu button (⋮).

FreeNAS 11

Specify the size of Zvol, after giving a name to it. Make sure the disk is larger than the minimum requirement of your installed OS. For example, Microsoft Windows 10 and Ubuntu Desktop will need at least 32 GB and 25 GB respectively.

FreeNAS 11

  • Go to the “Virtual Machines” section and click “Add” to create a new VM.
  • Pick the “Guest Operating System” between Windows, Linux and FreeBSD.
  • Name the VM and type in a description.
  • Uncheck the “Start on Boot”, if you want to manually start the VM every time.

By default, the VM will use the same IP address as your FreeNAS server. You can choose a different interface if it is available to the machine.

FreeNAS 11

  • Select the option to use the existing disk image, and find the previously-created Zvol.
  • Leave the virtual network adapter settings as default.

You can also assign an exclusive interface for the VM, if the computer is equipped with multiple network ports or add-in NICs.

FreeNAS 11

You can either transfer the prepared ISO file to one of the FreeNAS storage pools or directly upload it inside the setup wizard. A full list of the VM configuration will then be shown for confirmation.

FreeNAS 11

Click the toggle switch to start up the virtual machine. You can expand the tab to show more information and options. Hitting the “VNC” button will take you to the web viewer window, that allows you to remotely control and see the graphical output of the VM. Or you can check out our other how-to guide on connecting the VM using a standalone VNC application.

FreeNAS 11

You can proceed with the OS installation like normal, when you start the virtual machine for the first time.

It may not be the most efficient way to operate virtual machines over the network, but it is acceptable for most casual users. It is close to impossible to build a separate VM server in a home and small business environments. Not to mention, it is a waste not to spend the idle resources (CPU cycles and RAM capacity), if you can utilize them in a virtual machine.

Feel free to leave comments below, if you have any opinion about this website. Share the website around if you enjoy reading it. Subscribe to our Newsletter or follow our Twitter, Facebook and Instagram.

Support this website simply by shopping in Amazon and Newegg. It will give us small kickbacks, if you use the above affiliate links to make any purchases, which will help us grow.

Unboxing and Review of Apple iPad 10.2-inch (2019)

Apple iPad 10.2-inch (2019)

Apple updated its budget iPad (7th Generation) in late September 2019, with a slightly larger screen and mostly unchanged internals. Does it compromise on features or performance in order to be the cheapest iPad in the lineup?


Unboxing

Apple iPad 10.2-inch (2019)

The iPad 10.2-inch is shipped inside a white hard cardboard box. The design of the packaging is minimalistic, with only a side view of the iPad at the front. You get to see the chosen capacity, model number (A2197) and serial number of your iPad at the back.

Apple iPad 10.2-inch (2019)

The sides of the box have either the Apple logo or the word – “iPad”. The logo and word will be color-matched to your purchased iPad. Ours are in Space Gray.

Apple iPad 10.2-inch (2019)

Once the lid is opened, you are presented with the actual iPad, wrapped in plastic protection film. Behind the iPad are the paperwork and charging cable.

Apple iPad 10.2-inch (2019)

Quick start guide and safety/warranty information are provided in multiple languages. A power adapter, a AC plug and a USB Type-A to Lightning cable for charging and data transfer.

Apple iPad 10.2-inch (2019)

Apple includes the standard 10-watt USB Type-A power adapter for the iPad 10.2-inch, that outputs at 5.1V/2.1A.

Apple iPad 10.2-inch (2019)

Apple iPad 10.2-inch (2019)

The iPad 10.2 features the identical industrial exterior design, that Apple has been using for most of its previous iPads. It has a full tempered glass front and a rigid CNC-milled aluminium unibody chassis. If you have the cellular version, a long plastic on the top for the LTE antenna.

It has a length of 250.6 mm, width of 174.1 mm and thickness of 7.5 mm. It weighs in at 483 grams for the Wi-Fi model, and 493 grams for the Wi-Fi + Cellular model. Compared to the last generation iPad 9.7-inch (2018), it is slightly longer, wider and heavier.

Apple iPad 10.2-inch (2019)

The side bezels are shrunken down by a couple millimeters, due to the larger screen size. The top and bottom bezels stay relatively thick to house the 1.2 megapixel (MP) front-facing camera and Touch ID fingerprint sensor.

Apple iPad 10.2-inch (2019)

The “stereo” speakers are located at the bottom, surrounding the single Lightning port.

Apple iPad 10.2-inch (2019)

You can still plug in wired headphones to the iPad 10.2 with the 3.5 mm audio jack. The two holes on the top are the on-board microphones for FaceTime calls, voice chats and recordings.


Review

Specifications

[table id=318 /]

Features

Apple iPad 10.2-inch (2019)

There is a Touch ID fingerprint sensor at the bottom of the screen. It can be used to unlock the iPad, and pay through Apple Pay in applications and websites.

Apple iPad 10.2-inch (2019)

The 8 MP, f/2.4 main camera is able to capture still photos and panorama photos up to 43 megapixels. It can also record video at 1080p at 30 fps or slow motion video at 720p at 120 fps. The primary camera works fine enough for a tablet, which is mostly used to scan documents.

The 1st generation Apple Pencil and Smart Keyboard are supported by the iPad 10.2, but both will have to be bought separately for $99 USD and $159 USD (MSRP) respectively. They are rather pricey, like most Apple’s first-party accessories. The keyboard can be connected through the newly-added smart connector on the side of the iPad, which omits the needs for charging and Bluetooth configuration.

I would love to see the proprietary Lightning charging port on the iPad 10.2 to be replaced by a USB Type-C port. It will allow users to charge their phones (*not iPhones) and tablets with a single USB cable. Unfortunately, Apple only does that on the premium iPad Pro lineup.

Display Quality

Apple iPad 10.2-inch (2019)

Because of the affordable nature of the iPad 10.2, Apple does not put the highest-end display to the device. It does not have a fully-laminated display, which reduces the distance between the front glass and the actual display panel. There is a small air gap above the display for the iPad 10.2, that may reflect more light and worsen the image quality.

In practice, I do not find the non-laminated display a huge disappointment. The tiny air gap is negligible when looking straight at the screen. The rated 500 nits of brightness is great with good readability even in direct sunlight. Colors are vivid and accurate, despite not covering the DCI-P3 color gamut. The resolutions of the display actually goes up a bit from the previous generation at 2160×1620, but maintains the same pixel density at 264 PPI. True Tone technology is also missing in the iPad 10.2-inch, which you will have to choose the more expensive iPad Air 3 or iPad Pro.

For casual media consumption and note-taking, the lower quality display is perfectly okay in my opinion.

Performance

Apple decided not to upgrade the iPad 10.2-inch with a newer, more powerful processor. It is equipped with the quad-core A10 Fusion SoC, that was first introduced in the iPhone 7 series in 2016. However, the internal RAM capacity is increased from 2 GB to 3 GB. In Geekbench 4, the A10 gets about 3500 in single-core and 5400 in multi-core scores. It is not expected to chew through heavy workloads as easy as higher-end iPads, like photo and video editing.

The operating system and applications seems to be very optimized for the now 4-year-old A10 SoC. I do not experience significant lags or performance issues when browsing the web with multiple tabs opened, watching YouTube videos, as well as working on two apps side-by-side in Split View. The extra 1 GB of RAM also ensures the multitasking in iPadOS can operate smoothly. Due to the lack of a dedicated neural engine chip inside the A10 SoC, applications that implemented in-device machine learning, like AR apps, may run notably slower.

Software

Apple iPad 10.2-inch (2019)

The 7th generation iPad is pre-loaded with the reworked iPadOS 13. Instead of running the same operating system on both the iPhones and iPads, it is a more specialized and optimized version for iPads.

Apple iPad 10.2-inch (2019)

The default Safari web browser will now show the desktop version of a site, if possible, to fully utilize the iPad’s larger screen size. The new home screen can hold more apps in one page, while pinning the Today View widgets at the side. The redesigned Files app allows for better organizations of folders from different cloud services (e.g. Google Drive and Dropbox) and downloaded files. You can make your iPad act as a secondary display for your Mac computers with Sidecar.

Apple iPad 10.2-inch (2019)

The multitasking feature also gets some improvements. You can use a total of three applications at once on one screen simultaneously, two with Split View and one with Slide Over. With compatible apps (mostly first-party at the moment), the same app can be opened twice in Split View, creating multiple working spaces.

Simply said, iPadOS enable iPad to perform more tasks without requiring the users to switch to a full-fledged computer. And no, it cannot replace a notebook or desktop anytime soon, but it makes iPad more useful than just a media player.

Battery Life

The iPad 10.2 has a 8827 mAh lithium-ion battery inside, which Apple states for up to 10 hours of battery life. Our specific iPad lasted for about a week with intermittent use, watching YouTube videos and playing games for one to two hours every day. The iPad took two to three hours to fully charge from 0% battery, using the included 10-watt power adapter.

Conclusion

Unboxing Treatment Recommendation

Apple iPad 10.2-inch (2019) lacks in raw processing power and lower quality display from the old A10 Fusion SoC and non-laminated screen, compared to the other iPads in the lineup. However, the iPad 10.2 offers almost the same smooth user experience in iPadOS. Unless you are running resource-intensive applications/tasks, there is not much difference between the most expensive and cheapest iPads.

The iPad 10.2-inch Wi-Fi model costs $329 USD for 32 GB of storage and $429 USD (MSRP) for 128 GB. The cellular versions add another $130 USD on top. If you only plan on using your tablet for media, web browsing and light gaming, spending $799 USD for an iPad Pro is unnecessary. The iPad 10.2 is the perfect choice for first-time tablet users, students and children, with the prolonged software support and unbeatable app collections from Apple.

You can purchase the iPad from your local/online resellers or the links below from Amazon.


Feel free to leave comments below, if you have any opinion about this website. Share the website around if you enjoy reading it. Subscribe to our Newsletter or follow our Twitter, Facebook and Instagram.

Support this website simply by shopping in Amazon and Newegg. It will give us small kickbacks, if you use the above affiliate links to make any purchases, which will help us grow.

Unboxing and Review of SilverStone Permafrost Series PF240-ARGB AIO CPU Cooler

SilverStone PF240-ARGB AIO CPU Cooler

SilverStone has released a few generations of All-In-One liquid CPU cooler in the past, but they decided to hop on the train of addressable RGB lighting with the new Permafrost series AIOs. We are able to get our hands on a 240 mm version (PF240-ARGB) for review.


Unboxing

SilverStone PF240-ARGB AIO CPU Cooler

The PF240-ARGB is shipped in a large hard cardboard box, with a white and blue color scheme. Apart from some photos of the cooler, a list of all components’ specifications is printed at the back.

SilverStone PF240-ARGB AIO CPU Cooler

You can also find a short description in 11 different languages.

SilverStone PF240-ARGB AIO CPU Cooler

Everything inside the packaging, including fans and radiator, are stored inside plastic bags for protection.

SilverStone PF240-ARGB AIO CPU Cooler

The PF240-ARGB supports almost all modern CPU sockets, including Intel LGA 115x and AMD AM4. But AMD TR4 socket for the Threadripper HEDT processors is not compatible. For accessories, there are an ARGB controller and a number of related cables for the 3-pin fan connection and power. A small tube of thermal compound is also provided.

Interestingly, SilverStone does not put a physical user manual in the box, which will need to access online through the QR code on the side.

SilverStone PF240-ARGB AIO CPU Cooler

SilverStone PF240-ARGB AIO CPU Cooler

The CPU block/pump combo unit of the PF240-ARGB features a multi-chamber design, which separate the hot and cold liquid into isolated chambers. According to SilverStone, this will prevent heat bleeding and improve efficiency. A three-phase, six poles pump motor is used to provide a quieter operation, and can spin up to 3400 RPM. There are two 3-pin cables coming out from the block. One for pump power, the other one for ARGB lighting connection.

The top of the block is a hexagonal-shaped mirror-like plastic, that has the addressable RGB LEDs integrated. Once lit up, the “SilverStone” logo will be shown.

SilverStone PF240-ARGB AIO CPU Cooler

The PF240-ARGB uses a polished, non-plated copper CPU contact base. Behind the base are the 0.2 mm micro-channels, that dissipate the heat to the liquid.

SilverStone PF240-ARGB AIO CPU Cooler

The PF240-ARGB is equipped with a 240 mm thin radiator, painted in black. It is 272 mm in length, 120 mm in width and 28 mm in thickness. The fins are made from aluminium and have a relatively normal fin density at around 20 fins per inch (FPI) each row.

SilverStone PF240-ARGB AIO CPU Cooler

The PF240-ARGB has around 400 mm of sleeved EPDM (ethylene propylene diene monomer) rubber tubing, which is flexible and long enough for multiple configurations.

SilverStone PF240-ARGB AIO CPU Cooler

SilverStone has paired two Air Blazer AB120R-ARGB with the PF240-ARGB, that have the model number of APA1225H12. The fan are able to spin from 600 RPM to 2200 RPM, controlled via a 4-pin PWM connector. It can generate a maximum air flow of 93.97 CFM and static pressure of 3.53 mmH2O. It has a rated MTBF of 40,000 hours. Anti-vibration rubber pad can be found on each corner.

There are a total of eight addressable RGB LEDs located around the motor hub of the fan. The translucent blades help diffusing the light for a more subtle glowing effect.

SilverStone does not prepare a standalone software for the lighting. You can plug the connectors into a compatible motherboard for synchronization and control, such as ASUS Aura Sync and GIGABYTE RGB Fusion, etc. Though, you can choose to use the included physical controller without any software, which contains 10 pre-loaded effects and is able adjust the speed and brightness.

Please be reminded both the CPU block and cooling fans are intended to be used for a 3-pin 5V addressable RGB LED header, and will not work with a standard 12V 4-pin header.


Review

We have updated our CPU cooler tests to more reflect real-world cooling performance of coolers.

Testing Methodology

To find out how the cooler performs, a total of three benchmarks are included. AIDA64 is used to run a CPU stress test. CPU, FPU and system cache are all stressed to create as much heat output as possible. Also, Cinebench R15 and Cinebench R20 are used to simulate real-world CPU load (like video-editing or rendering). It will be run continuously for three times. The highest CPU package temperatures are recorded. Ambient temperature is around 26°C.

Results will be taken at a 50% fan speed and 100% speed, controlled via the motherboard CPU PWM fan header. Both single-fan and dual-fan configuration of the cooler will be tested.

Performance

SilverStone PF240-ARGB AIO CPU Cooler

The two cooling fans ran at around 1250 RPM when set as 50% PWM speed, and the PF240-ARGB was able to keep the CPU package temperature at 63°C in the AIDA64 stress test. Ramping up the fan to full speed (~2100 RPM) resulted in a 2°C decrease in temp, which is about 3.17% better.

SilverStone PF240-ARGB AIO CPU Cooler

Cinebench R15 generates less heat than the stress test. The highest temperature we saw is at 61°C. Speeding up the fans yielded a 3°C improvement at 58°C.

SilverStone PF240-ARGB AIO CPU Cooler

We observed a slightly larger difference in temperature between the two fan speeds. The PF240-ARGB managed to decrease the temp by 4°C in Cinebench R20, at 61°C.

Comparison

[visualizer id=”6155″]

We currently do not have a lot of AIO CPU coolers’ data, but the PF240-ARGB performed on par with the other two Thermalright coolers we have tested. The PF240-ARGB did about 1.8°C better than the same-sized Turbo Right 240. It was able to achieve 0.6°C lower than the larger Turbo Right 360 C, but the difference is too small and is well within the margin of error (<1°C).

[visualizer id=”5998″]

The PF240-ARGB had similar, if not a bit better cooling performance than a high-end dual-tower air cooler, such as the Noctua NH-D15 (its review here) and Corsair A500 (its review here).

Conclusion

Unboxing Treatment Recommendation

The SilverStone PF240-ARGB is one of the best CPU coolers (both in air or water) we have tested. With the cooling fans, running at full speed, it can keep the overclocked CPU temperature in the mid 60°C, and can compete with large dual-tower air coolers. The installation process is simple enough, which takes about 15 to 30 minutes for any experience users to figure everything out. The build quality of the AIO is decent, but the CPU block feels a little too plasticky.

The two included Air Blazer AB120R-ARGB fans have awesome-looking RGB lighting effects. They pushes a fair amount of air through the radiators, but some humming sound from the motors can be heard when spinning at higher RPMs.

The SilverStone Permafrost Series AIO coolers are on sale for $79.99 USD for the 120 mm version, $99.99 USD for the 240 mm and $129.99 USD (MSRP) for the 360 mm. All of them are provided with a 2-year warranty. They are pretty affordable for an addressable RGB-compatible AIO cooler, which some offerings in the market can cost about $20 USD to $40 USD more.

You can purchase the cooler from your local/online resellers or the links below from Amazon and Newegg.


Thanks SilverStone for providing us the cooler for review. (Review Sample)

Feel free to leave comments below, if you have any opinion about this website. Share the website around if you enjoy reading it. Subscribe to our Newsletter or follow our Twitter, Facebook and Instagram.

Support this website simply by shopping in Amazon and Newegg. It will give us small kickbacks, if you use the above affiliate links to make any purchases, which will help us grow.

Crucial Launches New Upgraded P2 QLC NVMe SSD

Crucial P2 PCIe NVMe SSD
Photo from Crucial

Crucial just released the successor of the now 1.5-year-old P1 NVMe SSD. The new P2 SSD offers slight performance improvements, while most of the parts seems to remain changed.


The P2 SSD transfers data through a PCIe 3.0×4 interface. Although the manufacturer or type of the memory are not confirmed officially, it is expected the P2 to have the same 64-Layer 3D QLC NAND flash as the old P1. It is advertised to reach maximum read/write speeds of 2100 MB/s and 1150 MB/s for the 250 GB variant, 2300 MB/s and 940 MB/s for the 500 GB. The increases in performance suggest a change in the memory controller, but the actual model is still unclear.

The new P2 NVMe SSD is only available in two smaller capacities (250 GB and 500 GB) at the moment, which both have a rated MTBF of 1.5 million hours and endurance of 150 TBW. A 5-year warranty is provided as well. The 250 GB version is priced at $54.99 USD (MSRP), while the 500 GB is at $64.99 USD (MSRP).

Feel free to leave comments below, if you have any opinion about this website. Share the website around if you enjoy reading it. Subscribe to our Newsletter or follow our Twitter, Facebook and Instagram.

Support this website simply by shopping in Amazon and Newegg. It will give us small kickbacks, if you use the above affiliate links to make any purchases, which will help us grow.

Unboxing and Review of Silicon Power Superior V30 128GB SD Card

Silicon Power Superior V30 SD Card

We are able to get our hands on the Superior V30 SD card, which is one of the two recently launched SD cards from Silicon Power in February 2020. Let’s see how it performs in our benchmarks.


Specifications

[table id=316 /]

The Superior V30 series SD cards have capacities from 64 GB to 512 GB, with maximum sequential read/write speeds of 100 MB/s and 80 MB/s respectively. It is certified with the Class 10, UHS-I, U3 and V30 speed classes from SD Association, that is tested to have a minimal sequential write speed of up to 30 MB/s and good for recording 4K Ultra-HD videos at 60 FPS or 120 FPS.

The card has a 5-year warranty, with a rated durability of at least 10,000 insertions.

Unboxing

Silicon Power Superior V30 SD Card

The packaging of the Superior SD card is relatively simple, with a plastic window showcasing the actual card. The capacity and various supported standards are clearly printed at the front, while a short description can be found at the back in 12 different languages.

Silicon Power Superior V30 SD Card

Silicon Power Superior V30 SD Card

The Superior V30 has the same physical dimensions of a standard SD card, which should be compatible with most SD/SDHC/SDXC card slots in readers and laptops. There is a lock switch on the top left, that can be used to prevent modifying or deleting contents in the SD card (write-protected).

Silicon Power Superior V30 SD Card

After formatting, the SD card has about 115 GB of storage remaining in Windows.


Review

Testing Methodology

To test the performance of the SD card, we use three well-established storage benchmarking software. They are CrystalDiskMark, ATTO Disk Benchmark and AS SSD Benchmark.

CrystalDiskMark can measure both sequential and random 4KB read/write speeds with a queue depth of 32. ATTO Disk Benchmark can test how the drive performs across different transfer block sizes, mostly in a sequential environment. AS SSD Benchmark can provide both normal read/write speed and the IOPS performance of the drive.

We also recorded the time to copy 62 files of 500 MB, 250 MB, 10 MB and 5 MB from a SSD to the SD card, to simulate a real-world situation.

Performance

Silicon Power Superior V30 SD Card

In CrystalDiskMark, the SD card reached sequential read/write speeds of about 92 MB/s and 80 MB/s, which are close to the advertised performance. 4K random operations dropped to around 14 MB/s to 7 MB/s.

Silicon Power Superior V30 SD Card

Sequential read speed was similar in AS SSD Benchmark at around 92 MB/s, but write speed decreased to only 47 MB/s. Increasing the queue depth from 32 to 64 made the 4K random write performance to climb to about 25 MB/s.

Silicon Power Superior V30 SD Card

IOPS number represents how well a SD card handles random input and output operations. The Superior V30 got a score of 87 in the benchmark, and had a read/write IOPS of 2964 and 6432.

Silicon Power Superior V30 SD Card

We saw the read and write speeds to stabilize, once the file sizes were larger than 32 KB. It was able to attain upwards of 80 MB/s to 97 MB/s. However, the write performance would fall to only around 47 MB/s.

Silicon Power Superior V30 SD Card

We simulated a real-world situation of a camera writing a series of photos or videos to the SD card, by transferring 62 small-sized test files. It took the Superior V30 SD card about 19.60 seconds to complete, and achieved speed at around 65 MB/s to 80 MB/s.

Conclusion

Unboxing Treatment Recommendation

The Silicon Power Superior V30 SD card performed mostly as advertised, with sequential read/write speeds at 92 MB/s and 80 MB/s. Although we occasionally observed slight write speed drops in our benchmarks, they were still higher than the minimum requirements for V30 and U3 speed classes of 30 MB/s. The card is good enough for professionals, who need to capture photos in burst and 4K UHD videos.

The Superior V30 SD card seems to be hard to find at the moment, possibly due to the current global supply chain issues from the coronavirus pandemic. According to Silicon Power, the 128 GB version of the card will be priced at around $20 USD, which is in line with other similar offerings in the markets.

You can purchase the SD Card from your local/online resellers.

Thanks Silicon Power for providing us the SD Card for review. (Review Sample)

Feel free to leave comments below, if you have any opinion about this website. Share the website around if you enjoy reading it. Subscribe to our Newsletter or follow our Twitter, Facebook and Instagram.

Support this website simply by shopping in Amazon and Newegg. It will give us small kickbacks, if you use the above affiliate links to make any purchases, which will help us grow.

Unboxing and Review of Noctua chromax.black CPU Coolers (NH-L9i/NH-U12S/NH-D15)

Noctua chromax.black CPU Coolers

Despite having some of the best performance in the market, Noctua’s CPU coolers are criticized to have less than ideal styles and looks with the silver and brown colors. Finally, Noctua released the long-awaited chromax.black coolers in October 2019, with all-black appearances.


Unboxing

Noctua chromax.black CPU Coolers

The new black, grey and brown color scheme on the packaging is the easiest difference to spot between the regular and chromax.black versions. Gone is the descriptions in multiple languages on the cardboard box. You can now see a few photos of the cooler with highlighted features, like RAM and PCIe slot compatibility. The specification lists for the heatsink and cooling fans can still be found.

You can check out our other Noctua coolers’ reviews here.

Noctua chromax.black CPU Coolers

The cooler and accessories are packed into two separate cardboard boxes, which served to prevent damages during shipping.

Noctua chromax.black CPU Coolers

Both the NH-L9i, NH-U12S and NH-D15 chromax.black edition will receive the same amount of accessories. The only dissimilarity is the color. Normally, Noctua will include standard screws, mounting brackets and fan clips in silver. But for the chromax.black coolers, Noctua takes the effort to paint them black, which I appreciate the attention of details very much.

Noctua chromax.black CPU Coolers

Noctua chromax.black CPU Coolers

All three chromax.black coolers have the identical physical dimensions as the regular versions. Below are their respective height, width and depth without the included fan(s).

  • NH-U12S chromax.black: 158 mm x 125 mm x 45 mm
  • NH-D15 chromax.black: 160 mm x 150 mm x 135 mm
  • NH-L9i chromax.black: 23 mm x 95 mm x 95 mm

The Noctua logos are embossed on top of the heatsinks for the NH-U12S and NH-D15.

Noctua chromax.black CPU Coolers

Every single aluminium fin and heatpipe on the heatsink is covered with the heat dissipation-optimized black coating, which Noctua claims the additional coating and manufacturing process will not hinder the cooling capability. From my experience, the coating seems to be relatively durable against minor scratches, but handling the coolers with care is still recommended.

Noctua chromax.black CPU Coolers

The only thing that remains shinny is the polished nickel-plated CPU contact base on the cooler. The retention plate and screws of the mounting system are also coated in black.

Noctua chromax.black CPU Coolers

Noctua provides the three chromax.black coolers with their chromax.black.swap NF-A9x14, NF-F12 and NF-A15 PWM fans. The fans come with black anti-vibration pads on each corner on both sides. We have done a review about the chromax.black.swap fans in 2017.

The NF-A9x14 spins from 600 RPM to 2500 RPM; NF-F12 from 300 RPM to 1500 RPM; NF-A15 from 300 RPM to 1500 RPM. The speed can be controlled via a 4-pin PWM connector. All the fans are rated to last at least 150,000 hours (MTBF).


Review

Noctua chromax.black CPU Coolers

We have updated our CPU cooler tests to more reflect real-world cooling performance of coolers.

Testing Methodology

To find out how the cooler performs, a total of three benchmarks are included. AIDA64 is used to run a CPU stress test. CPU, FPU and system cache are all stressed to create as much heat output as possible. Also, Cinebench R15 and Cinebench R20 are used to simulate real-world CPU load (like video-editing or rendering). It will be run continuously for three times. The highest CPU package temperatures are recorded. Ambient temperature is around 24 to 26°C.

Results will be taken at a 50% fan speed and 100% speed, controlled via the motherboard CPU PWM fan header. Both single-fan and dual-fan configuration of the cooler will be tested.

Performance

Please note that the NH-L9i and NH-L9i chromax.black (with the NM-AM4-L9aL9i mounting kit) are tested with a non-overclocked Ryzen 5 1600X CPU at 3.6 GHz, because they are not designed and advertised to work with an overclocked processor. Their results are not comparable with other coolers.

Noctua chromax.black CPU Coolers

With the included fan(s) set at 50% PWM speed, the NH-U12S was able to keep the CPU package temperature in AIDA64 at around 75°C, while the larger dual-tower NH-D15 did 10°C better. Respective improvements of 9°C and 3°C were observed for the coolers at full fan speed.

The NH-L9i handled the non-overclocked R5 1600X pretty well at both situations, with temperatures at 75°C and 72°C.

Noctua chromax.black CPU Coolers

In Cinebench R15, we saw similar changes from different fan speeds. The NH-U12S had the same 9°C decrease, and the NH-D15 had a smaller 2°C difference. The NH-L9i dropped 5°C when the fan was at full speed.

Noctua chromax.black CPU Coolers

The CPU temperature increased to 64°C, 69°C and 74°C for each cooler, due to the higher heat output from Cinebench R20.

Comparison

To verify the claim from Noctua, we put both the chromax.black and regular versions of the three coolers to the tests. The largest difference we could record is only about 2.1°C from the NH-L9i cooler. Most of the results are within 2°C of difference between the two versions, which is well inside the margin of error in our measurements, tools and the manufacturing tolerances. The chromax.black coolers have virtually identical cooling performance as their regular “brothers”.

[visualizer id=”5998″]

Conclusion

Unboxing Treatment Recommendation

The Noctua chromax.black coolers fix that one problem the PC community has requested for quite some time. The all-black exterior will enable the coolers to fit in more PC build styles. The matte black finish on the heatsink somehow make the coolers feel more premium and modern. I believe Noctua did not want to compromise on cooling performance for aesthetic, unless they find a way to optimize the coating. And the new coolers have practically equal cooling capability than the regular versions, according to our benchmarks. The SecuFrim 2 mounting system allows for quick and simple installation as always.

The included chromax.black.swap fans match the looks of the coolers very well. You can also get extra anti-vibration pads in 7 different colors (or 8 if you count the signature brown) (NA-SAVP1 for the NF-F12 and NA-SAVP3 for the NF-A15).

The chromax.black editions of NH-L9i, NH-U12S and NH-D15 cost $49.90 USD, $69.90 USD and $99.90 USD (MSRP) severally. All of them are provided with a usual 6-year warranty. They are priced around $5 USD to $10 USD more expensive than the regular versions, depending on the stores and ongoing promotions. If you take the aesthetic of your computer seriously, I would definitely recommend the chromax.black coolers. They hold the same high standard from Noctua with the beautiful black coating, but without impacting the cooling performance.

For more information, you can visit the Noctua product pages of the NH-L9i, NH-U12S and NH-D15 chromax.black coolers. You can purchase the coolers from your local/online resellers or the links below from Amazon and Newegg.

Thanks Noctua for providing us the coolers for review. (Review Sample)

Feel free to leave comments below, if you have any opinion about this website. Share the website around if you enjoy reading it. Subscribe to our Newsletter or follow our Twitter, Facebook and Instagram.

Support this website simply by shopping in Amazon and Newegg. It will give us small kickbacks, if you use the above affiliate links to make any purchases, which will help us grow.

Follow Us on Social Media

583FansLike
635FollowersFollow
494FollowersFollow
1,494FollowersFollow
43SubscribersSubscribe

More Articles