Sometimes, storage devices will stop functioning normally, due to incorrectly-configured partition, data corruption or more. It is common to see this problem in Windows, especially with USB flash drives, SD cards and portable hard drives. The drives may not even appear inside the File Explorer, rendering the built-in quick format useless. Fortunately, it can be easily fixed, using the DiskPart command.
DiskPart is an extremely helpful and powerful command-line tool available in Windows 7 to Windows 10. It can be used to manage all the drives (disks and partitions) inside the computer, including clean and re-formatting them.
Before you fire up DiskPart, you should open the Disk Management Utility and make sure the plugged-in drive is detected. Most importantly, you need to remember the designated disk number, which will be used later in DiskPart. In our example, it is a 8 GB USB flash drive from SanDisk (Disk 4). You can disconnect some of the drives in advance to prevent wiping the data on the wrong drive.
Open the Start Menu and search for Command Prompt (CMD). Right Click on the app and select “Run as administrator”. You can also use DiskPart in Windows PowerShell, if you so desire.
Type diskpart and press Enter.
Type list disk to show all the connected drives on the computer.
Type select disk 4 to choose the problematic drive. (Change the disk number, depends on your particular system and situation)
You can type list disk again to show all available drives. The selected disk will have an asterisk (*) next to itself in the list. Confirm it is the correct drive by checking in Disk Management Utility and its capacity, before continuing.
Type clean to wipe ALL the data in the drive. Please be reminded that everything on the selected drive will be deleted permanently.
Type create partition primary to create a new partition in the cleaned drive.
Type format fs=fat32 to format the partition. We use FAT32 as the file system of our USB flash drive. You can change it to exFAT or NTFS, if you are formatting a HDD or SSD. (format fs=exfat or format fs=ntfs)
Wait 15 to 30 minutes for it to finish the formatting. Do not remove the drive, unless it is 100% completed.
Type exit to terminate the DiskPart program.
DiskPart can do a lot more than cleaning and formatting corrupted drives. You can type help to show all the available commands.
Feel free to leave comments below. Share the article if you enjoy reading it. Follow us on Twitter, Facebook, Instagram and Pinterest.
Support this website simply by shopping on Amazon and Newegg. We will receive small kickbacks, if the above affiliate links are used to make any purchases.
“Thermal Conductivity” data is provided by the manufacturers.
“Temperature Difference” is an average of our benchmark results.
“Review Score” is an average of the three categories (Unboxing, Performance, Value).
Testing Methodology
To find out the performance for each thermal compound, a total of three benchmarks are included. AIDA64 is used to run a CPU stress test. CPU, FPU and system cache are all stressed to create as much heat output as possible. Also, Cinebench R15 and Cinebench R20 are used to simulate real-world CPU load (like video-editing or rendering). They will be run continuously for three times. The highest CPU package temperatures are recorded. Results will be taken at 100% fan speed, controlled via the motherboard CPU PWM fan header. Only single-fan configuration will be used in the benchmark.
“Review Score” is an average of the three categories (Unboxing, Performance, Value).
Testing Methodology
CrystalDiskMark can measure both sequential and random 4KB read/write speeds with a queue depth of 32. ATTO Disk Benchmark can test how the drive performs across different transfer block sizes, mostly in a sequential environment. AS SSD Benchmark can provide both normal read/write speed and the IOPS performance of the drive. HD Tune Pro can be used to simulate a large file transfer of up to 100 GB. We also recorded the time to copy three files of 10 GB, 500 MB and 250 MB from a RAM disk to the SSD, to simulate a real-world situation.
“Maximum RPM” data is provided by the manufacturers.
“Review Score” is an average of the three categories (Unboxing, Performance, Value).
Testing Methodology
To determine the performance of the fan, we will measure both the airflow and CPU temperatures when using in heatsink, as well as its sound levels. An anemometer is used to record the fan’s airflow in various RPM ranges, including 25%, 50%, 75% and 100%. The results are measured in CFM (cubic feet per minute). The distance between the anemometer and the fan is kept at around 5 cm.
A decibel/sound level meter is also used to measure the fan’s operating noise at 1000 RPM, 50% and 100% fan speeds. Results are shown as dbA. Distance between the decibel meter and the fan is maintained at around 10 cm. Ambient sound level is at around 35 dbA.
The fan is then installed on the air cooler. The CPU, FPU and system cache are stressed using AIDA64. The temperature of the CPU package is recorded at full load when the fan is running at full speed.
“Review Score” is an average of the three categories (Unboxing, Performance, Value).
Testing Methodology
To find out how the cooler performs, a total of three benchmarks are included. AIDA64 is used to run a CPU stress test. CPU, FPU and system cache are all stressed to create as much heat output as possible. Also, Cinebench R15 and Cinebench R20 are used to simulate real-world CPU load (like video-editing or rendering). It will be run continuously for three times.
Results will be taken at a 50% and 100% fan speed, controlled via the motherboard CPU PWM header. Stress test will run for at least 15 minutes. Once the CPU has reached the equilibrium temperature, we will record both the average and highest temperatures of the CPU package/hottest core with HWiNFO in the next 5 minutes.
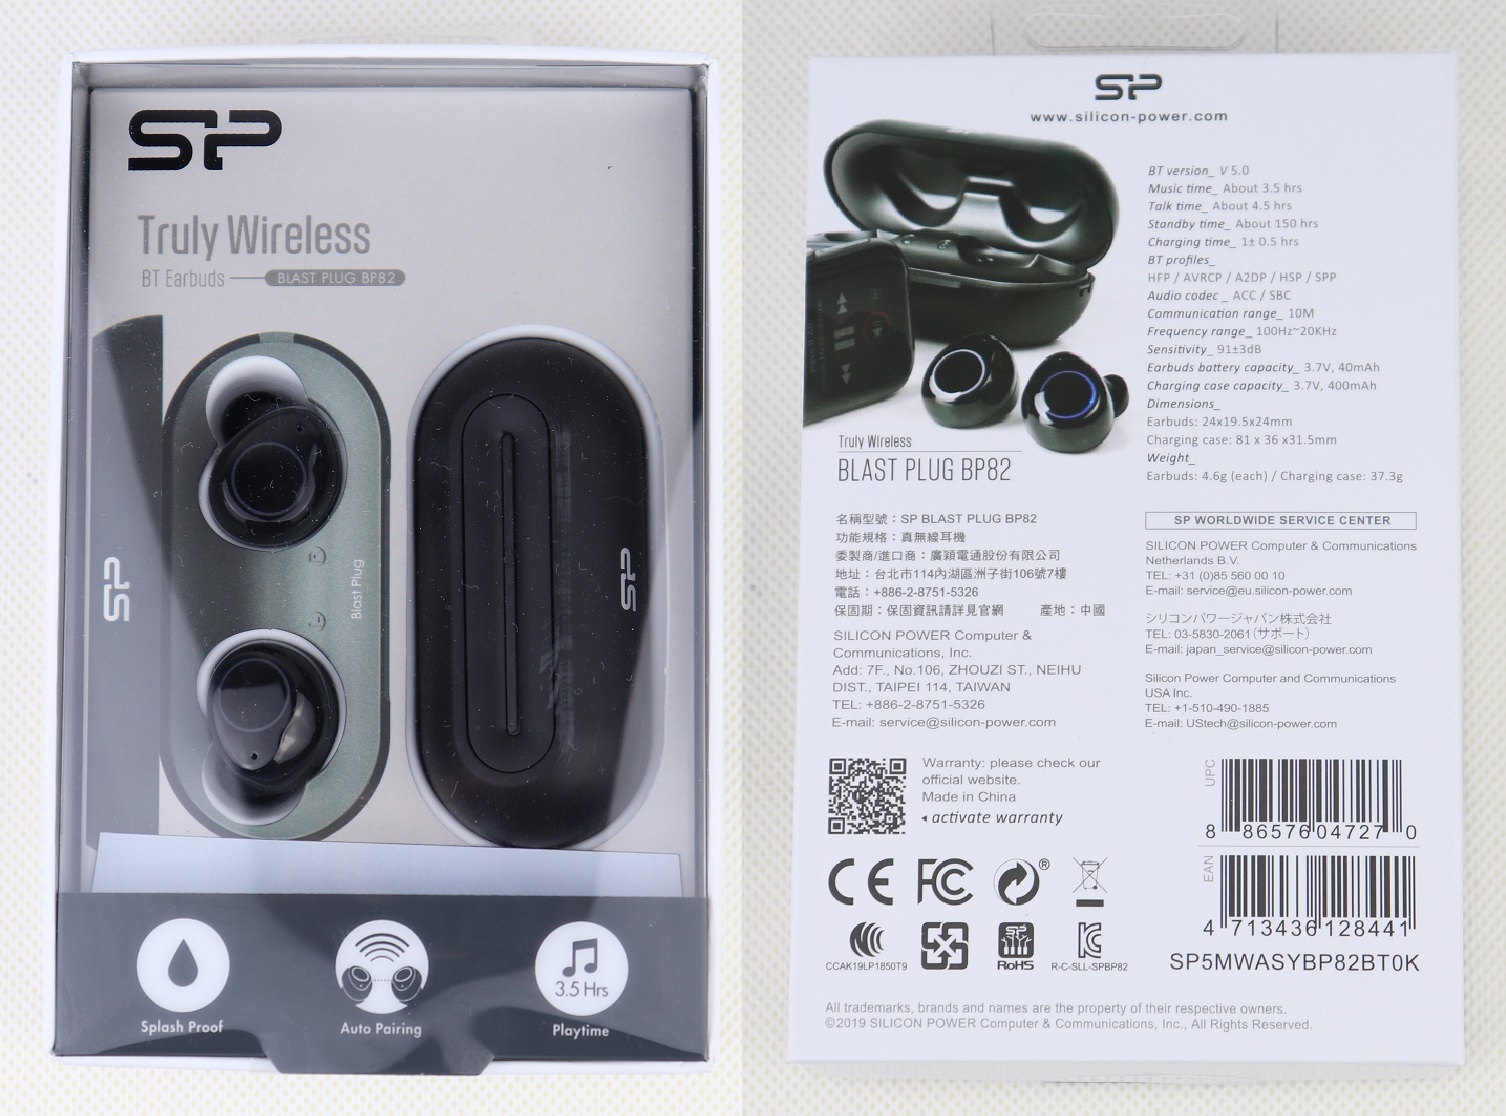
Silicon Power is well-known for flash memory products and storage devices. But in this article, we are going to review the BP82, which is their second iteration of the Blast Plug series Bluetooth wireless earbuds.
Unboxing
The packaging of the BP82 is about the same size as a normal mouse. The front plastic window shows the actual earbuds and charging case. A specification list is printed on the back with information, like Bluetooth version and supported audio codec. You can also find the contact details of Silicon Power service centers globally.
Aside from the charging case and earbuds, two sets of differently-sized ear tips, user manual and a short USB Type-A to micro-USB cable as accessories.
Silicon Power Blast Plug BP82 Truly Wireless Earphones
The BP82 earbuds sport an in-ear design, which the ergonomic shape should offer better passive noise isolation with a tighter seal against the ear canals. The top glossy plastic houses the activity LED ring and the touch panel to control music/video playback. The bottom part has a matte finish and the two copper contact pads for charging. Each earbud weighs in at 4.6 grams, and carries a 40 mAh internal battery.
The LED ring will show red when charging; or remain/flash blue, depends on the condition of the Bluetooth connection.
Despite having two microphones on each earbud, the BP82 does not feature active noise-cancellation. They are used for voice calls only.
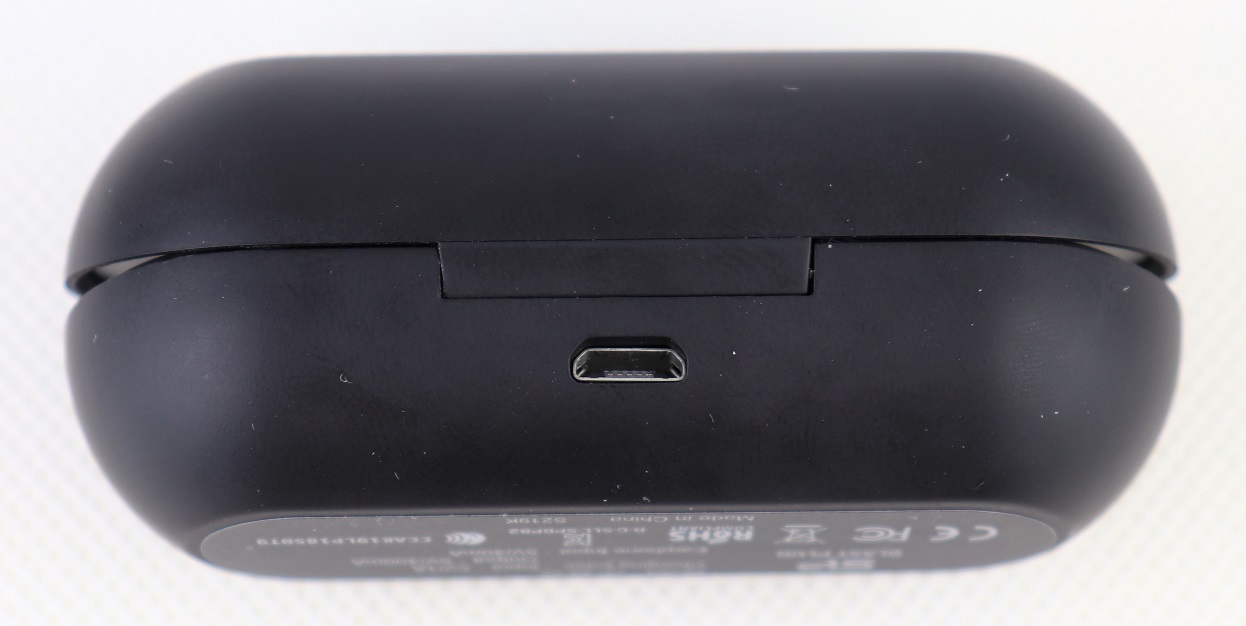
The flat pill-shaped charging case of the BP82 is made from matte plastic and has a 400 mAh battery inside, which should be able to top up the earbuds for around three to five times. The earbuds are secured by hidden magnets and charged via the golden metal pins.
Under the hinge is a micro-USB port for charging, instead of USB Type-C.
Review
Features
The Silicon Power BP82 is claimed to be water- and sweat-resistant, but there is no certified Ingress Protection (IP) rating. I would not recommend wearing the earbuds for swimming or in bath, though it should work fine in small rain and sweat.
The BP82 is fitted with capacitive touch button/panel on top of the earbud, which can be used to control playback and accept/reject phone calls. It avoids the problem we faced from the Creative Outlier Air (its review here) with stiff physical buttons. You can tap once on either sides to pause the music or videos, tap twice on right side to skip track; left side to reverse to previous track. However, it is not possible to summon your smart assistant on your phones, such as Apple Siri and Google Assistant. Accidental touch can sometimes occur, when adjusting the positions of the earbuds.
Sound Quality
Silicon Power does not reveal the size and type of the audio drivers. The BP82 supports AAC and SBC audio codecs. From my experience, the BP82 outputs acceptable sound for the size and price. The volume can get pretty loud with reasonable amount of bass. The instrument separation in songs is a bit too muddy for my taste. Lows and mids are okay, but highs and vocals seem to be too muffled.
Benefited from the in-ear design and multiple-sized ear tips, outside noise is isolated quite well.
Bluetooth Connectivity
It is surprised to see how newer technologies are quickly implemented to more budget-oriented devices. The BP82 is equipped with the latest Bluetooth 5.0 and is claimed to have around 10 meters of wireless range. I personally did not encounter any noticeable lag and latency issues, while watching YouTube videos. Connection between the two earbuds remains in sync all the time.
After pairing the BP82 the first time, it will automatically reconnect to the previous device, once it is taken out of the charging case. You can connect an individual earbud, if you want to use it on one side only.
Battery Life
The BP82 is advertised to last for 3.5 to 4.5 hours on a single charge. Although most wireless earphones in the market can reach upwards of 5 to 8 hours of battery life, the BP82 should be good enough for most users’ listening sessions. The case can fully charge the earbuds in about 1 hours.
Conclusion
The Silicon Power BP82 creates decent enough sound in bass and mids for small earbuds, but lacks clear separation and definition of instruments, vocals and highs. It would be great to get the official certification for IP rating, though the necessary testing and approval fee may drive up the cost of the BP82. With Bluetooth 5.0, the wireless connection is rock solid with no sudden dropouts.
The BP82 costs around $30 USD to $40 USD (MSRP), depending on your regions. It is on sale for only $21.99 USD at the time of this review, which is an insanely cheap price for any pair of truly wireless earbuds.
You can purchase the earbuds from your local/online resellers or the links below from Amazon.
Thanks Silicon Power for providing us the earbuds for review. (Review Sample)
Feel free to leave comments below, if you have any opinion about this website. Share the website around if you enjoy reading it. Subscribe to our Newsletter or follow our Twitter, Facebook and Instagram.
Support this website simply by shopping in Amazon and Newegg. It will give us small kickbacks, if you use the above affiliate links to make any purchases, which will help us grow.
One of the most useful features for a FreeNAS server is the sharing files over the network. In this article, we will teach you how to create a shared folder/drive, that can be accessed from all SMB-supported operating systems (mostly Microsoft Windows).
Before you start, you will have to make sure FreeNAS is properly installed on your server with at least one available hard disk. For reference, Server Message Block (SMB/Samba/CIFS) is a common network protocol for transferring data between different nodes on the network.
Procedures
First, you have to configure a storage pool with one or more hard drives in the server. Unlike creating a virtual machine, you should add a Dataset by clicking the vertical ellipsis menu button (⋮), instead of a Zvol.
Give a easily-distinguishable name to the dataset and remember to choose the “Share Type” as SMB. You can leave other settings as default and click save to proceed.
To use the SMB share later in Windows, you will need to create a user account in FreeNAS. You will be prompted to enter all the details of the account. In our example, the “Full Name” is Test User; “Username” is testuser; “Password” is 123456789. It is recommended to select a more secure password, if you are going to store important or privacy-related data.
Go to the Sharing section.
Go to the Windows Share (SMB) sub-section.
Add a new network share.
Pick the previously-created dataset from the dropdown menus.
Enter the desired name for the SMB share, which it will be what you type to find it in Windows.
Go to the Services section, and make sure SMB is enabled.
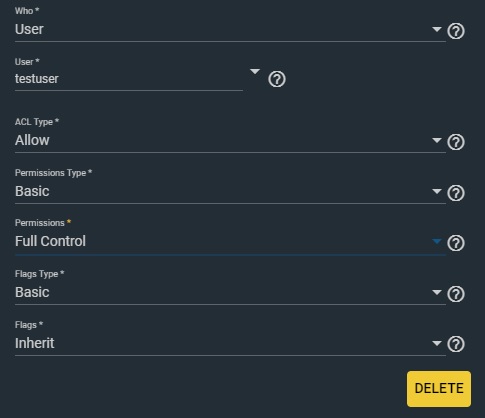
You will also need to change the permission to grant yourself access to the SMB share. Click the vertical ellipsis menu button (⋮) and select “Edit ACL”.
Add a new ACL item.
Choose “User” in the “Who” field.
Select your user account.
Change the “Permissions” to Full Control.
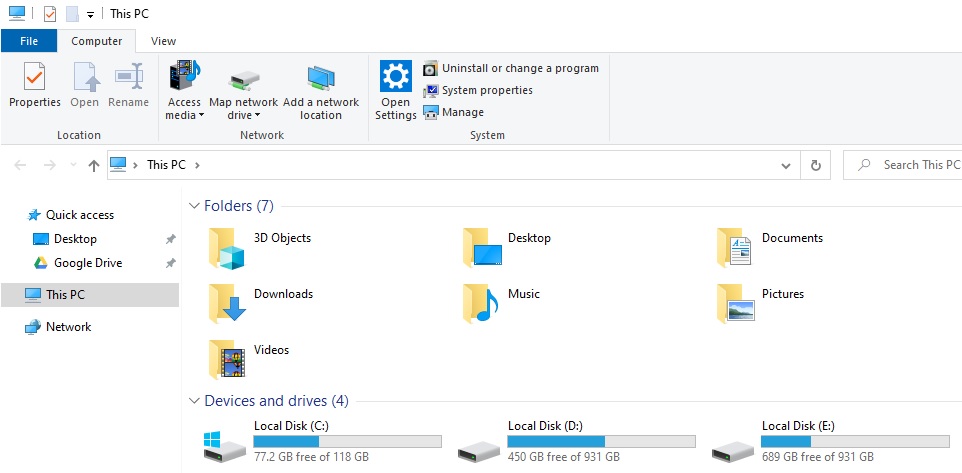
At this point, you can switch back to your Windows computer. Open File Explorer and expand the top menu. You will see the option to “Map network drive”.
Choose the drive letter and type in the location of your SMB share in the box.
\\the IP address of your FreeNAS server\testshare
A pop up will appear to ask your credentials, which are your FreeNAS account’s username and password. If successful, you will be able to read and write files to the FreeNAS server like a normal internal drive in the system.
Feel free to leave comments below, if you have any opinion about this website. Share the website around if you enjoy reading it. Subscribe to our Newsletter or follow our Twitter, Facebook and Instagram.
Support this website simply by shopping in Amazon and Newegg. It will give us small kickbacks, if you use the above affiliate links to make any purchases, which will help us grow.
We have reviewed a few RAIJINTEK products previously, like the LETO PRO and PALLAS 120 RGB CPU coolers. In this article, we are going to check out a mid-sized PC case from the company, named the PONOS TG. It is priced under $100 USD and features tempered glass side panels.
Technical Specifications
[table id=443 /]
Unboxing
The PONOS TG case is packed in a large brown cardboard box for shipping, which has a few sketches/drawings of the chassis printed at the front. A small red sticker is present to warn the couriers about the fragile tempered glass inside.
You can find two specification lists of the PONOS series cases with information, such as dimensions, compatible motherboard and cooling fan sizes.
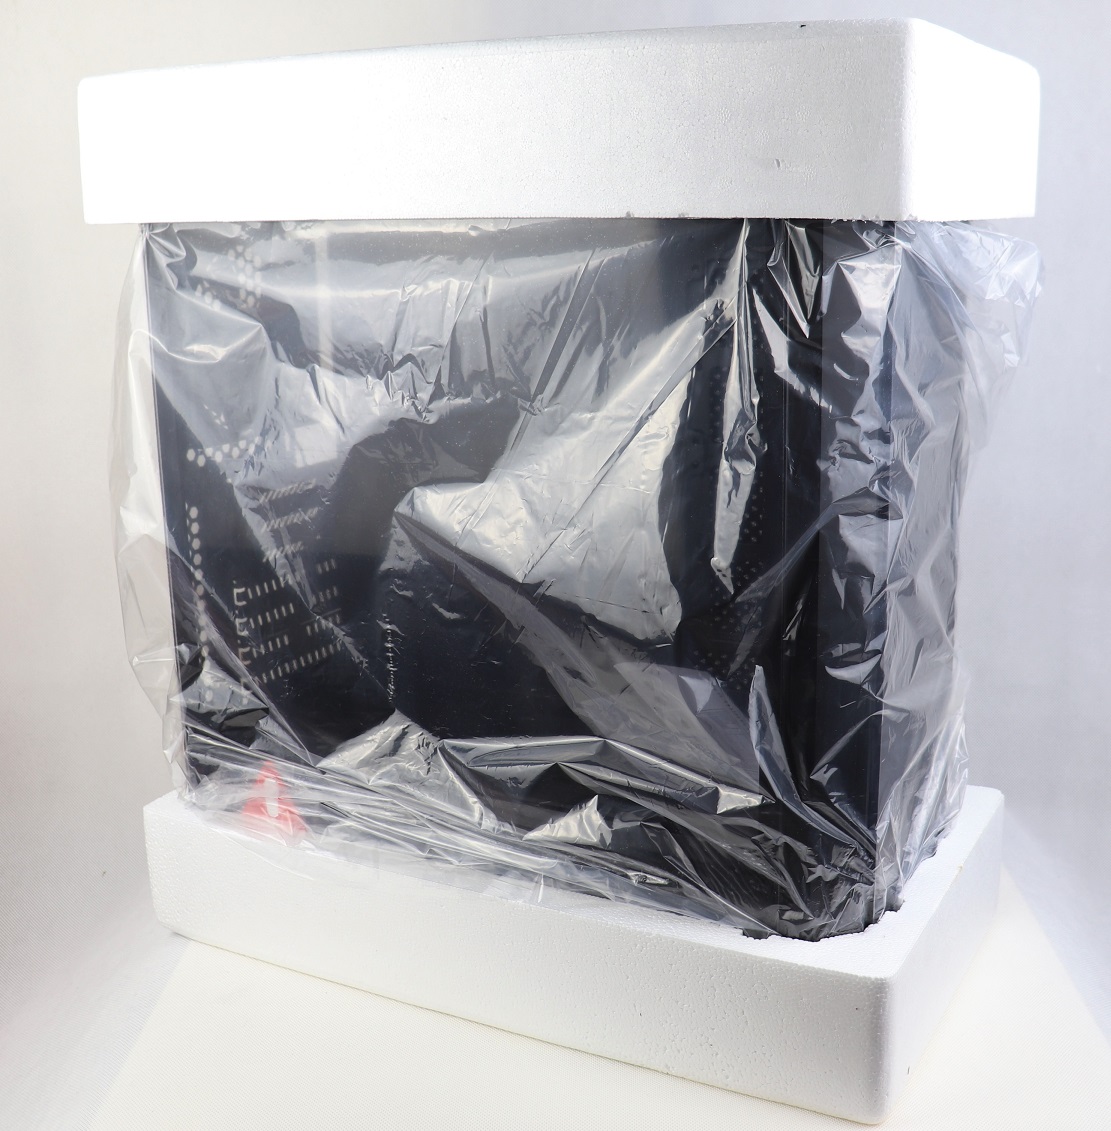
Apart from the plastic bag to prevent minor scratches, the PONOS TG is also sandwiched by two hard Styrofoam for additional drop protection.
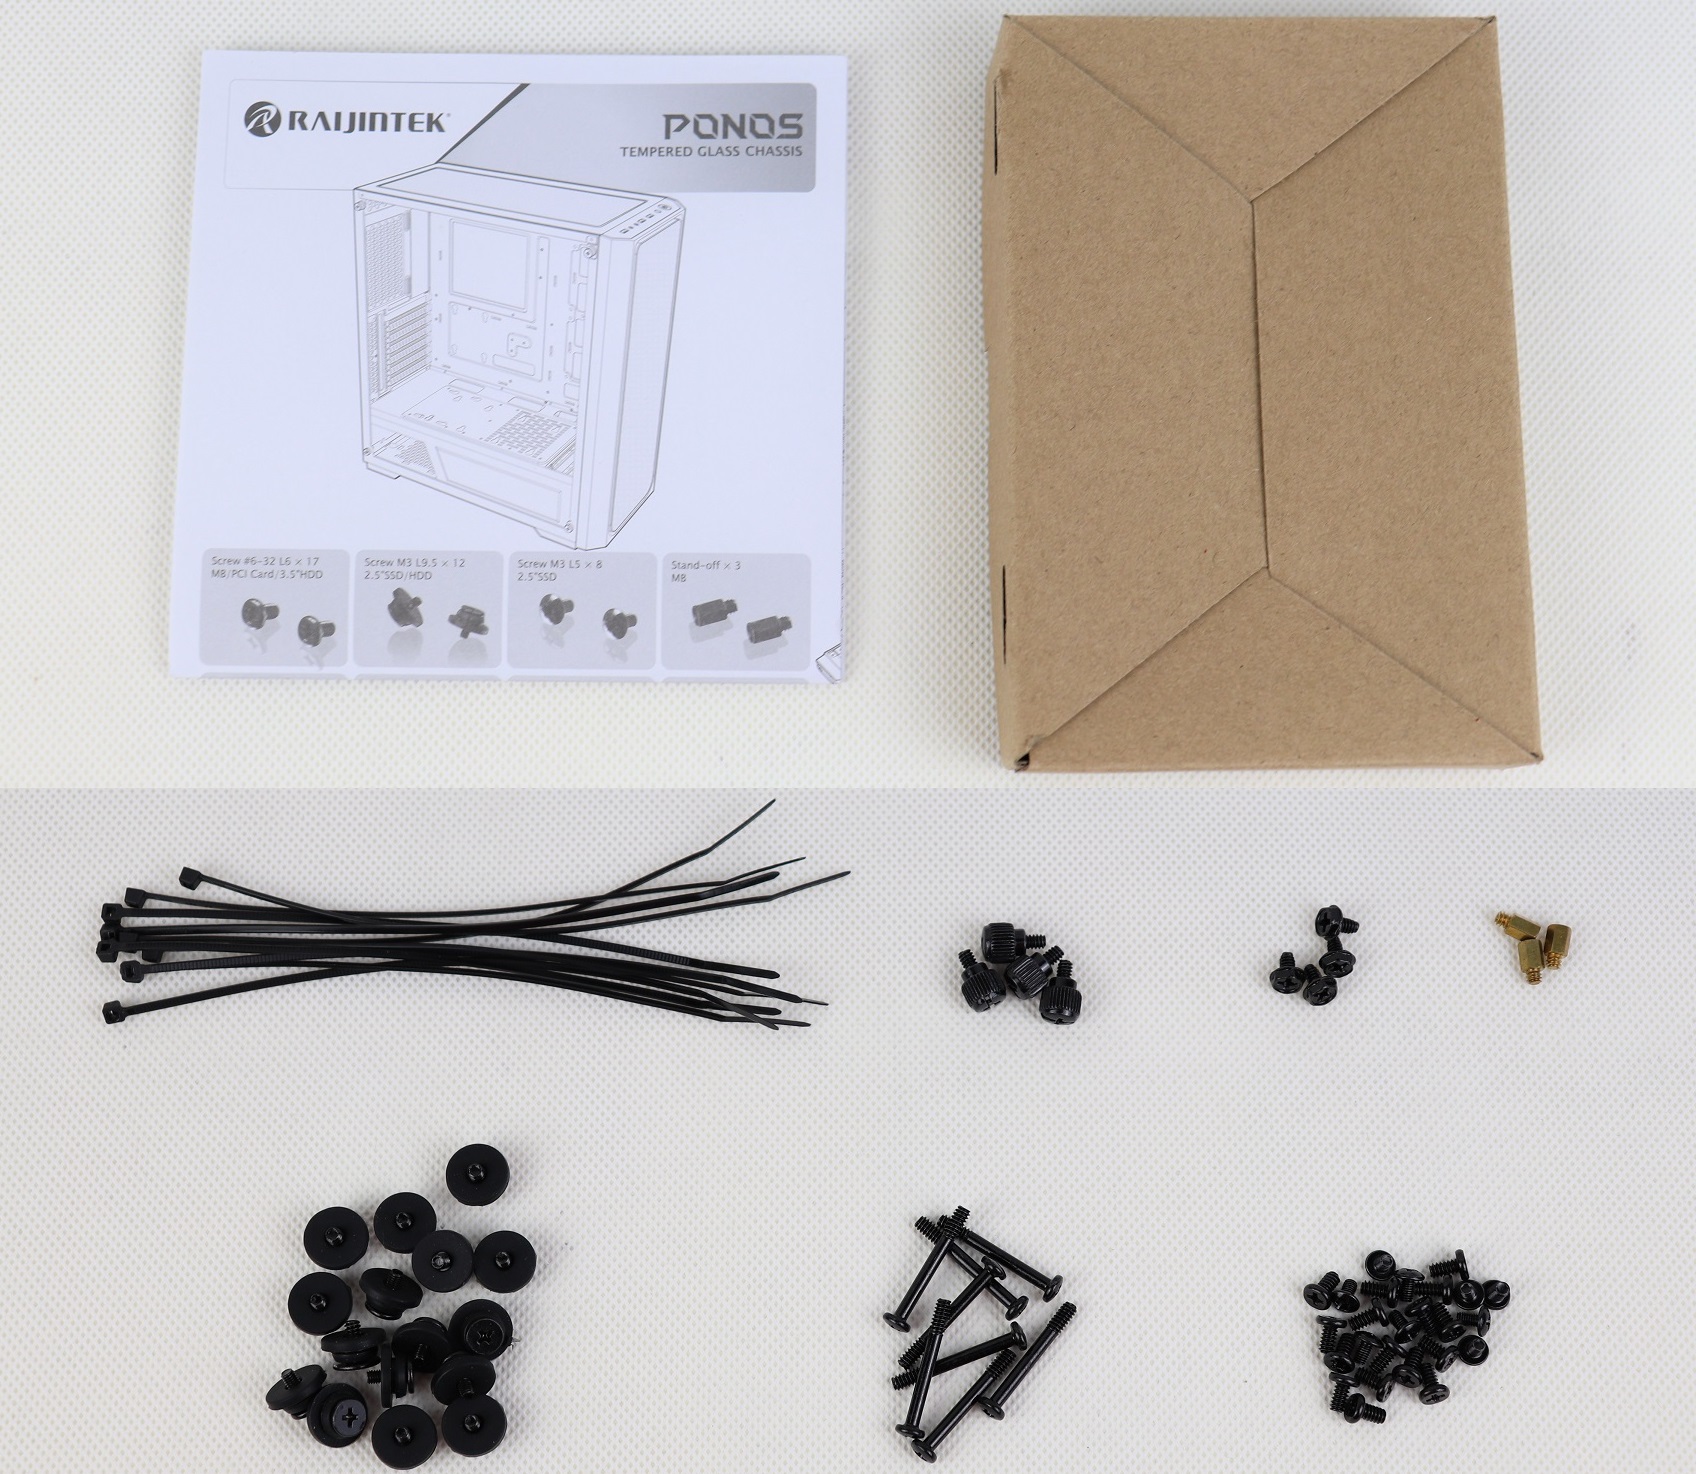
For accessories, there is a user manual and a box of screws, as well as about ten zip ties.
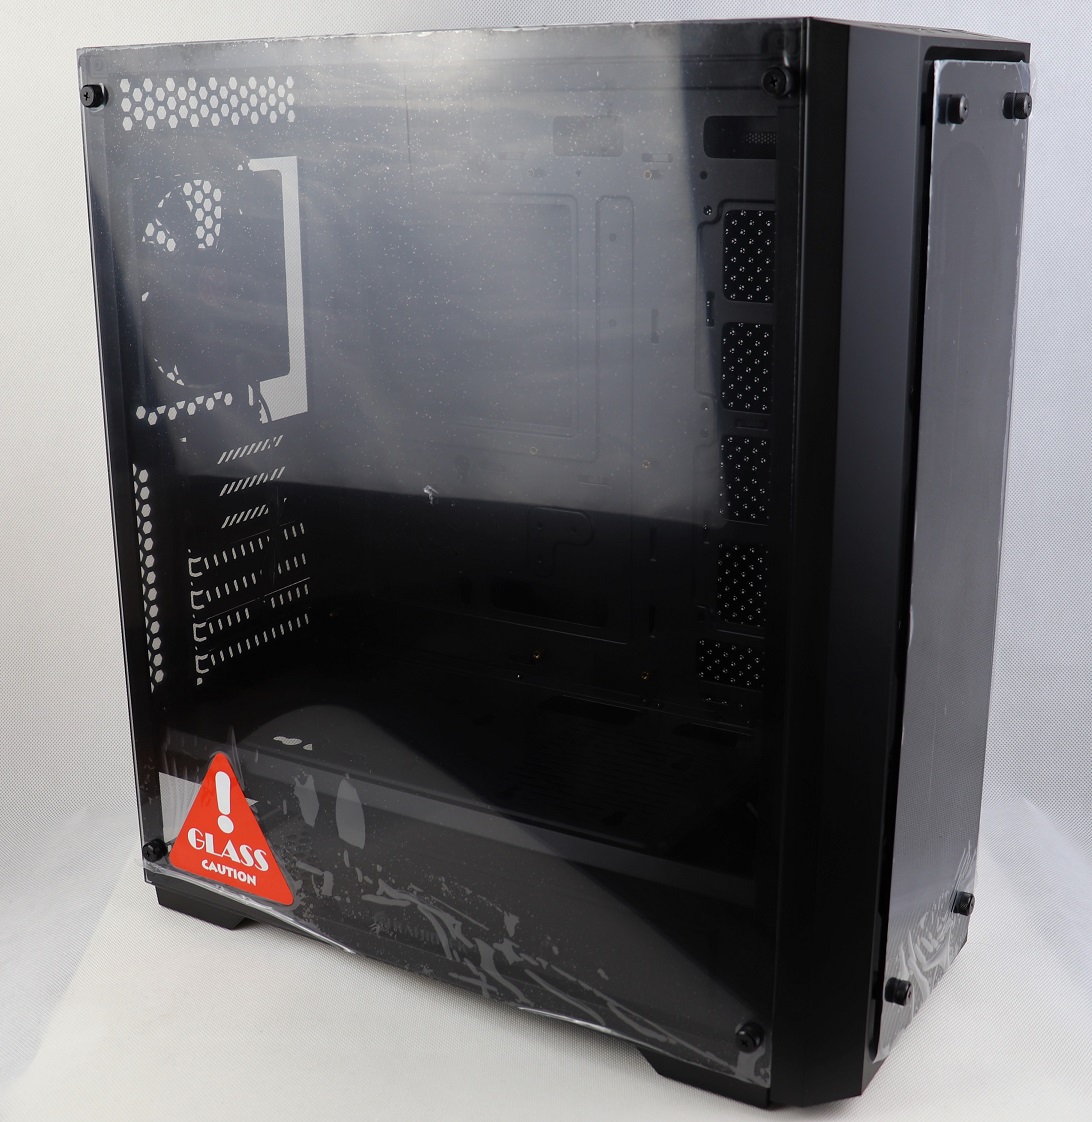
RAIJINTEK PONOS TG PC Case
The PONOS TG sports a normal boxy design, without aggressive shapes to draw gamers’ attentions. The front and primary side panel are two whole pieces of 4.0 mm tempered glass. The case frame is mostly constructed of steel, except for the front portion that houses the I/O ports.
The back of the PONOS TG has a solid steel panel with ventilation holes for the two 120 mm cooling fans on the motherboard tray. Large cutouts and cable hooks can be found all over the chassis for easier CPU cooler installation and cable management.
You can put three 120 mm or two 140 mm fans at the front. There is sufficient space between the glass and the fans for air to pass through. The PONOS TG accepts motherboards from Mini-ITX up to E-ATX and SSI-EEB. The power supply is installed at the bottom.
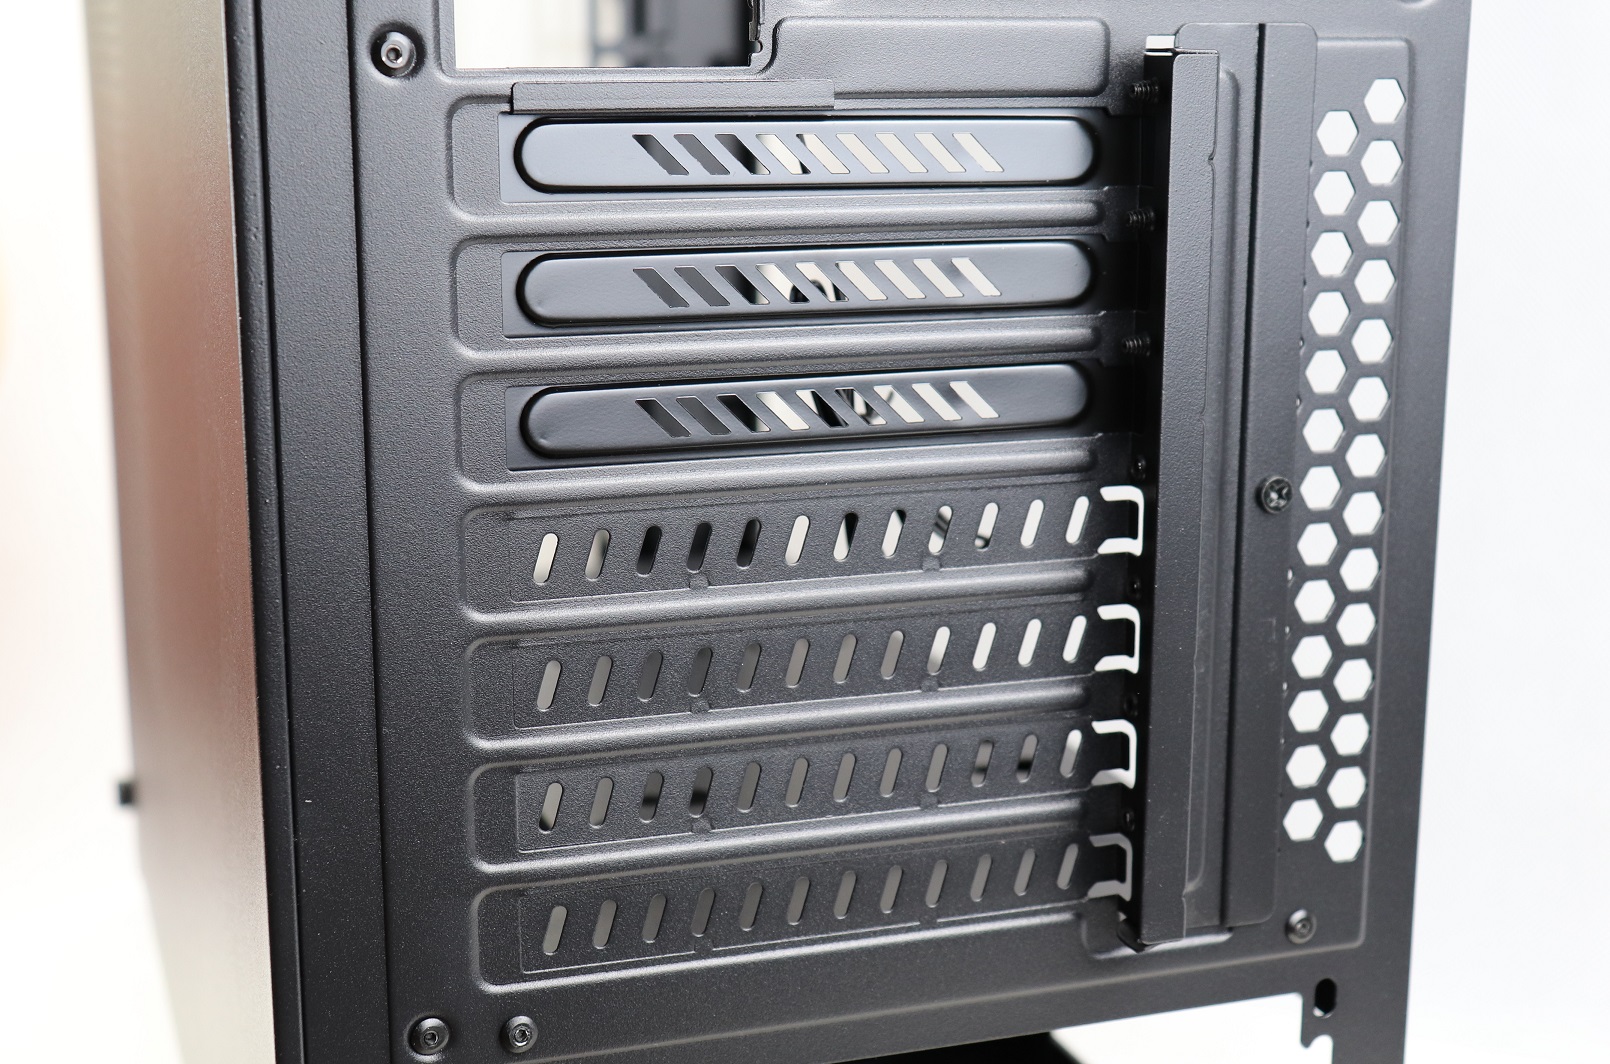
Seven PCIe expansion slots are available, which can fit at least two dual-slot graphics cards for SLI or Crossfire with length no longer than 390 mm. You can purchase the PAXX-S vertical GPU mounting kit from RAIJINTEK, to better showcase the graphics card through the glass side panel.
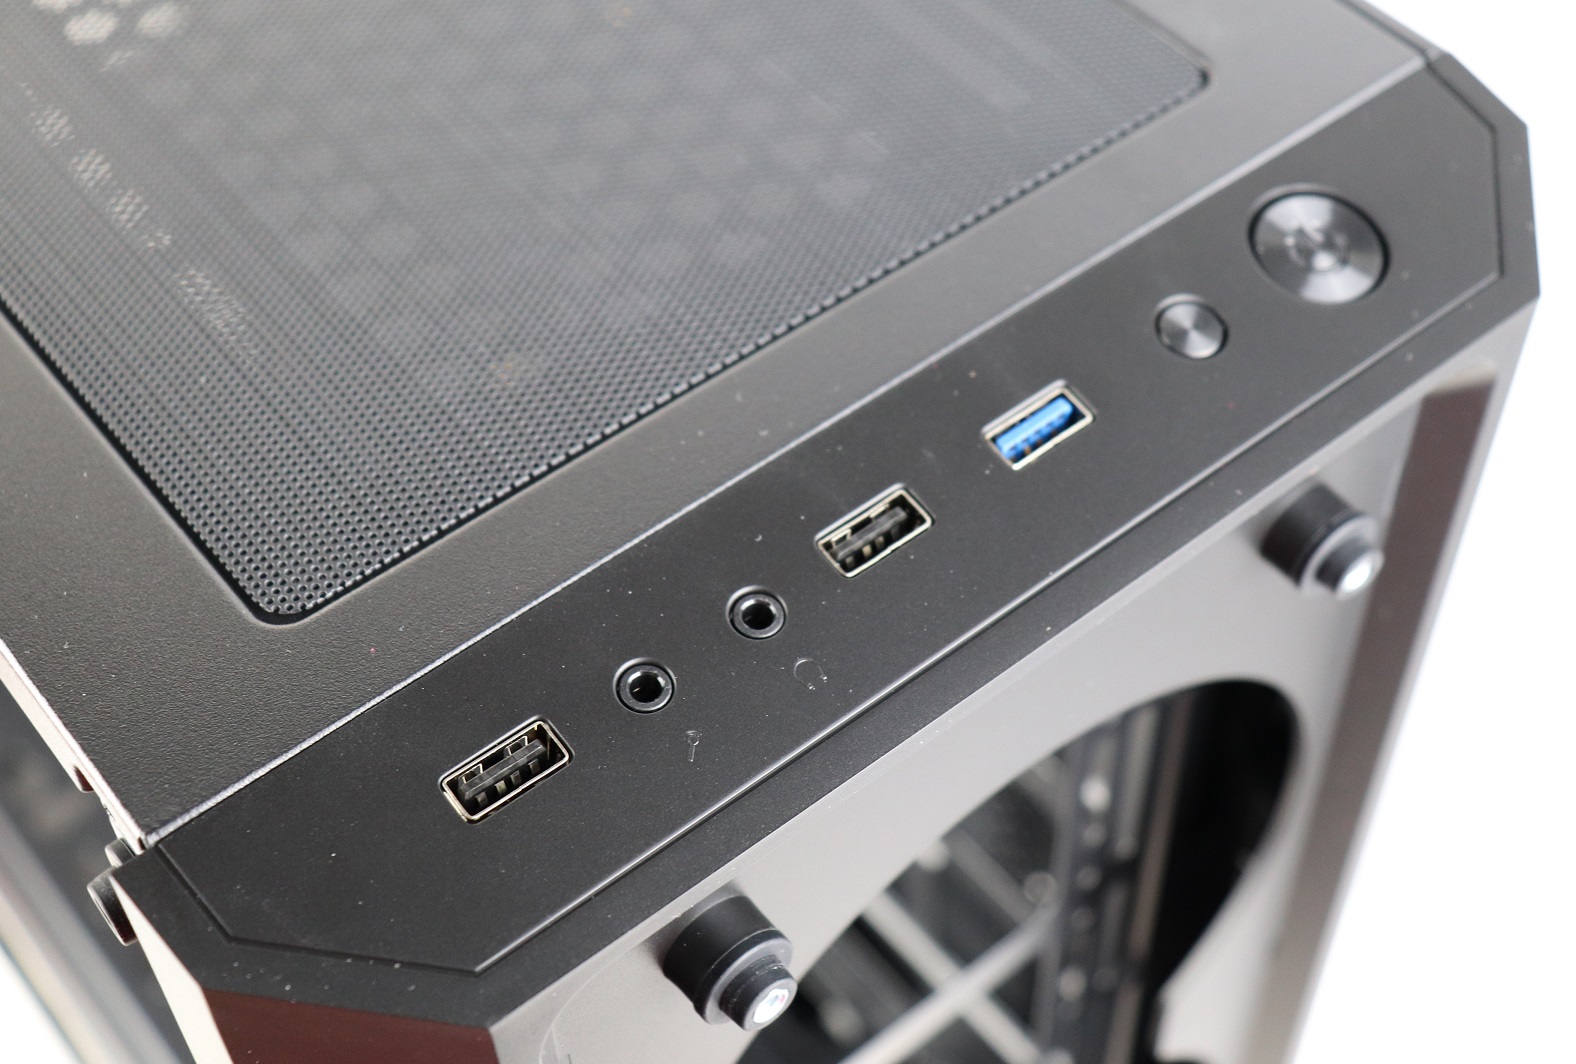
The PONOS TG has the I/O located on the top. There are two USB 2.0, one USB 3.0 Type-A ports, separate 3.5 mm headphone and microphone jacks, as well as the power and reset buttons.
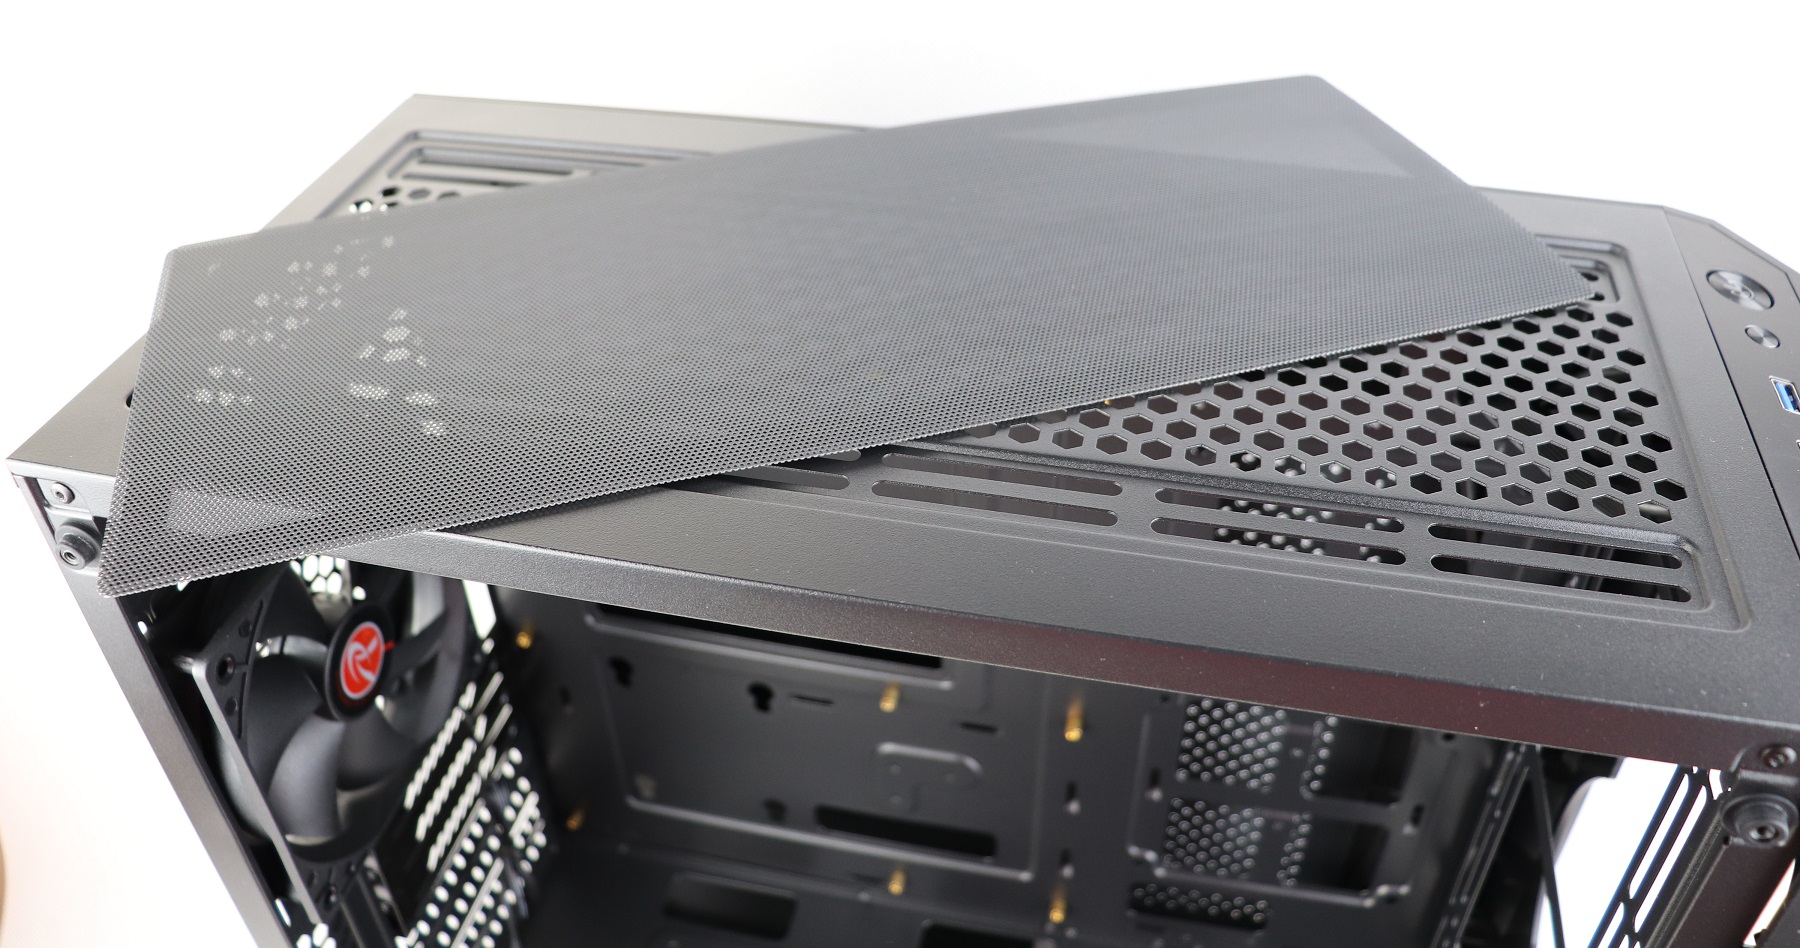
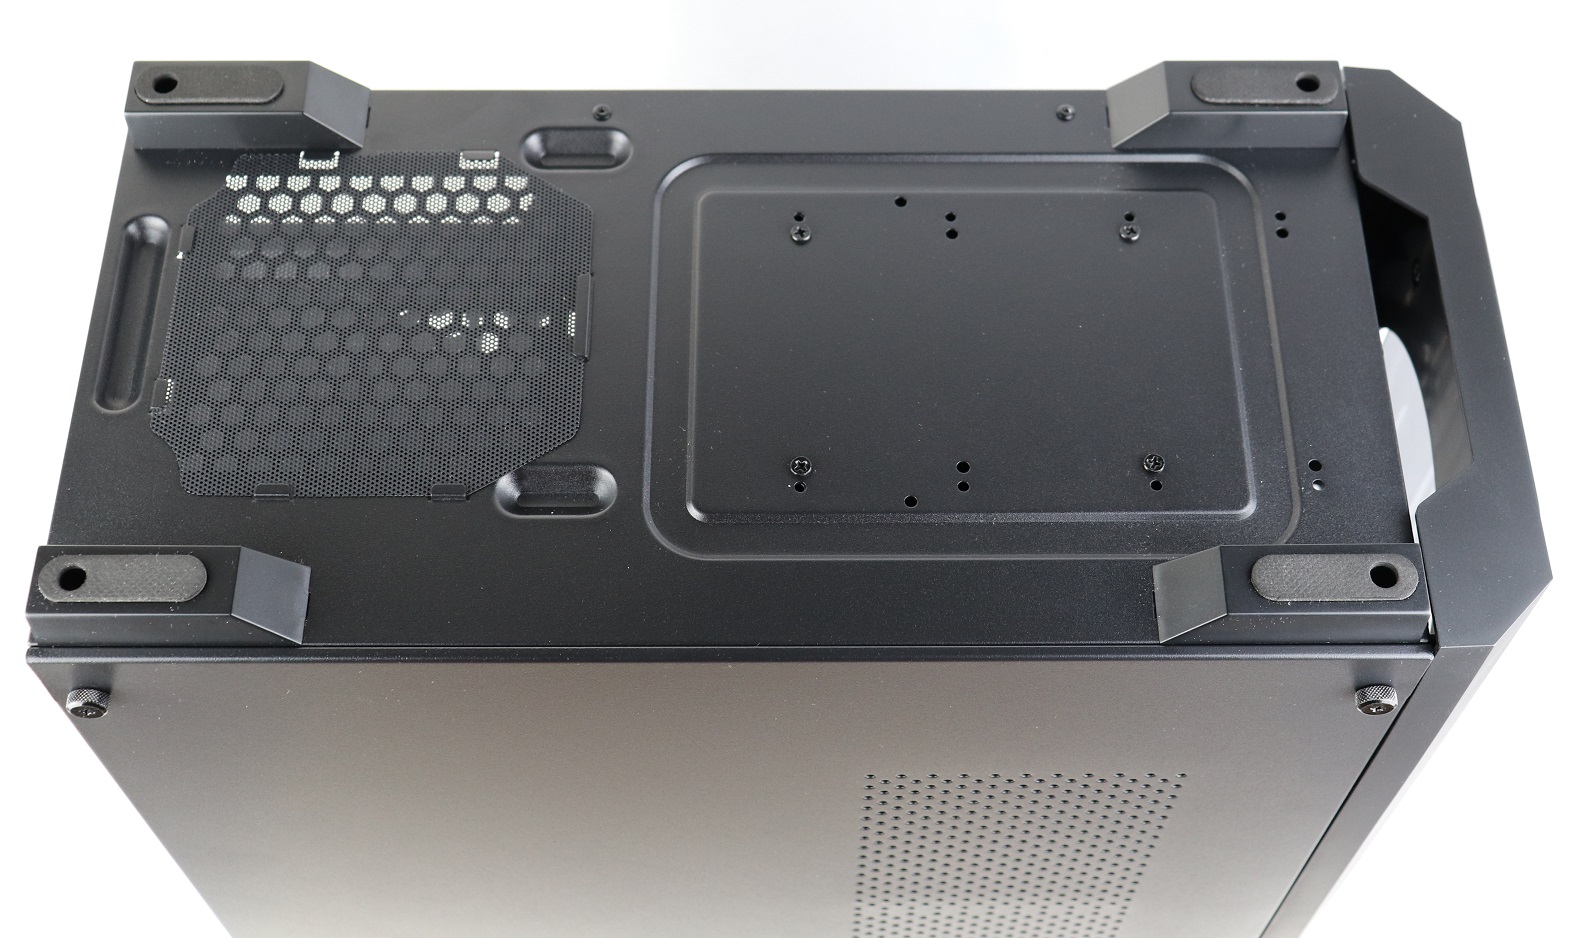
The top of the PONOS TG supports up to a 360 mm or 280 mm radiator (65 mm thick) or equivalently-sized fans, which is equipped with a removable magnetic dust filter. You can slide the radiators/fans slightly forward or backward with the rail mounting system, for better motherboard compatibility.
The intake at the bottom is also filtered to reduce dust from accumulating in the power supply. The four case feet have anti-slippery rubber pads and are raised to allow better airflow in most environments.
Review
Each tempered glass panel on the PONOS TG is secured by four large thumbscrews. There are rubber pads on the case to prevent hard contact and damage. This mounting method gets the job done, but requires a bit more time and caution to remove the panel.
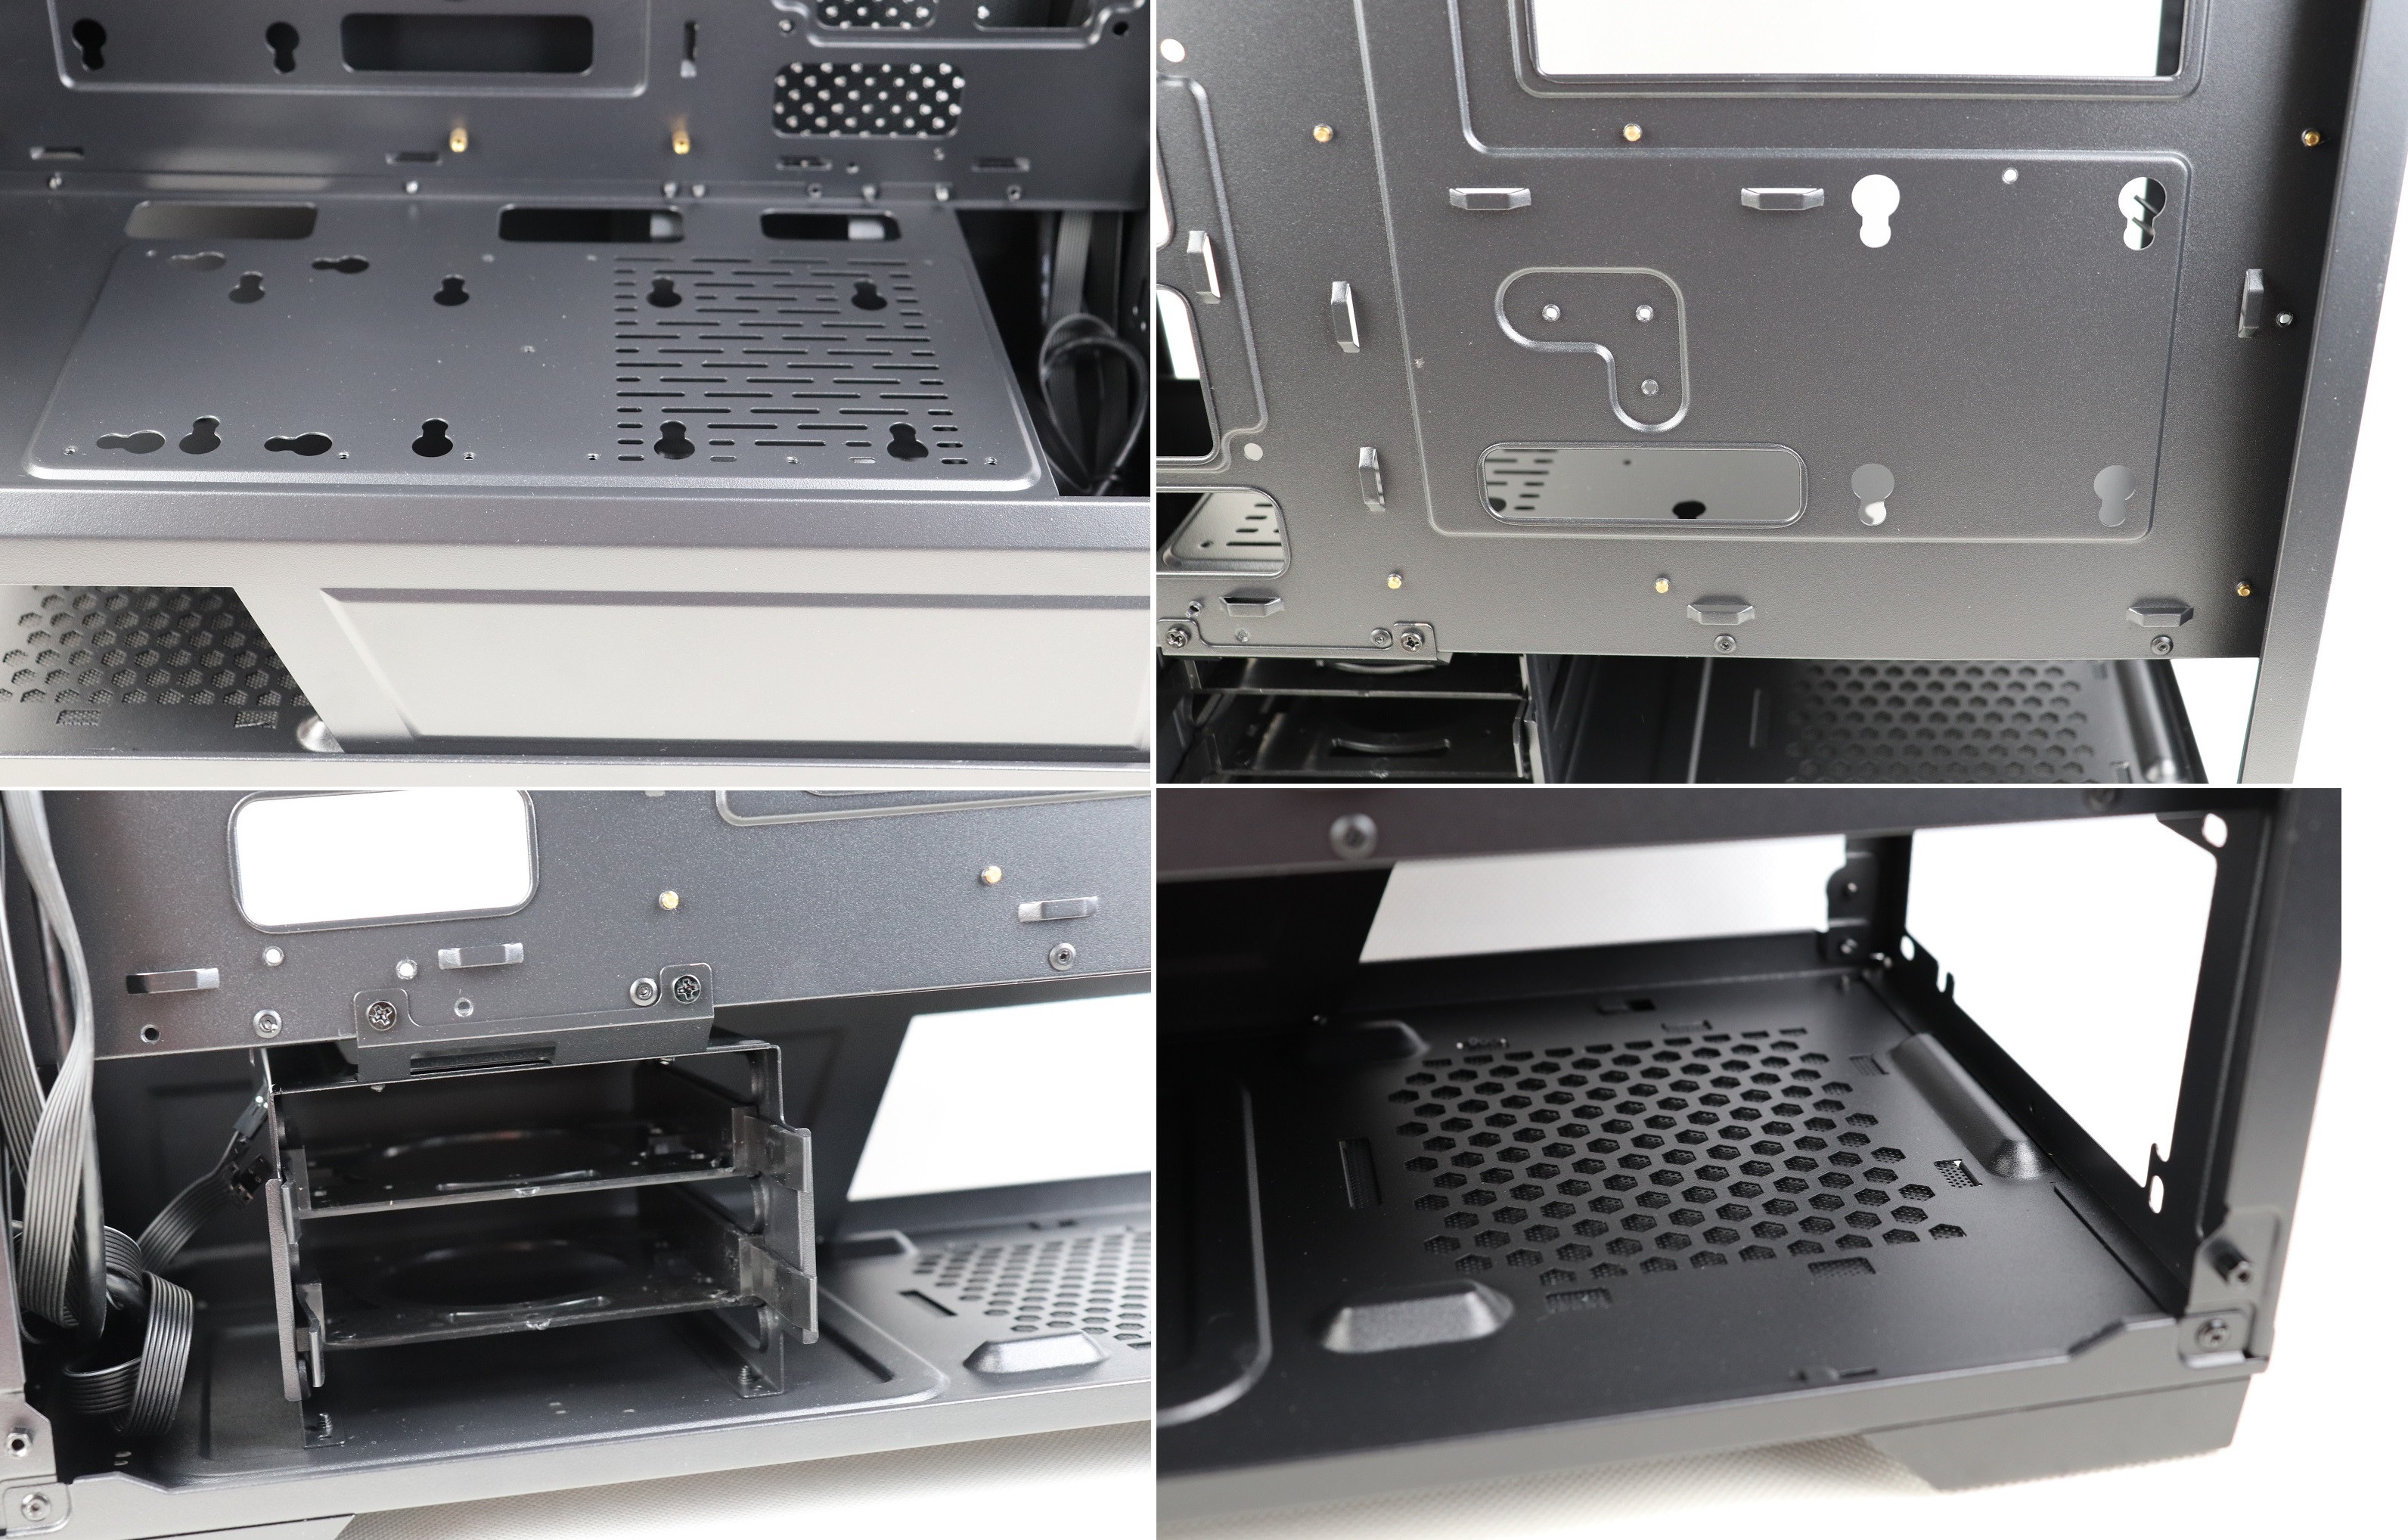
The PONOS TG provides a lot of mounting options for storage devices. It can support a total of three 3.5-inch HDDs or five 2.5-inch HDDs/SSDs, located in the drive cage, above the PSU cover and behind the motherboard tray. The HDD cage can be easily removed or pushed forward, via the screws below, for more flexibility in choosing the power supply’s length or front radiator thickness.
I find it slightly annoying that the PONOS TG opts to not make the lower four PCIe expansion slot covers reusable, though it does not affect any functionality of the case. You will not be able to re-install the covers, when you swap or remove any add-in cards in the system.
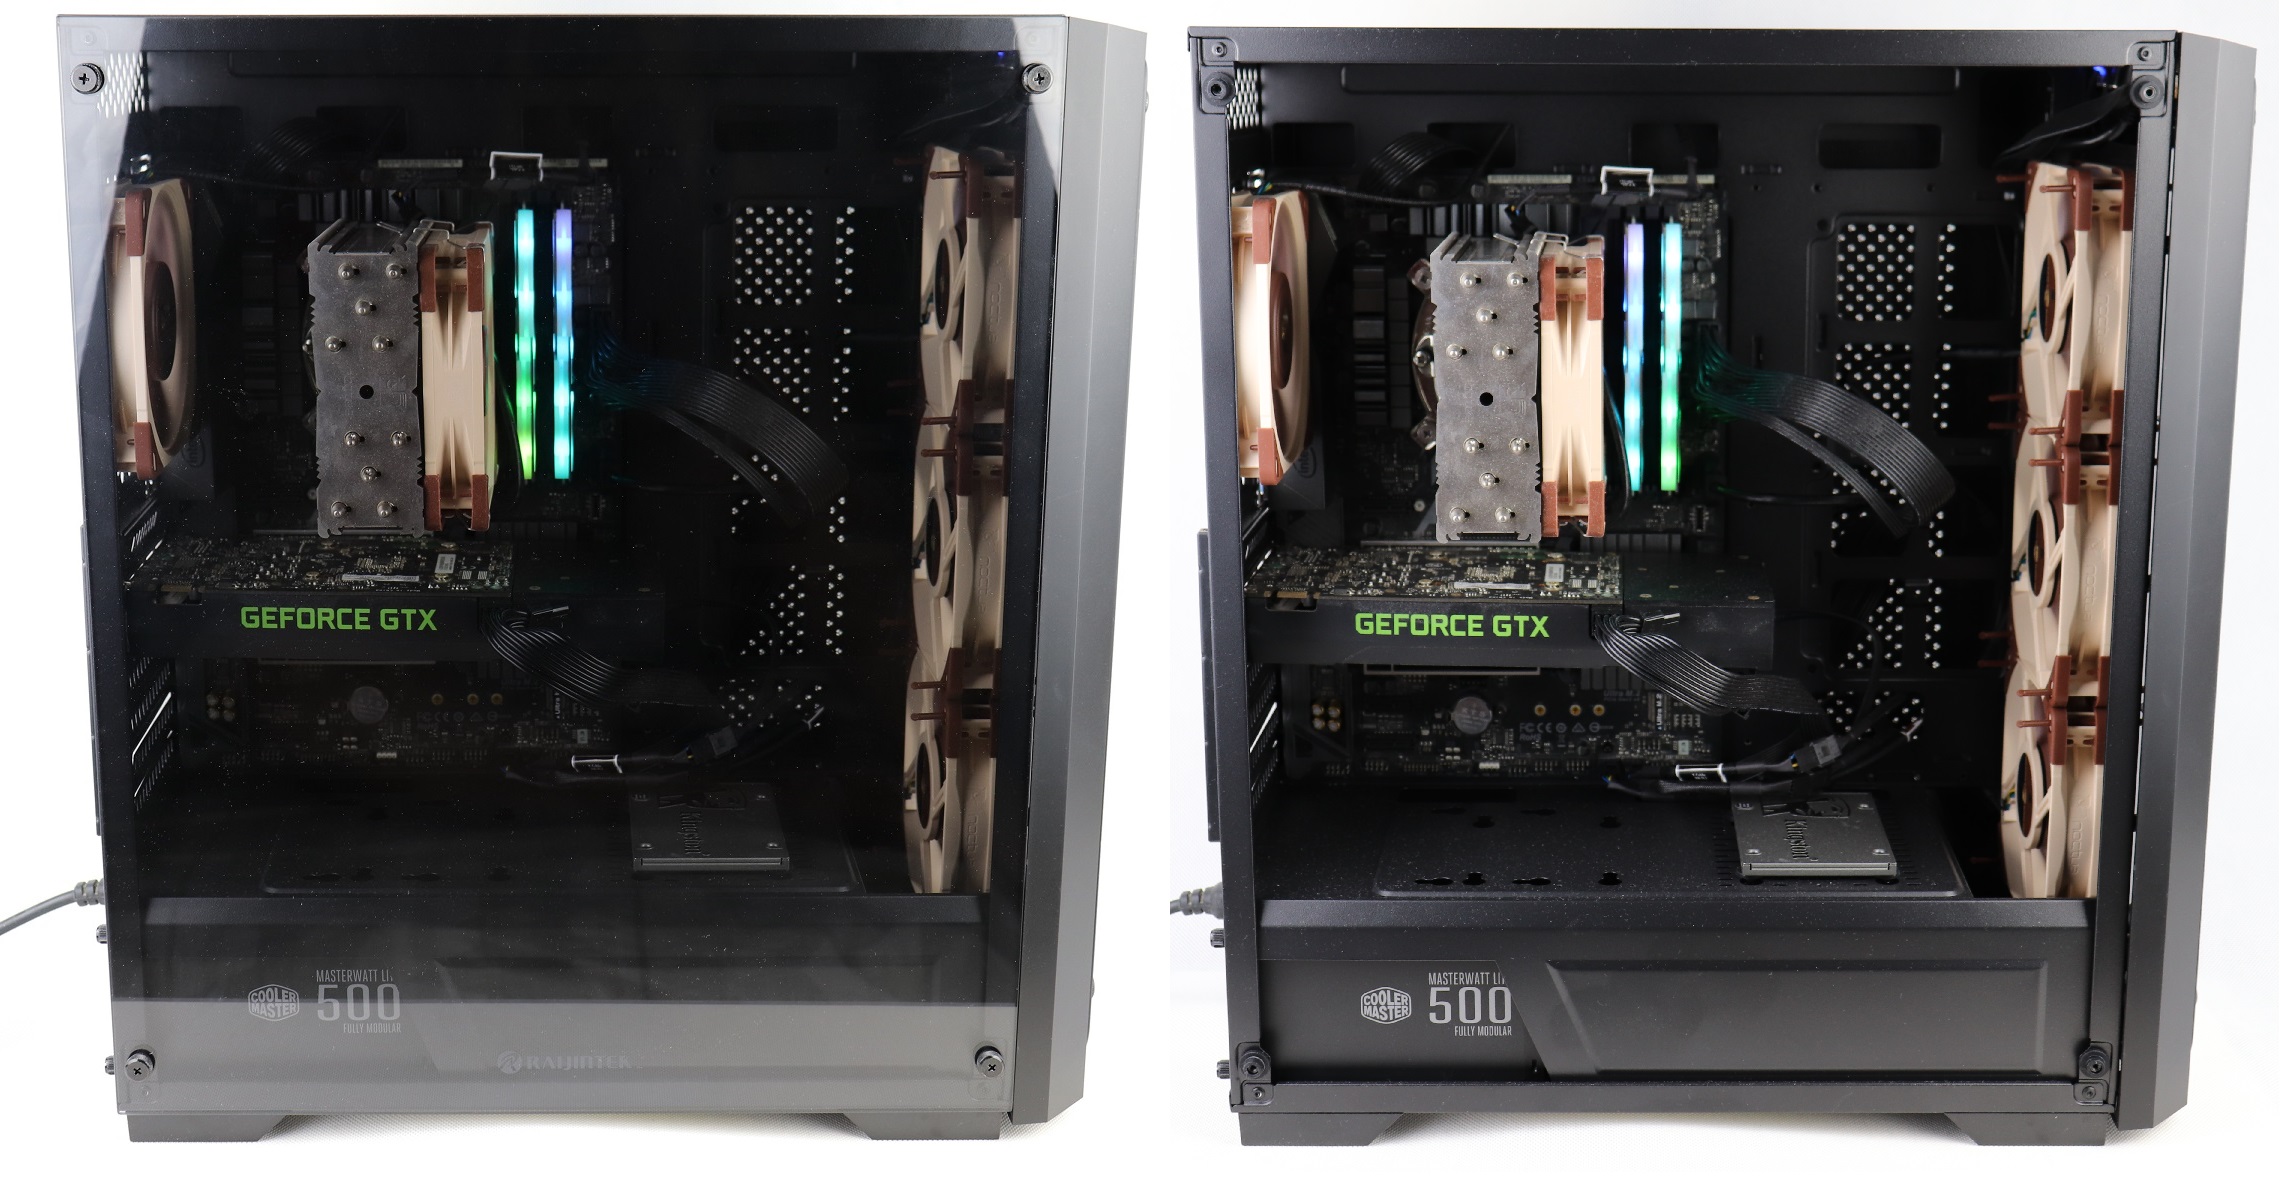
The PONOS TG sports a modern and spacious interior design, which makes building the computer very easy and enjoyable. The power supply shroud covers the cable mess underneath and provides a couple spots for mounting a 2.5-inch HDD/SSD. There is ample room between the motherboard tray and back side panel for routing all the necessary cables. Without much work, most people should be able to build a very clean and awesome-looking system inside the PONOS TG.
Performance
The maximum system’s CPU and GPU temperatures were measured, when AIDA64 stress test and UNIGINE Heaven Benchmark 4.0 were running simultaneously. Two sets of data were recorded, depends on the case fans’ speeds (50%/100% PWM speeds).
Ambient Temperature at 24.9°C
Spinning the four Noctua NF-A12x25 case fans at full speed, the CPU and GPU topped out at 51°C and 77°C respectively at load. The CPU temperature was increased by 6°C to 57°C ; GPU by 3°C to 80°C, if the fans’ speed was lowered.
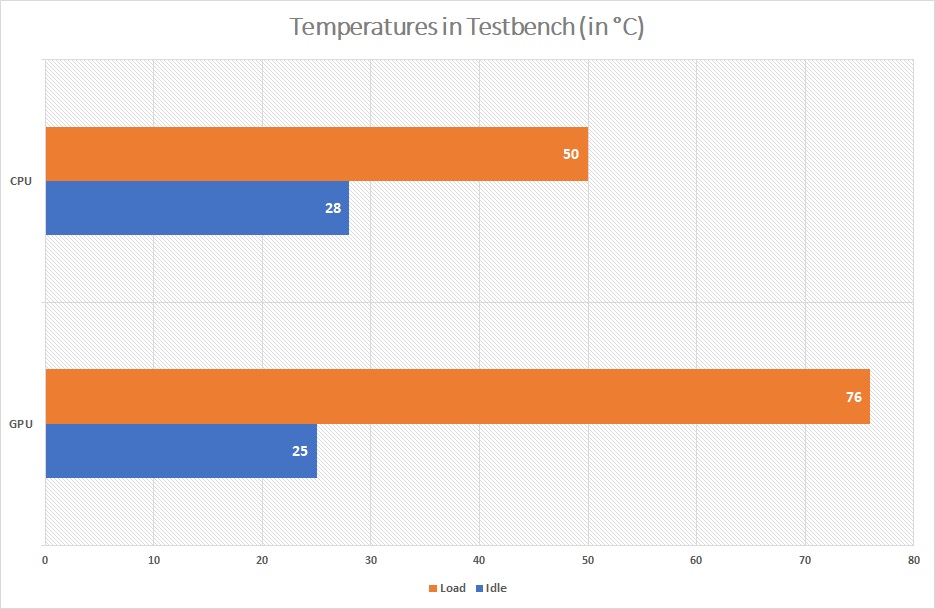
Ambient Temperature at 22°C
The temperatures in an open-air test bench looked very similar to those in the PONOS TG with fans operating at 100%. The CPU and GPU reached 50°C and 76°C in the test.
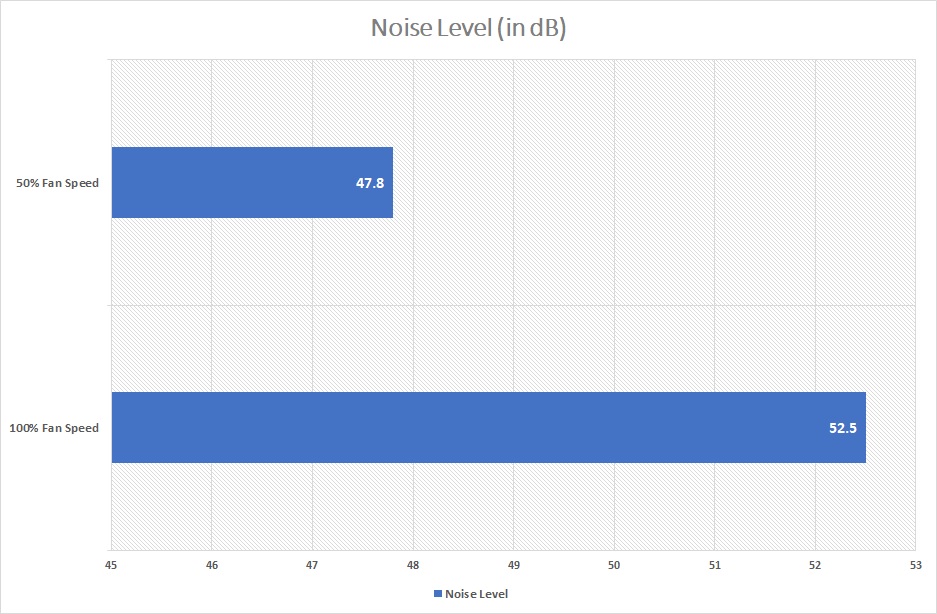
A sound level meter was placed right next to (~5 cm) the glass side panel of the PONOS TG. The noise level from the case was at 47.8 dB at 50% fan speed and 52.5 dB at full speed. For reference, normal conversation has an average noise level at 60 dB.
Conclusion
RAIJINTEK has put together a feature-rich and good-looking mid-tower PC case with the PONOS TG. The roomy interior allows for greater motherboard and graphics card compatibility, as well as DIY water cooling hardware. You can fit up to two 360 mm radiators in this chassis. Large and reasonably-positioned cutouts make routing and managing cables really easy. It is a nice touch to include the magnetic filters in the intake areas. But the front does not have a filtered intake, due to the glass panel. If you want to prevent dust from the front, you may need to get the PONOS MS version, not to mention the better airflow for the mesh panel.
Although the PONOS TG has three USB Type-A ports for I/O, only one of them is USB 3.0-capable. We should also see a USB Type-C port for its increased popularity in various devices. The non-reusable PCIe expansion slot covers should be replaced with the standard one, that is secured by screws.
The PONOS TG is priced at $89.99 USD (MSRP) with a 2-year warranty. The build quality is solid with thick and stiff tempered glass and steel side panels. The Phanteks P400 with similar size and features costs about $10 USD less for comparison, but it does not have the front glass panel. Overall, the case is pretty affordable and can be used to create a rather clean and sharp PC build with a couple LED strips and RGB-enabled components installed.
You can purchase the PC case from your local/online resellers or the links below from Newegg.
Thanks RAIJINTEK for providing us the case for review. (Review Sample)
Feel free to leave comments below, if you have any opinion about this website. Share the website around if you enjoy reading it. Subscribe to our Newsletter or follow our Twitter, Facebook and Instagram.
Support this website simply by shopping in Amazon and Newegg. It will give us small kickbacks, if you use the above affiliate links to make any purchases, which will help us grow.


 Explained")


")